HomeNavigation arrowBlogNavigation arrow
Current page
NowCandid 101

How to Make FreePics Work for Your Photography Business 📸✨

How to Make FreePics Work for Your Photography Business 📸✨
In honor of our QuicPics Program’s rebrand to FreePics, we wanted to take a fresh look at some helpful info, best practices, and booking strategies for using FreePics and service photography successfully!

Giving photos away for free might not sound like an obvious way to make money.

But with the right setup, FreePics can be a powerful business tool — whether you’re getting paid by an event organizer, working with a sponsor, building the cost into ticket sales, developing relationships with venues, or simply using free photos to get your name in front of more potential customers.

And depending on the kind of experience you want to offer, you now have three different Programs to choose from: FreePics, FreePics GO!, and FreePortraits.

First: What Is FreePics?

FreePics is designed for photographers who want to provide images to subjects at no cost to the person being photographed.

Instead of relying on each participant to purchase their own images, the photography can be funded another way — or used as a marketing tool to help generate future business.

That opens up a lot of possibilities.

Ways to “Sell” FreePics 💸

1. Work Through an Event Organizer

One of the simplest approaches is to have the event organizer pay for photography as part of the event itself.

That could include:

  • Reunions
  • Luncheons
  • Galas
  • Corporate parties
  • Balls
  • Private events
  • Community events

Instead of charging individual guests for their photos, the organizer pays you for your time and coverage.

This can make the photography feel like another included event amenity — just like entertainment, décor, or catering.

The original FreePics training material even suggested photographers may be able to charge a few hundred dollars per hour, per photographer, depending on the event and market.

2. Find an Event Sponsor

Another option is to have a sponsor cover the photography.

In exchange, you can incorporate the sponsor’s branding into the experience, including branded image artwork or overlays.

That gives the sponsor something more memorable than a banner or table sign: photos attendees may actually save, share, and revisit.

Sponsorship pricing will naturally depend on the event, audience, and sponsor, but this type of arrangement may support a much higher overall photography budget than selling directly to individual attendees.

3. Build Photography Into Ticket Sales 🎟️

If every attendee is going to receive photos, another option is to simply include the photography cost in the ticket price.

A relatively small increase per ticket can add up quickly across a large event.

For example, an organizer could add a photography fee to each admission ticket, then use that revenue to pay for event coverage while letting every guest access their photos afterward.

Participants feel like they’re getting something included with admission, while the photographer still gets paid.

4. Partner With Party Planners or Venues 🤝

FreePics can also be a great tool for building recurring relationships.

A photographer can establish themselves as the go-to photographer for a planner or venue and create an arrangement that works for everyone involved.

That could mean a commission, referral agreement, preferred-vendor relationship, or another setup that encourages the planner or venue to continue sending events your way.

Instead of thinking about a single event, you’re using FreePics to help build a steady pipeline of future bookings.

5. Use FreePics as Marketing for Your Own Business 📣

You don’t necessarily have to make money directly from every FreePics Event.

Sometimes, the value is the exposure.

Offering free photography at the right event can introduce your business to dozens or even hundreds of potential customers.

Because participants receive their images directly, you have an opportunity to put your business and branding in front of them while creating a positive interaction with your photography.

That can turn one promotional event into future:

  • Event bookings
  • Portrait sessions
  • School or sports opportunities
  • Corporate work
  • Referrals
  • Repeat customers

Sometimes the free photo is the product.

Sometimes it’s the advertisement. 👀

Which Free Program Should You Use?

This is where the three Programs start to differ.

FreePics — Best for Most Events ⭐

For most photographers, FreePics is the best all-around option.

It provides the full FreePics experience and gives you the most flexibility in how images are delivered to participants.

If you simply want to photograph an event and make it easy for subjects to receive their images for free, start here.

It costs more per image than the other Free Programs, but you’re paying for the broader experience and flexibility.

Best for:

  • Parties
  • Galas
  • Corporate events
  • Reunions
  • Sponsored events
  • General event photography
  • Most situations where you want free image delivery

FreePics GO! — Best for a Gallery-First Experience 🖼️

FreePics GO! is a gallery-only experience, which allows it to cost less per image than standard FreePics.

But the gallery format also gives it some unique advantages.

FreePics GO! is especially useful if you want participants to clearly see that they can download different versions of their images — such as versions without overlay artwork.

It can also be a better choice when using Background Removal, because participants can browse different background options before deciding which version of an image they want to download.

And because subjects are already browsing through a gallery, FreePics GO! gives you a stronger opportunity to showcase physical products and other potential upsells alongside their free images.

Best for:

  • No-overlay option is important
  • Sponsored events with branded artwork
  • Background Removal workflows
  • Events where you want subjects choosing between different image treatments
  • Photographers who want to promote prints or physical products
  • Situations where keeping per-image costs lower is important

FreePortraits — Best for Headshots 👤

FreePortraits takes the FreePics concept and adapts it specifically for headshot-style photography.

Because the workflow is more limited — with only one image file sent out per image — it can be offered at a lower per-image cost than standard FreePics.

If your Event is centered around individual portraits rather than a larger event gallery, that limitation can actually make perfect sense.

Best for:

  • Corporate headshots
  • Conferences
  • Professional networking events
  • Employee portraits
  • Profile photos
  • Other single-image portrait workflows

If you want the FreePics experience but you’re really photographing headshots, FreePortraits is likely the better fit.

A Simple Way to Choose 🍬

When in doubt:

Use FreePics for the best general-purpose experience.

Choose FreePics GO! when the gallery itself adds value — especially for Background Removal choices and physical-product upsells.

Choose FreePortraits when you’re photographing headshots and only need to deliver one finished image file per image.

The goal with all three is the same: make it easy to get great images into your subjects’ hands while giving you flexibility in how the photography fits into your business.

Free Doesn’t Have to Mean Unprofitable 🚀

FreePics is less about giving your work away and more about deciding who is paying for the experience — and what value the photography creates.

Maybe the event organizer pays you.

Maybe a sponsor does.

Maybe the cost is included in admission.

Maybe a venue relationship brings you more bookings.

Or maybe the Event itself acts as marketing that introduces your photography business to a whole new group of people.

There are plenty of ways to make free photos make business sense.

And with FreePics, FreePics GO!, and FreePortraits, you can choose the version that fits the Event instead of forcing every job into the same workflow. 📸✨

Cheers,

— Candy 🍬

Related articles

Weekly Recap: Collapsible Sidebar, QR Code Printouts & RCS Text Preview ✨📱
Feature Updates
May 15, 2026

Weekly Recap: Collapsible Sidebar, QR Code Printouts & RCS Text Preview ✨📱

3
 minutes read
Hey photo friends! 👋

Candy here with another round of NowCandid updates! This week brings a more flexible Dashboard sidebar, easier QR code sharing, a new price level reference page, and a preview of cleaner-looking RCS messaging.

🖥️ Dashboard Improvements

📌 Collapsible Sidebar on desktop

  • You can now collapse the Dashboard Sidebar to give yourself more room. Click the edge of the Sidebar to toggle it, or use CTRL/CMD+B or CTRL/CMD+S.

🎓 “Class of 2026” background pack added

  • Available now in the Offer Creator.

🖼️ Participant Details fix

  • Invisible BGR images now appear where expected.

📅 Event Calendar fix

  • Hidden Events no longer appear on the Event Calendar.

Better performance for large Events

  • Event Participants and Manage Images pages now behave better with several thousand participants or images, including faster initial loading, longer timeouts, and clearer loading feedback.

📊 Default Price Levels Overview is now built into the Dashboard

__wf_reserved_inherit
View it here: https://app.nowcandid.com/offers/price-level-overview

🔳 QR Creator Upgrade: Printable QR Code Cards

🖨️ Download a PDF sheet of QR code cards

  • The NowCandid QR Code Generator can now create a printable PDF sheet with customizable text.

Great for:

🎓 Placing QR cards on graduation chairs for Selfie Check-In

🏈 Handing out QR cards at sports events linking to an All Images Gallery

📸 Creating polished cards for check-in links, retail links, or any URL you want to share

💬 RCS Messaging Preview

We’re testing RCS messaging for some texts.

📱 Texts can appear as coming from “FreePics” instead of a phone number

📷 Uses a generic camera-style logo to keep things white-labeled

✅ Helps messages look cleaner and easier to find

🛡️ May help reduce spam filtering in some cases

Currently, RCS is available for:

  • Dashboard 2FA texts
  • Find Me Portal texts

We’ll likely explore rolling this out to marketing texts after grad season.

__wf_reserved_inherit

🛍️ Retail Updates

💸 Slash-through pricing improved

  • Slash-through amounts now use week 3 pricing when applicable, or à la carte pricing if that is higher.
  • So now, we've ensured your customer is always seeing the maximum amount of Discount being provided! Automatically.

📦 Personal Gallery Download slash-through price

  • Even though Personal Gallery Download is technically a package, it can now show a slash-through price based on the individual download product in your Event, when available.

🖼️ Better package performance with BGR images

  • Selecting and editing BGR images inside packages should feel faster.

🧼 Cleaner BGR timing on retail

  • Images going through background removal will no longer appear on the retail site before the BGR process is finished.
  • This helps keep galleries clearer for shoppers! Especially during grad season, when high BGR volume can occasionally slow processing down.

🧩 Favorites Gallery download fix

  • Fixed an edge case where the Personal Image Gallery Download product could appear for Favorites Galleries even when Dynamic Personal Gallery Download was not enabled.

🛠️ Small Fixes & Cleanup

📅 Hidden Events no longer appear on the Event Calendar.

🖼️ Invisible BGR images now display correctly on Participant Details.

⚡ Large Events with thousands of participants or images should feel more stable and responsive.

That’s the update for this week!

From a cleaner Dashboard layout to printable QR cards and better retail pricing displays, these changes are all about making NowCandid easier to use in real-world event workflows.

Keep creating magic,

Candy 🍬

Use the Workflow That Fits the Job
Photography Tips
May 12, 2026

Use the Workflow That Fits the Job

10
 minutes read
Not every event works the same way—so your platform shouldn’t force every job into the same box.


One of the biggest reasons photographers switch to NowCandid™ is workflow flexibility. We give you multiple ways to connect photos to people, so you can choose the approach that makes the most sense for the event, the audience, and the level of privacy sensitivity involved.


That flexibility isn’t just “nice to have.” It’s the difference between a smooth event and a stressful one—between galleries that convert and galleries that never get seen.


The core problem with one-size-fits-all platforms

Many platforms are built around a single assumption: “Every event should be identified and delivered the same way.”

But photographers know better.

  • • A youth sports tournament behaves nothing like a graduation.
  • • A corporate headshot day has different privacy needs than a fundraiser gala.
  • • A high-volume school day requires a totally different on-site flow than a casual community event.

NowCandid™ is built around the belief: the workflow should adapt to the job—not the other way around.


The NowCandid™ workflow toolbox

Here are the primary ways photographers connect images to the right people in NowCandid™:

  • • Scanner ID
  • • Name Lookup
  • • Type & Take
  • • Tap-A-Face
  • • Selfie Check-In™
  • • Roster Check-In
  • • PhotoRosters

Each one has a “best fit,” and knowing how to choose is where photographers gain speed, confidence, and profit.


Quick guide: which workflow should you use?

Scanner ID

Best for: high-volume, highly controlled check-in environments (schools, leagues, credentialed events)
Why photographers use it: fast, structured, low-error identification at scale.
Great when: you have a roster/card system and you want the cleanest, most consistent subject-to-photo connection.

Name Lookup

Best for: rosters and organized groups where names are known(schools, teams, structured lists)
Why it works: quick selection from a list is often faster than typing or post-event matching.
Great when: you can get the list ahead of time and want to keep on-site flow moving.

Type & Take

Best for: smaller events or flexible environments where you can type quickly and keep moving
Why it works: zero dependency on rosters/cards—simple and direct.
Great when: speed matters and you have a staff member who can handle quick data entry.

Tap-A-Face

Best for: fast on-site identification when the “right” person wasn’t captured by check-in/roster
Why it works: it’s the practical fix for real events. If someone slipped through, you can still connect them.
Great when: you need a quick, human-in-the-loop tool to create a participant and kick off matching/marketing.

Selfie Check-In™

Best for: events where guests can self-identify (graduations, dances, large public events, photo ops)
Why it works: it collects contact info and gives you a reference image—without requiring staff to identify everyone manually.
Great when: you want broad participation and easy post-event delivery without a heavy on-site registration process.

And More!

PhotoRosters and Roster Check-In get a bit more involved... and we recommend getting more familiar with the NowCandid platform before utilizing these! But in short:

PhotoRosters allow you to upload headshots and previously collection contact info and consent to easily reuse them as reference images for future Face Matching Events.

Roster Check-In allows you to upload a league- or school-provided roster and then also take a quick pic of each kid, pairing a reference image to their info in the roster to serve as their reference image.


Why flexibility leads to higher sales

When photographers can choose the right identification workflow, three things improve immediately:

1) You deliver galleries faster

Fast delivery matters because excitement decays quickly. The sooner people can find themselves, the more likely they are to buy—especially for emotional, time-sensitive events.

2) You reduce friction for customers

If the workflow is right, customers don’t have to dig, guess, or give up. They get a clear path to their photos.

3) You reduce labor and cleanup

The “wrong workflow” usually means hours of fixing issues later: missing IDs, unlinked galleries, manual sorting, angry parents, and support tickets. The “right workflow” avoids that.


Privacy sensitivity: the hidden factor most platforms ignore

Some events require extra care—especially schools, youth organizations, or sponsor-driven programs. NowCandid’s workflow options allow you to choose identification approaches that align with the privacy and communication expectations of the event.

In plain terms: you can run a more open workflow when it’s appropriate, and a more controlled workflow when it’s not.


The takeaway: choose what makes sense, every time

Whether a shoot demands the versatility of Face Matching-style workflows, the directness of Positive ID-style workflows, or another approach entirely, you need the flexibility to choose what makes sense.

Most importantly, you need to deliver galleries fast enough to turn that initial excitement into actual orders—and NowCandid is built to help you do exactly that.


Want help choosing the right workflow?

If you tell us what you shoot—schools, sports, graduations, events—we’ll recommend the best workflow setup and explain why it fits.

👉 Create a free account or book a quick demo to see the workflows in action.

Weekly Recap: Express Checkout Confirmations, Capture App Speed Testing, and a New Lightroom Classic Plugin
Feature Updates
May 8, 2026

Weekly Recap: Express Checkout Confirmations, Capture App Speed Testing, and a New Lightroom Classic Plugin

10
 minutes read
Hey photo friends! 👋


This week’s updates are all about clearer customer actions, smoother retail performance, and new tools that speed up upload workflows. Plus, a strong round of Capture App polish (iOS & Android OTA) and some important Dashboard + Marketing fixes.

Let’s jump in. ✨

🛍️ Retail: Fewer Mis-clicks, Better Previews, Faster Feel

✅ Express Checkout confirmation (all express checkouts)

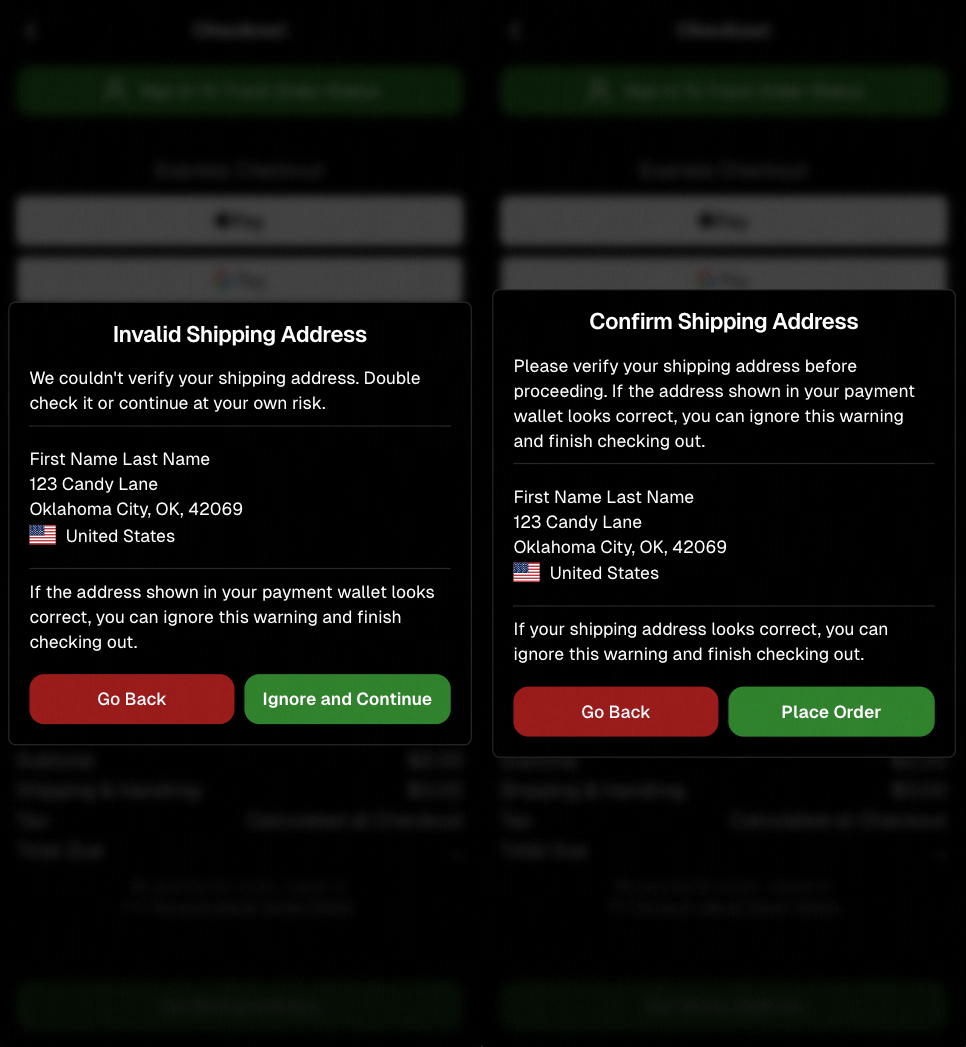
All express checkout flows now show a confirmation popup that clearly displays the shipping address selected, with options to place the order or go back. It also includes an invalid address popup.

Previously, people would sometimes purchase without double checking their express-checkout-method's default shipping address. So, this change is designed to reduce address mistakes and improve customer experience!

Confirmation popup now clearly displays shipping address confirmation.

🧠 Better UI + performance improvements

  • Improved local rendering (performance, memory usage, and task handling) — originally aimed to improve the retail experience on low-end devices, but it should make most devices feel faster!

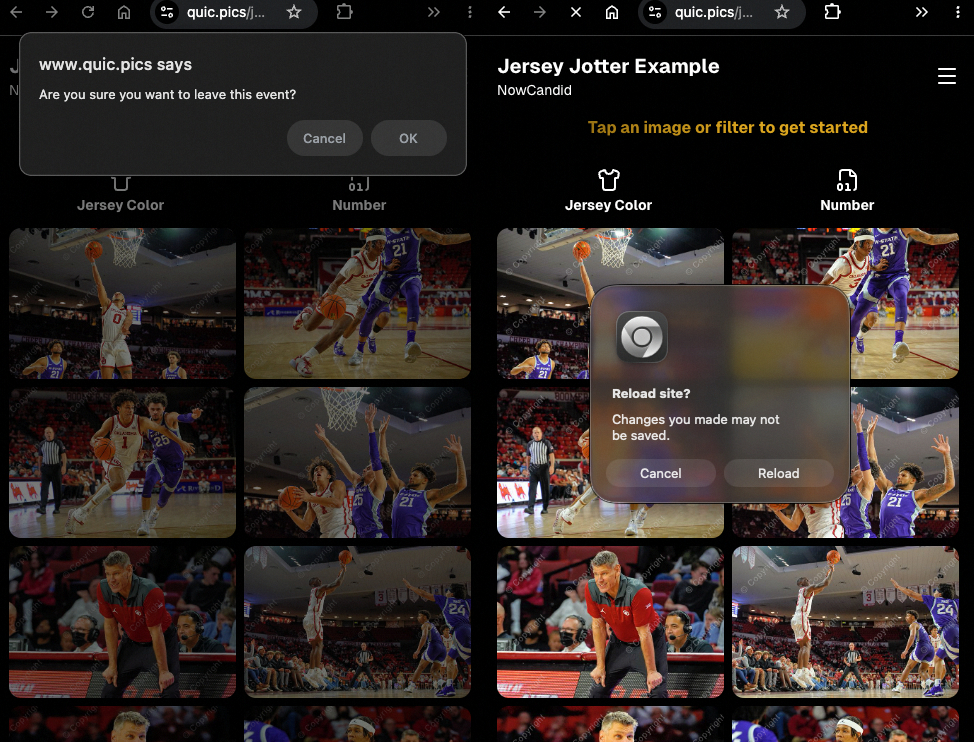
  • Native “leave page” confirmation on supported browsers/devices (desktop + Samsung back button) when navigating away from an event page (refresh/back).

Leave page confirmation

🖼️ Clearer package download expectations + better pickers

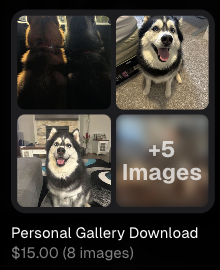
  • Personal Gallery Downloads on store sheet and package editor now show “+X Images” in the configurator when there are more than 4 images—so customers don’t think they only get what’s previewed.

Personal Gallery Download "+X Images"

    • Personal Gallery Download products inside packages can now be clicked to preview contents.

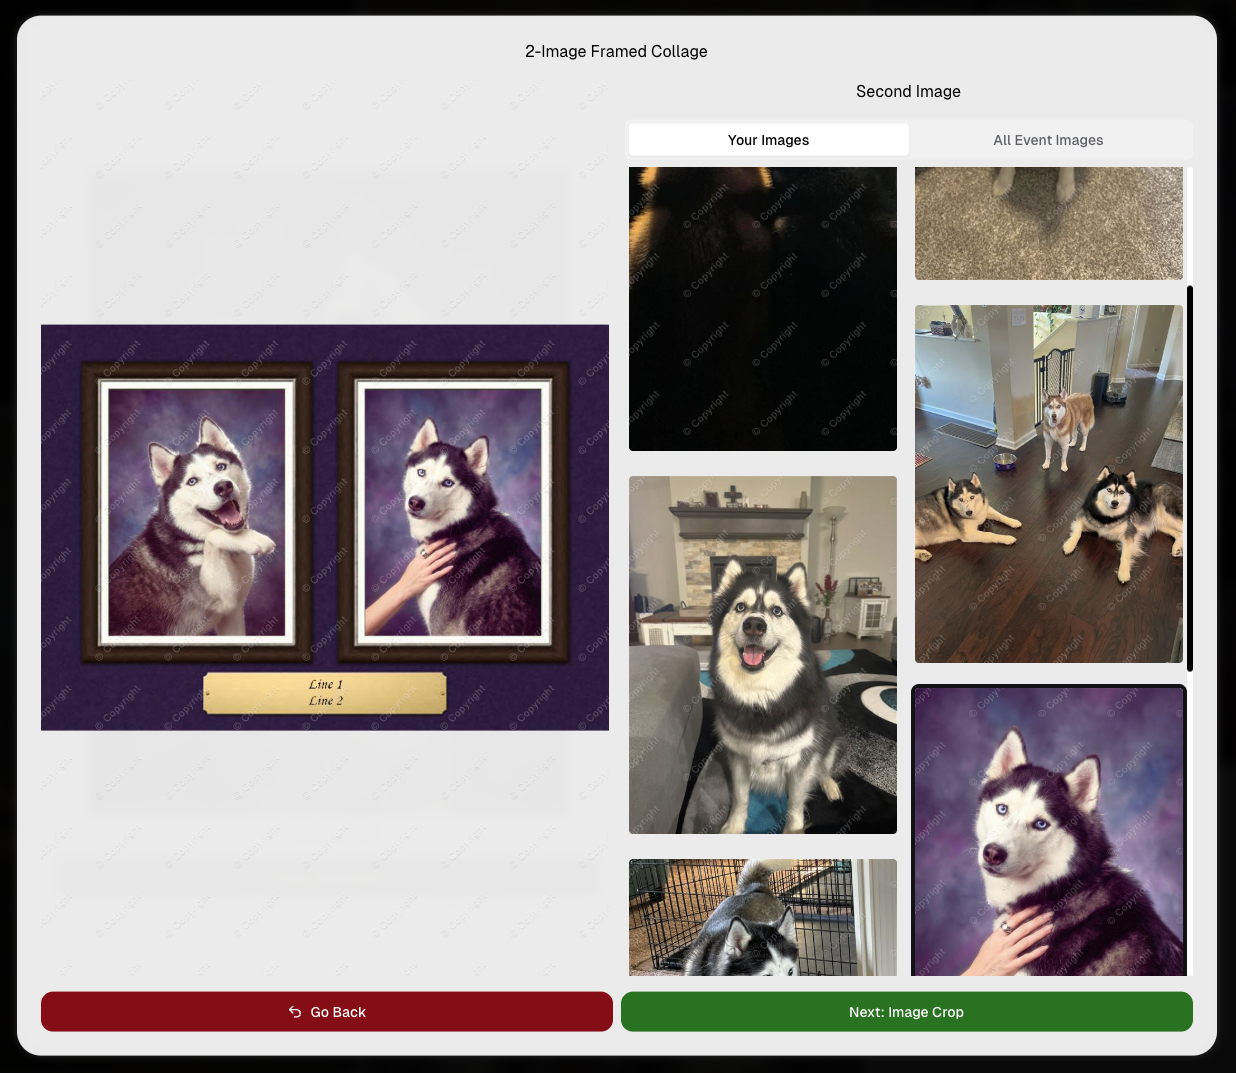
    • Desktop product/package image pickers are now two columns (like mobile), allowing larger image preview during selection.

    Larger two column image previews

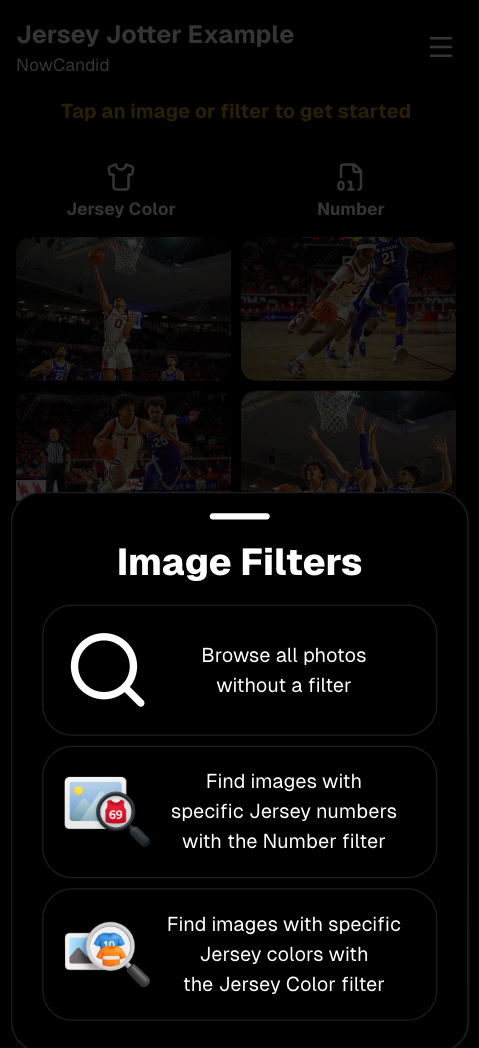
      • Image Filters landing popup now includes “Browse all photos without a filter” so customers who think they must pick a filter know they can also just browse!

      Image Filters landing popup

      🧩 Retail fixes worth noting

      • Fixed a slashed discount amount showing on week 3 when there is no higher amount.
      • Fixed a GalleryGuard edge case that could close the retail site on some Android devices that support mobile context menus when long-pressing.
      • Fixed a race condition where a Group-by-Face gallery loaded from URL params could show default results instead of the filtered view.
      • Fixed an edge case where manually assigned images marked as group could behave like non-group images on retail.

      📱 Capture App OTA: 5.6.1 & 5.6.2 (iOS & Android)

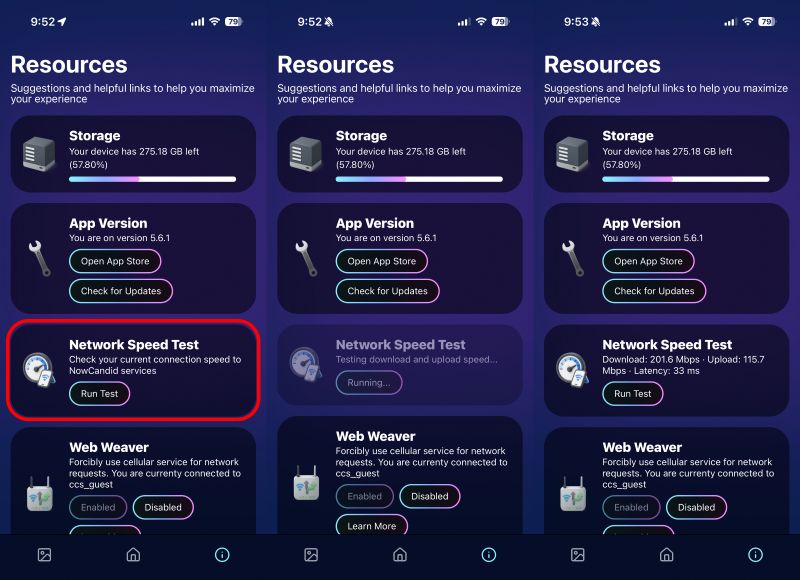
      🌐 NEW: Network Speed Test (5.6.1)

      A new Network Speed Test button is available in Resources. Tap Run Test to check download speed, upload speed, and latency to NowCandid servers (so results may differ from Google/Ookla). It’s a quick test (downloads 5 MB, uploads 2 MB) and is useful for diagnosing weak or congested service during events.

      Mbps is a standard measurement for connection speeds, and 1 megabit per second (Mbps) is 0.125 Megabytes per second (MB/s). So 8 Mbps is 1 Megabyte per second, max. For example, with images that are 10 Megabytes in size, a speed of 8 Mbps would take a minimum of 10 seconds to upload. When speeds are very slow, image uploads may be impossible due to uploads timing out and restarting. In these cases, open the app when you have a stronger connection and all your images will start going up!

      Network Speed Test

      🎪 Photo Booth + Selfie Check-In Station UI upgrades (5.6.2)

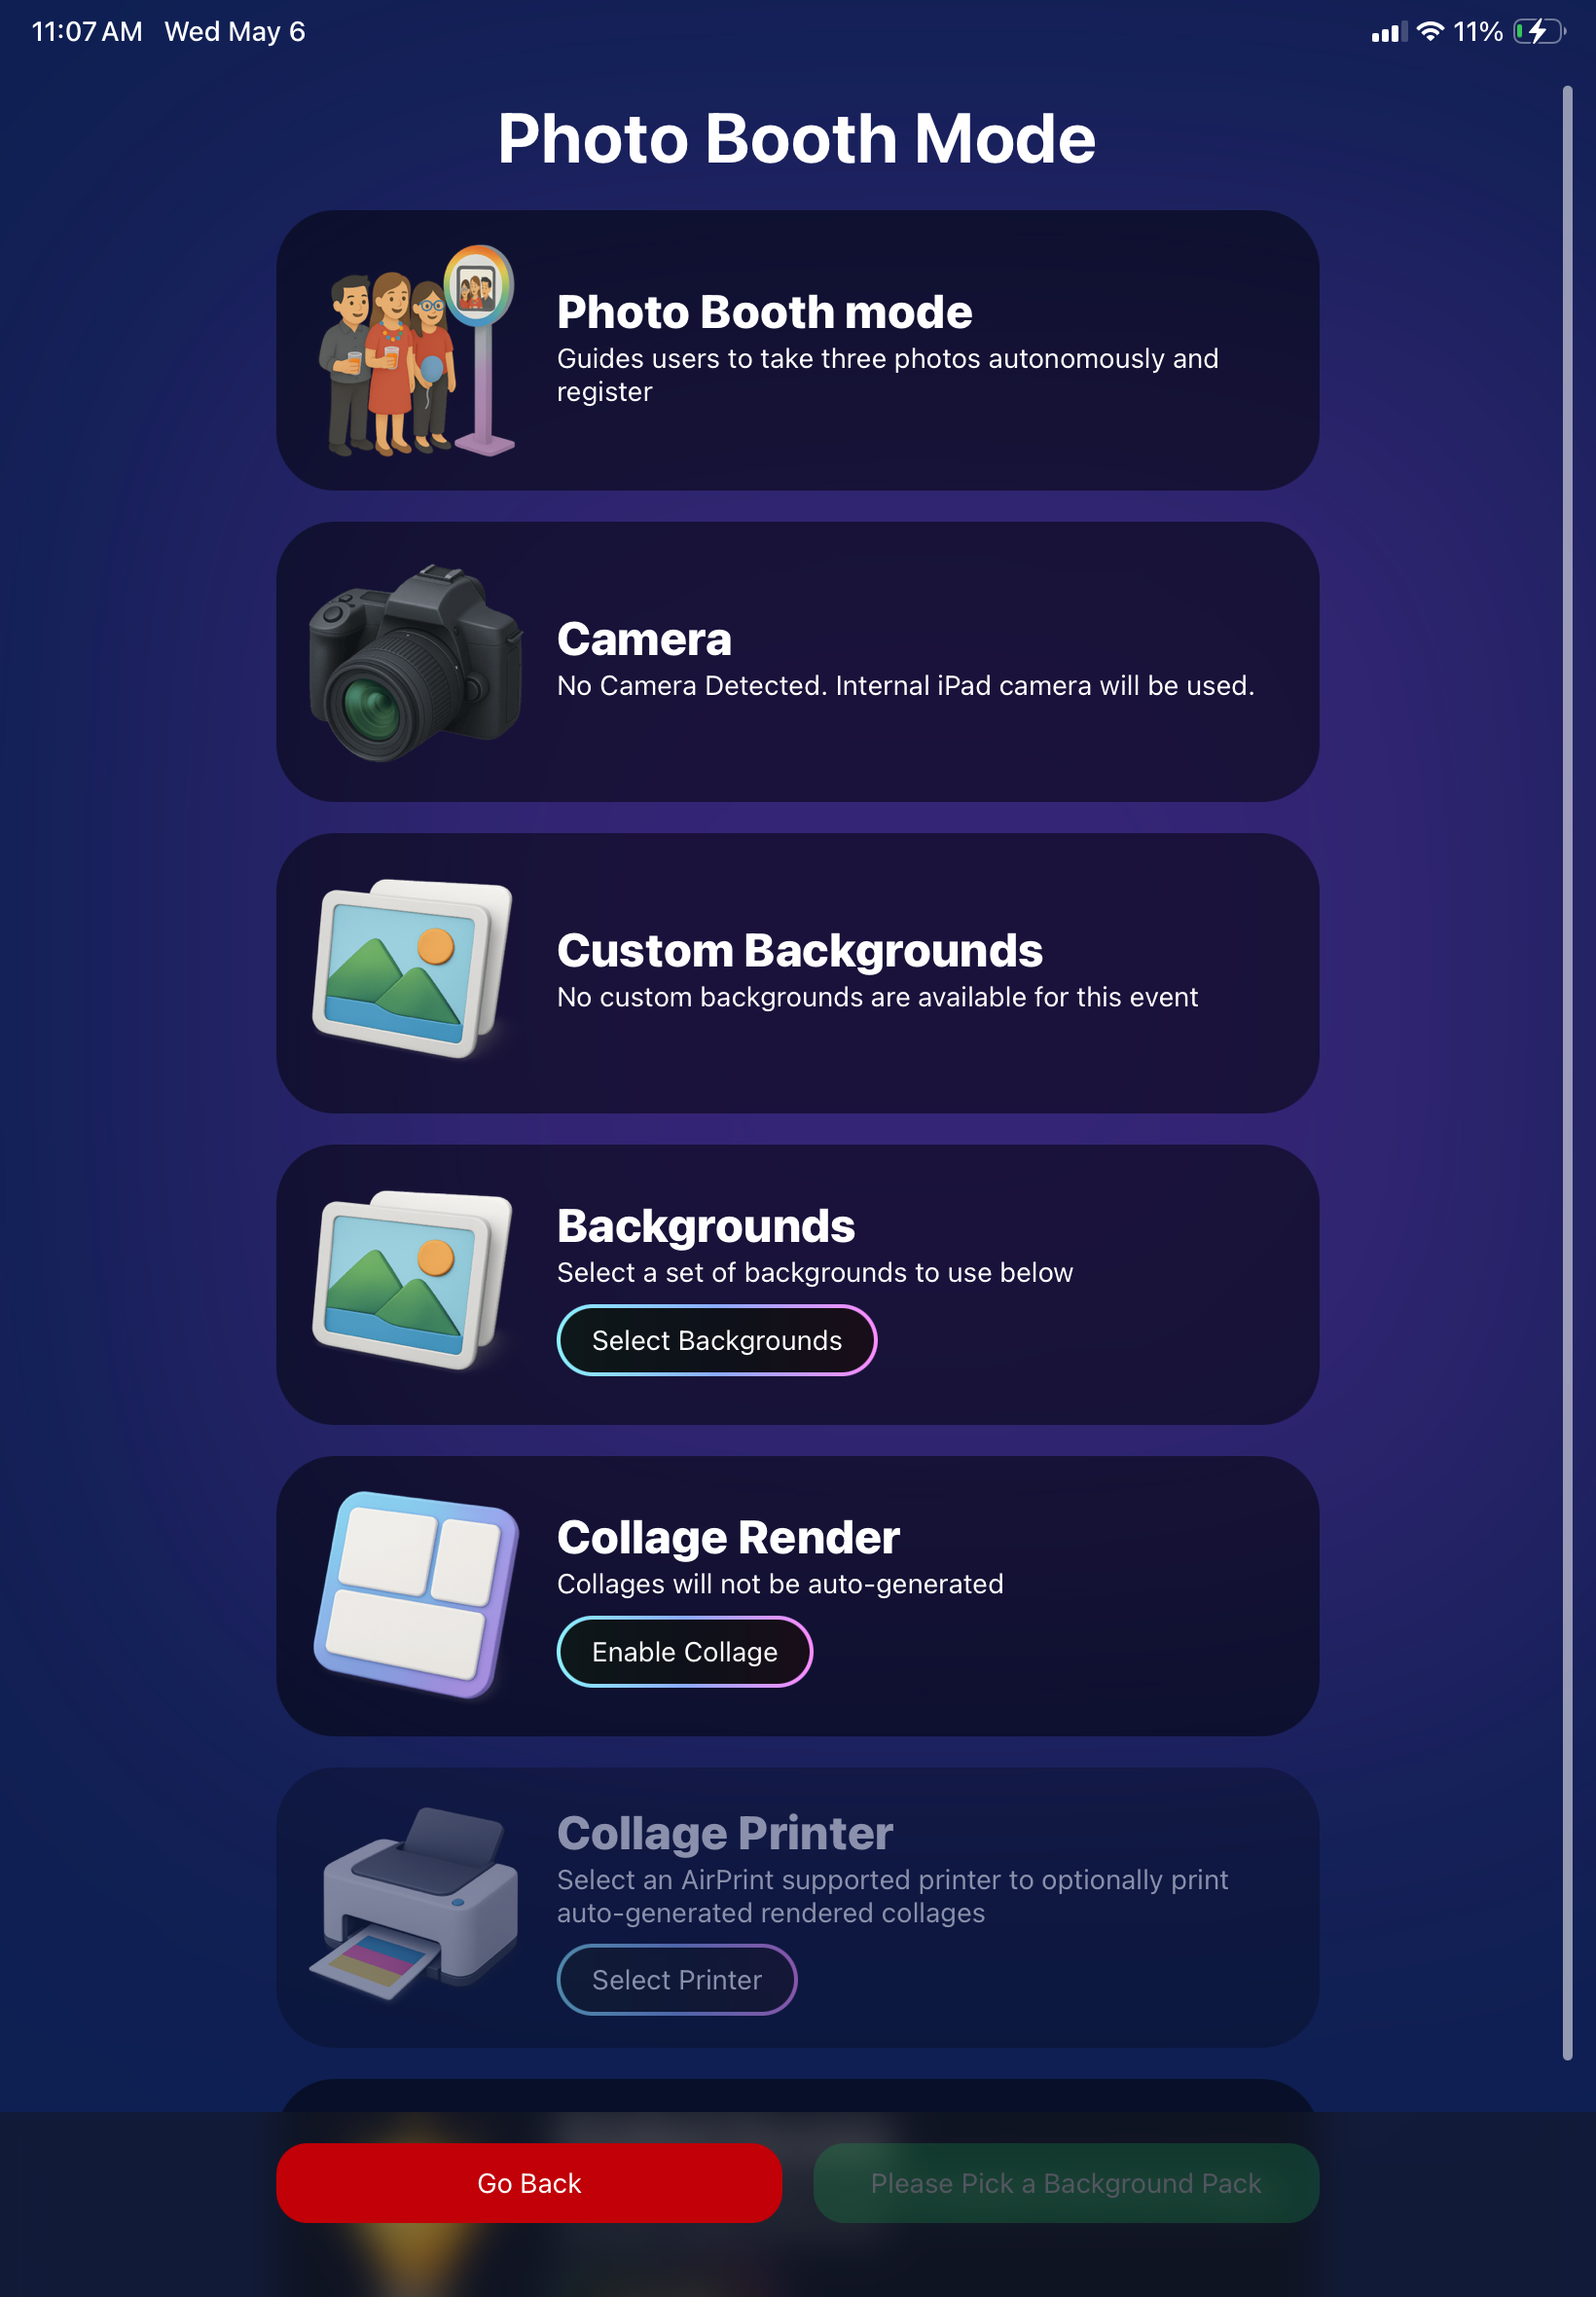
      • Photo Booth landing page updated to be more user-friendly (always-visible scrollbar, updated text, sticky go back/continue buttons, red/green emphasis, and a popup explaining why Continue is greyed out).
      • Selfie Check-In Station landing page updated with red/green Go Back / Begin buttons.
      • New dropdown icon beside Group Photo toggle (when an event has PhotoTags) to better display there are additional options to assign PhotoTags.
      • Fixed edge case cancel/continue behavior on Selfie Check-In Station when no contact info was entered.

      🧩 NEW: Lightroom Classic Plugin (Official)

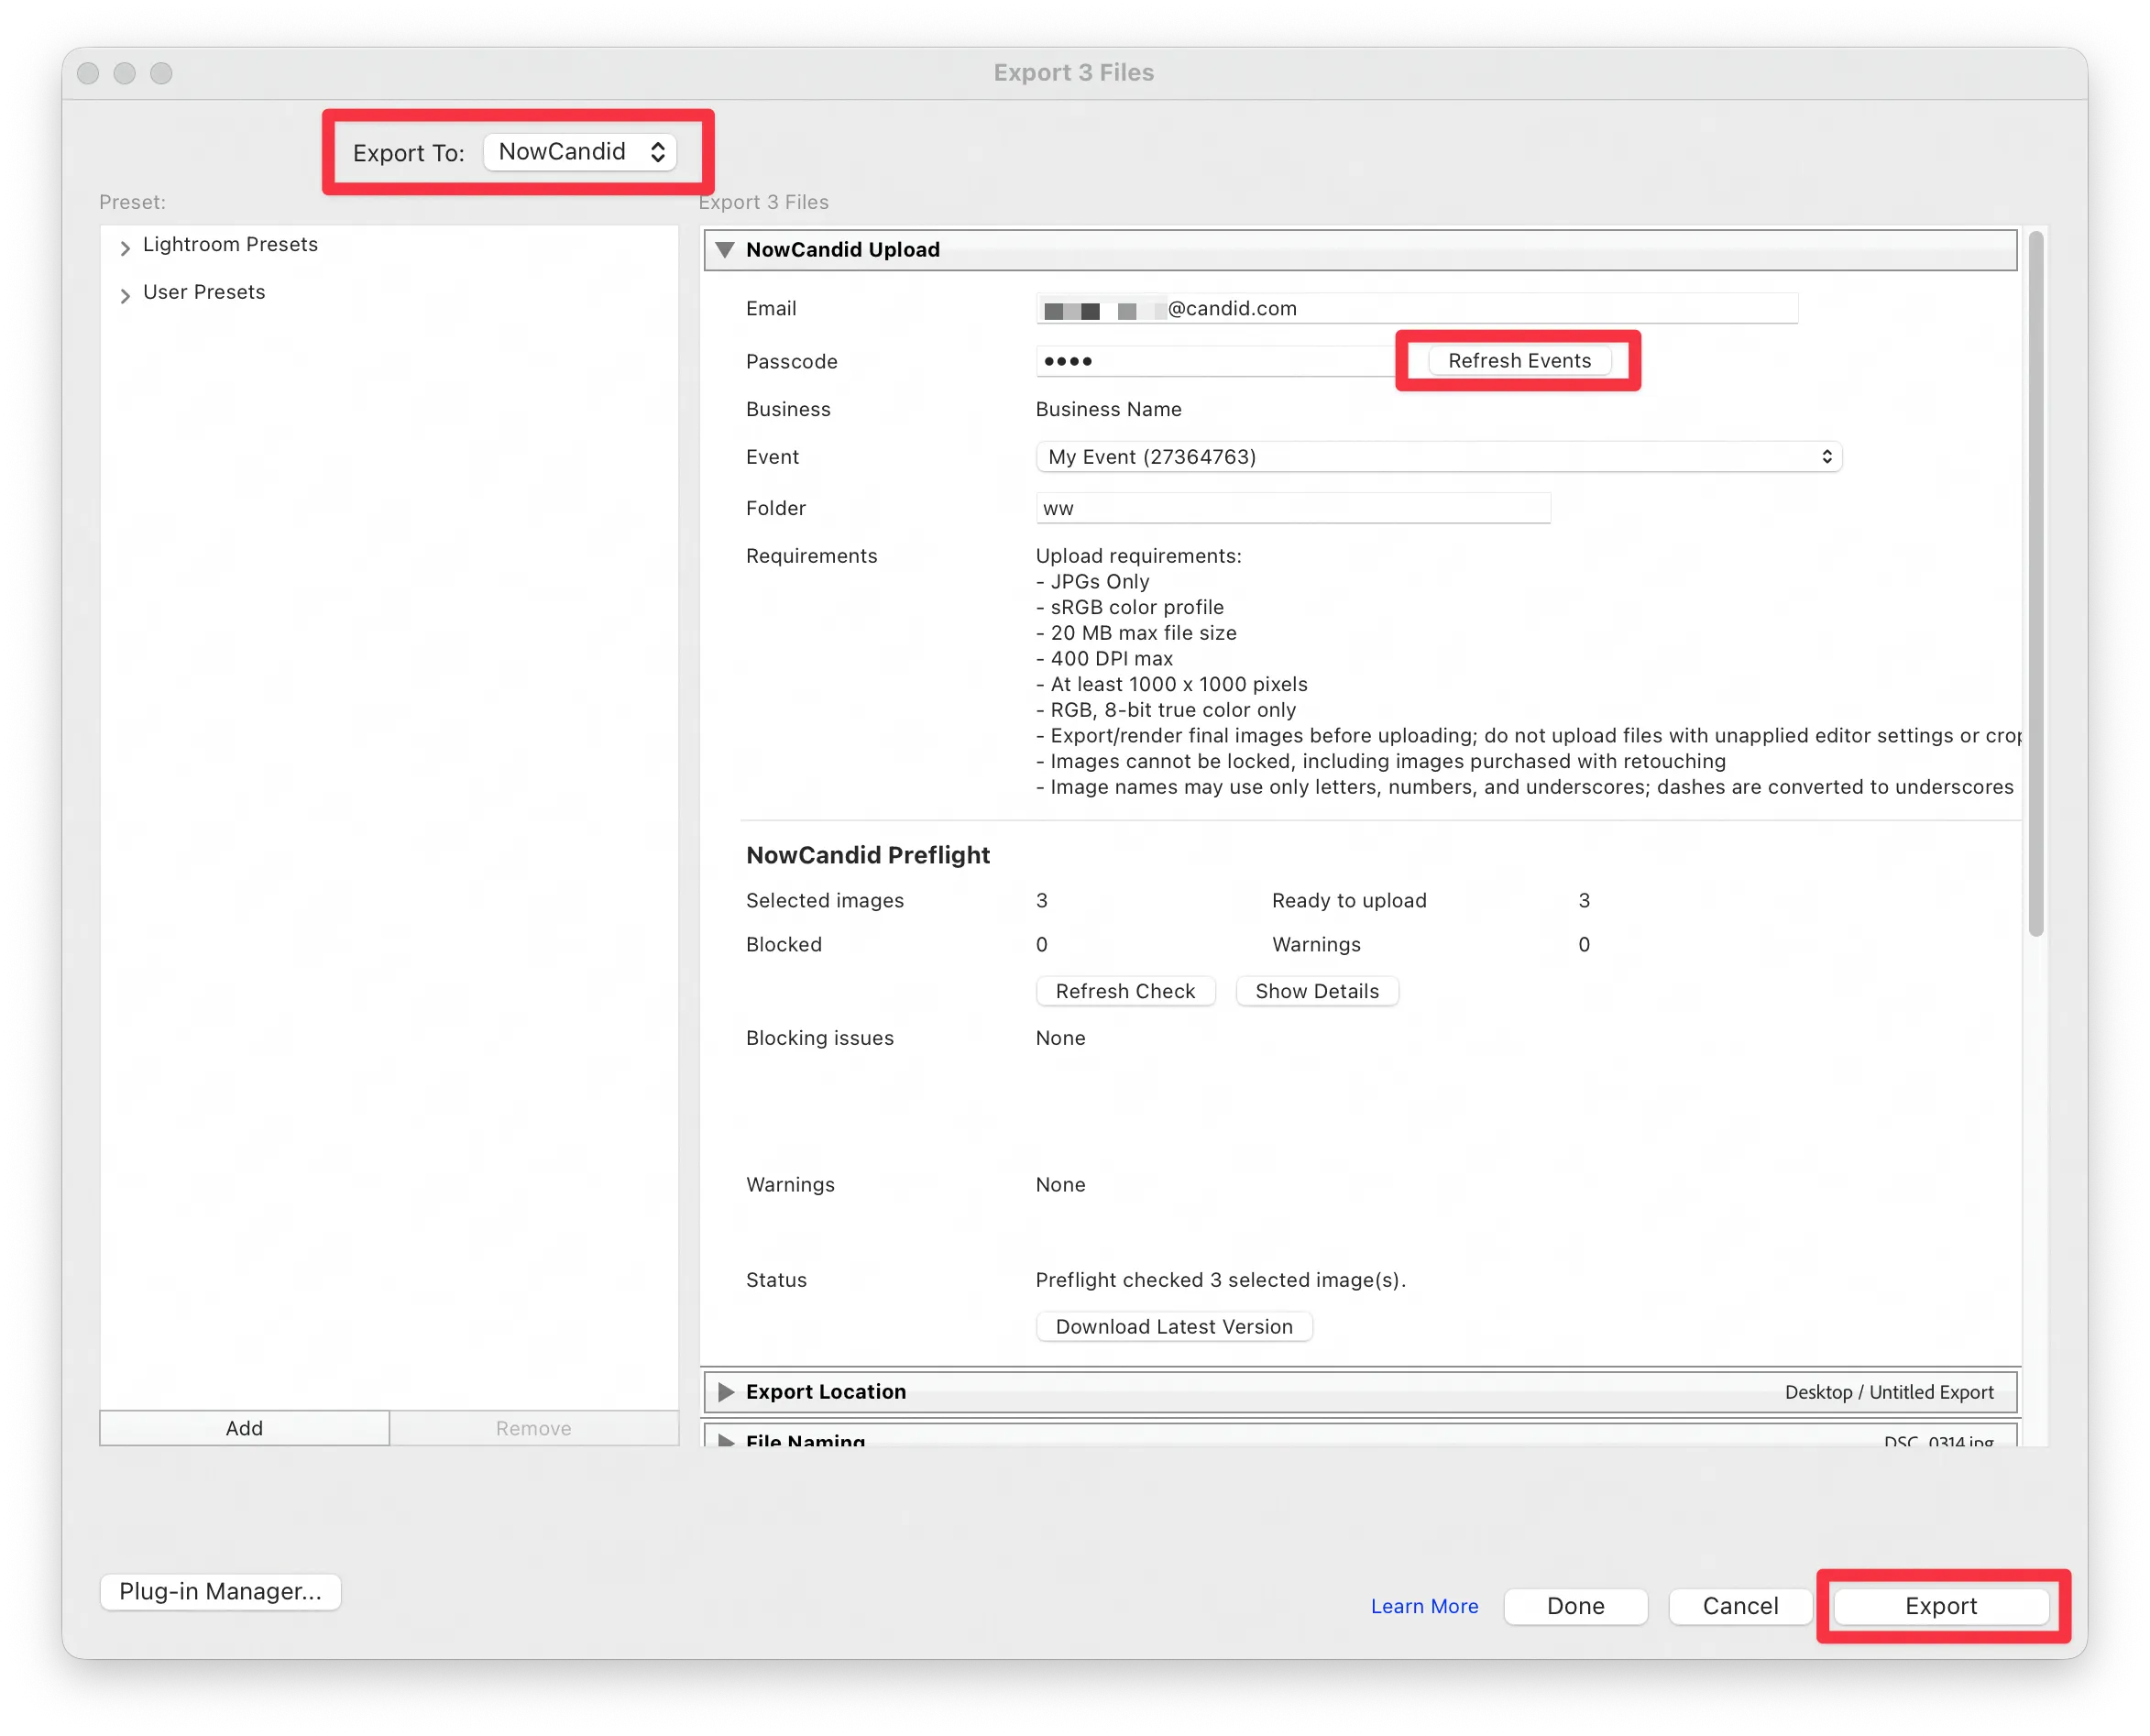
      We’ve launched an official Lightroom Classic plugin to upload images to NowCandid events directly from Lightroom Classic.

      Key notes:

      • Lightroom Classic only
      • Same image rules apply (color profile, DPI, etc.)
      • Uses Capture App login
      • Only events within 60 days of event start date show in the selector
      • Image Details → Logs will show “Uploaded from NowCandid Lightroom Plugin”
      • Docs include guide/download/installation: https://app.nowcandid.com/docs/tools-more/lightroom

      Lightroom Classic Plugin

      Upload from NowCandid Lightroom Plugin

      🖥️ Dashboard: Upload & Roster Clarity + Small UX Wins

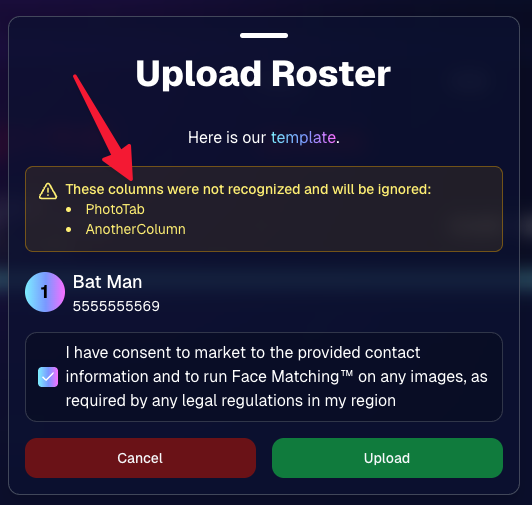
      • Event roster upload and PhotoRoster upload now warn about every unrecognized column, making it easier to spot misspellings (especially for optional columns).
      • Participant list page download now puts additional contacts into columns instead of rows.
      • Participant list download now puts merged contacts into their own row if they have different first/last names.
      • Image upload naming cleanup:
        • spaces/parentheses now automatically become underscores (e.g., Image (2)Image_2)
        • names ending in z now get a trailing underscore (e.g., ImagezImagez_)
      • Candy got even better at using the new Docs for responses.
      • Password reset now shows a clear “Your link has expired” screen (links expire after 24 hours).
      • Fixed participant filter inside another participant’s manual assign/unassign page not working properly.
      • Participant Details PhotoTag assignment UI: merged participants no longer incorrectly show PhotoTags as assigned.

      Upload Roster now warns about every unrecognized column.

      📣 Marketing Fixes

      • Fixed edge cases where galleries that were only AI-edited images could cause follow-up email marketing issues and show as 0 images on Participant List.
      • Fixed Day0 marketing edge case not starting if gallery is just AI-edited images.
      • SMS gallery links now include “View photos:” before the gallery URL to reduce confusion where some users thought the gallery link was an unsubscribe link.

      That’s the week! 💫

      Between the Lightroom Classic plugin, the Capture App’s new Network Speed Test, and retail improvements that reduce confusion (and improve performance), this week was packed with practical wins you’ll feel right away.

      Keep it sparkly,

      Candy

      Let’s get in touch

      If you’re a photographer looking to add NowCandid™ services to your wheelhouse, set up a call with us!

      How to customize formatting for each rich text

      How to customize formatting for each rich text

      How to customize formatting for each rich text

      How to customize formatting for each rich text

      How to customize formatting for each rich text
      How to customize formatting for each rich text

      What’s a Rich Text element?

      The rich text element allows you to create and format headings, paragraphs, blockquotes, images, and video all in one place instead of having to add and format them individually. Just double-click and easily create content.

      A rich text element can be used with static or dynamic content. For static content, just drop it into any page and begin editing. For dynamic content, add a rich text field to any collection and then connect a rich text element to that field in the settings panel. Voila!

      Headings, paragraphs, blockquotes, figures, images, and figure captions can all be styled after a class is added to the rich text element using the "When inside of" nested selector system.

      • List One
      • List Two
      • List Three
      • List Four
      • List Five

      This is a link

      This is bold text