HomeNavigation arrowBlogNavigation arrow
Current page
NowCandid 101

How to Make FreePics Work for Your Photography Business 📸✨

How to Make FreePics Work for Your Photography Business 📸✨
In honor of our QuicPics Program’s rebrand to FreePics, we wanted to take a fresh look at some helpful info, best practices, and booking strategies for using FreePics and service photography successfully!

Giving photos away for free might not sound like an obvious way to make money.

But with the right setup, FreePics can be a powerful business tool — whether you’re getting paid by an event organizer, working with a sponsor, building the cost into ticket sales, developing relationships with venues, or simply using free photos to get your name in front of more potential customers.

And depending on the kind of experience you want to offer, you now have three different Programs to choose from: FreePics, FreePics GO!, and FreePortraits.

First: What Is FreePics?

FreePics is designed for photographers who want to provide images to subjects at no cost to the person being photographed.

Instead of relying on each participant to purchase their own images, the photography can be funded another way — or used as a marketing tool to help generate future business.

That opens up a lot of possibilities.

Ways to “Sell” FreePics 💸

1. Work Through an Event Organizer

One of the simplest approaches is to have the event organizer pay for photography as part of the event itself.

That could include:

  • Reunions
  • Luncheons
  • Galas
  • Corporate parties
  • Balls
  • Private events
  • Community events

Instead of charging individual guests for their photos, the organizer pays you for your time and coverage.

This can make the photography feel like another included event amenity — just like entertainment, décor, or catering.

The original FreePics training material even suggested photographers may be able to charge a few hundred dollars per hour, per photographer, depending on the event and market.

2. Find an Event Sponsor

Another option is to have a sponsor cover the photography.

In exchange, you can incorporate the sponsor’s branding into the experience, including branded image artwork or overlays.

That gives the sponsor something more memorable than a banner or table sign: photos attendees may actually save, share, and revisit.

Sponsorship pricing will naturally depend on the event, audience, and sponsor, but this type of arrangement may support a much higher overall photography budget than selling directly to individual attendees.

3. Build Photography Into Ticket Sales 🎟️

If every attendee is going to receive photos, another option is to simply include the photography cost in the ticket price.

A relatively small increase per ticket can add up quickly across a large event.

For example, an organizer could add a photography fee to each admission ticket, then use that revenue to pay for event coverage while letting every guest access their photos afterward.

Participants feel like they’re getting something included with admission, while the photographer still gets paid.

4. Partner With Party Planners or Venues 🤝

FreePics can also be a great tool for building recurring relationships.

A photographer can establish themselves as the go-to photographer for a planner or venue and create an arrangement that works for everyone involved.

That could mean a commission, referral agreement, preferred-vendor relationship, or another setup that encourages the planner or venue to continue sending events your way.

Instead of thinking about a single event, you’re using FreePics to help build a steady pipeline of future bookings.

5. Use FreePics as Marketing for Your Own Business 📣

You don’t necessarily have to make money directly from every FreePics Event.

Sometimes, the value is the exposure.

Offering free photography at the right event can introduce your business to dozens or even hundreds of potential customers.

Because participants receive their images directly, you have an opportunity to put your business and branding in front of them while creating a positive interaction with your photography.

That can turn one promotional event into future:

  • Event bookings
  • Portrait sessions
  • School or sports opportunities
  • Corporate work
  • Referrals
  • Repeat customers

Sometimes the free photo is the product.

Sometimes it’s the advertisement. 👀

Which Free Program Should You Use?

This is where the three Programs start to differ.

FreePics — Best for Most Events ⭐

For most photographers, FreePics is the best all-around option.

It provides the full FreePics experience and gives you the most flexibility in how images are delivered to participants.

If you simply want to photograph an event and make it easy for subjects to receive their images for free, start here.

It costs more per image than the other Free Programs, but you’re paying for the broader experience and flexibility.

Best for:

  • Parties
  • Galas
  • Corporate events
  • Reunions
  • Sponsored events
  • General event photography
  • Most situations where you want free image delivery

FreePics GO! — Best for a Gallery-First Experience 🖼️

FreePics GO! is a gallery-only experience, which allows it to cost less per image than standard FreePics.

But the gallery format also gives it some unique advantages.

FreePics GO! is especially useful if you want participants to clearly see that they can download different versions of their images — such as versions without overlay artwork.

It can also be a better choice when using Background Removal, because participants can browse different background options before deciding which version of an image they want to download.

And because subjects are already browsing through a gallery, FreePics GO! gives you a stronger opportunity to showcase physical products and other potential upsells alongside their free images.

Best for:

  • No-overlay option is important
  • Sponsored events with branded artwork
  • Background Removal workflows
  • Events where you want subjects choosing between different image treatments
  • Photographers who want to promote prints or physical products
  • Situations where keeping per-image costs lower is important

FreePortraits — Best for Headshots 👤

FreePortraits takes the FreePics concept and adapts it specifically for headshot-style photography.

Because the workflow is more limited — with only one image file sent out per image — it can be offered at a lower per-image cost than standard FreePics.

If your Event is centered around individual portraits rather than a larger event gallery, that limitation can actually make perfect sense.

Best for:

  • Corporate headshots
  • Conferences
  • Professional networking events
  • Employee portraits
  • Profile photos
  • Other single-image portrait workflows

If you want the FreePics experience but you’re really photographing headshots, FreePortraits is likely the better fit.

A Simple Way to Choose 🍬

When in doubt:

Use FreePics for the best general-purpose experience.

Choose FreePics GO! when the gallery itself adds value — especially for Background Removal choices and physical-product upsells.

Choose FreePortraits when you’re photographing headshots and only need to deliver one finished image file per image.

The goal with all three is the same: make it easy to get great images into your subjects’ hands while giving you flexibility in how the photography fits into your business.

Free Doesn’t Have to Mean Unprofitable 🚀

FreePics is less about giving your work away and more about deciding who is paying for the experience — and what value the photography creates.

Maybe the event organizer pays you.

Maybe a sponsor does.

Maybe the cost is included in admission.

Maybe a venue relationship brings you more bookings.

Or maybe the Event itself acts as marketing that introduces your photography business to a whole new group of people.

There are plenty of ways to make free photos make business sense.

And with FreePics, FreePics GO!, and FreePortraits, you can choose the version that fits the Event instead of forcing every job into the same workflow. 📸✨

Cheers,

— Candy 🍬

Related articles

Weekly Recap: Faster Face Matching, Virtual Group Tweaks & Reporting Upgrades ⚡📸
Feature Updates
May 29, 2026

Weekly Recap: Faster Face Matching, Virtual Group Tweaks & Reporting Upgrades ⚡📸

3
 minutes read
Hey photo friends! 👋


This week’s update is all about keeping up with the busiest season yet. We saw an enormous wave of images come through recently — more than ever — and Face Matching delays got much longer than we want them to be.

So, we’ve been making improvements accordingly. 💪

⚡ Face Matching Speed Improvements

🚀 Face Matching performance upgrades are in progress! We’re implementing changes that should help speed up Face Matching by up to 10× faster in some cases.

These improvements are especially important during high-volume stretches like graduation season, when thousands upon thousands of images are coming in at once. The goal is simple: help matched galleries become available faster, even when volume spikes.

📊 Reporting Upgrades

📈 Sales Report now supports up to 15,000 orders

  • The Sales Report list and Excel download can now include up to 15k orders at once. Previously, the limit was 1k.

💵 Sales Report download now includes eFee and COGs

  • The Excel export now includes eFee and COGs for each order, giving you more detailed financial visibility.

📦 Products Report sorting fixed

  • Column sorting now works correctly on the Products Report.

🏷️ Event Tags report filter fixed

  • Fixed an issue where the Event Tags filter could set the end date based on the newest Event end date instead of today, potentially missing newer report data.

🧑‍🤝‍🧑 Virtual Group Builder Improvements

📝 New Text Vertical Position slider

  • You can now adjust the vertical position of subject names in Virtual Group Builder.

🎯 Logo positioning fix

  • Fixed logos being off by a few pixels in Virtual Group Builder.

🧭 Edit redirect fix

  • Fixed an issue where editing a Virtual Group could sometimes send you back to Home.

🖼️ Dashboard Image Management Updates

🔢 Manage Images now shows total image count

  • At the top of the Manage Images page, you’ll now see how many images are included in your current search/filter results.

🏷️ PhotoTag duplicate prevention improved

  • PhotoTag creation now better prevents duplicates caused by extra empty space at the end of the PhotoTag name.

🛍️ Retail Improvements

🧑‍🤝‍🧑 PhotoTag group images appear first

  • When a participant is associated with a PhotoTag, group images tied to that same PhotoTag will now appear before general group images with no PhotoTag.

⬇️ Receipt download button cleanup

  • The Download All Images button is now hidden if the order does not include any downloads to reduce confusion.

Web Receipt Download Page processing message fixed

  • If a customer clicks the receipt download link before the order is fully loaded by the lab, the page will correctly say the order is still processing.

✂️ Z-crop product cropping improved

  • When cropping a z-cropped image during product configuration, retail now uses the z-cropped version directly instead of jumping back to the full original image.

🖼️ “Matte” clarified to “Standard”

  • Most products now use "Standard" instead of "Matte" for clearer wording. Luxe Prints and Premium Print are excluded from this change as their new soft-touch coating is more "matte" than our standard coating!

That’s the week!

Faster Face Matching is the big focus right now, and these reporting, Virtual Group, Dashboard, and retail updates should help keep things clearer and more manageable going forward for photographers as well!

Keep creating magic,

Candy 🍬

Deliver Faster and Start Selling Sooner
Feature Updates
May 26, 2026

Deliver Faster and Start Selling Sooner

7
 minutes read

Why timing is the most overlooked “marketing strategy” in event photography

In photography, timing matters.

Not just because clients want their photos quickly—but because buying behavior is emotional and time-sensitive. The longer customers wait to see their images, the more the energy fades. The excitement from the event turns into “I’ll get to it later,” and “later” often becomes “never.”

That’s why one of the biggest marketing advantages you can build into your business isn’t a fancy email template or a new ad campaign. It’s this:

Deliver faster—so you can start selling sooner.

NowCandid™ is built around that idea.

The real problem: attention decays fast

After an event, people are at peak interest:

  • •They’re excited.
  • •They’re already talking about it.
  • •They’re texting friends.
  • •They’re posting.
  • •They’re still in “memory mode.”

That’s the moment when they’re most likely to open a message, click a gallery link, and buy.

But when delivery drags out:

  • •They stop checking.
  • •They forget.
  • •They move on.
  • •They’re less likely to convert.

Even a delay of a couple days can change the outcome.

The NowCandid approach: proactive delivery, not passive browsing

A lot of platforms rely on customers to work hard to find their photos. The experience is often:

“Here’s a link. Good luck.”

NowCandid is designed to flip that.

Instead of waiting for customers to dig through a massive gallery, the platform is built to connect the right photos to the right people quickly, and then help you reach them while the moment still feels immediate.

Here’s what that looks like.

The “faster = more sales” workflow

1) Customers complete a quick Selfie Check-In™

Selfie Check-In gives customers a simple way to identify themselves and provide contact info, so your system has what it needs to deliver their images efficiently—without a bunch of manual work on your end.

The key benefit: less friction.
You’re not chasing names after the fact. They’re raising their hand while the event energy is still high.

2) Images can be live-uploaded as they are shot

When you can upload while you shoot, you change the entire sales timeline.

Instead of “photos delivered days later,” you’re moving toward:

  • •Same-day visibility
  • •Immediate browsing
  • •Faster order velocity

Even if you don’t upload every frame live, the ability to move photos quickly gives you leverage. It’s the difference between a slow drip and a real-time experience.

3) Galleries can be sent right away

Once customers are identified and images are flowing in, the next step is simple:

Send the gallery.

That’s where momentum turns into conversion.

You’re no longer hoping attendees remember to check a website later. You’re proactively reaching them with a direct path to their photos.

4) Customers receive images while it still feels immediate

This is the most important part.

People buy when:

  • •They can find themselves quickly
  • •The experience feels fresh
  • •They’re emotionally connected to the moment

When images arrive while the event still feels “present,” the purchase becomes part of the experience—not an afterthought.

That’s why speed isn’t just operational.
It’s marketing.

What this unlocks for photographers

When delivery speeds up, you’ll feel the impact in a few places immediately:

✅ More orders (because more people actually view their photos)

Fast delivery increases engagement. Engagement increases conversion.

✅ Higher order values (because customers stay in the moment)

When people browse while excited, they tend to buy more. They’re not minimizing the purchase—they’re celebrating the memory.

✅ Less support burden

Most support requests come from confusion and delay:

  • •“Where are my photos?”
  • •“How do I find my kid?”
  • •“I can’t remember the link.”

A fast, direct delivery workflow reduces those issues naturally.

✅ Better event/client satisfaction

Organizers don’t want complaints. Faster delivery means fewer unhappy guests and fewer incoming emails for the client—which makes you look professional (and helps you get rebooked).

The takeaway: timing is a growth strategy

If you want to grow your event photography business, you don’t always need more marketing.

Sometimes you need better timing.

NowCandid is built to help you:

  • •Identify customers quickly
  • •Upload faster
  • •Deliver sooner
  • •Convert while energy is high

Because in volume photography, the platform that helps you move faster is usually the platform that helps you sell more.

Want to see what “fast delivery” looks like in practice?

If you tell us what type of events you shoot (sports, schools, graduations, dances, etc.), we’ll recommend the best NowCandid workflow to deliver faster and start selling sooner. Set a time with one of our reps using our Calendly: https://calendly.com/nowcandid-training.

Weekly Recap: Virtual Group Builder, Client Outreach Updates & Smarter Retail Support 🎉📸
Feature Updates
May 22, 2026

Weekly Recap: Virtual Group Builder, Client Outreach Updates & Smarter Retail Support 🎉📸

6
 minutes read
Hey photo friends! 👋

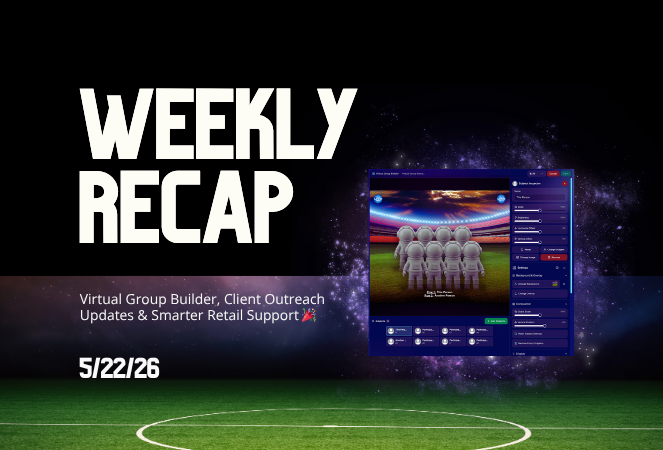
This is a big week! The headline feature is one many sports and volume photographers are going to love: An all-new Virtual Group Builder is now available directly on the Dashboard.

We’ve also added new Candy Image Studio tools, improved Client Outreach behavior, refreshed image assignment tools, and made retail support easier for shoppers and photographers alike.

Let’s jump in!

🧑‍🤝‍🧑 Big New Feature: Virtual Group Builder

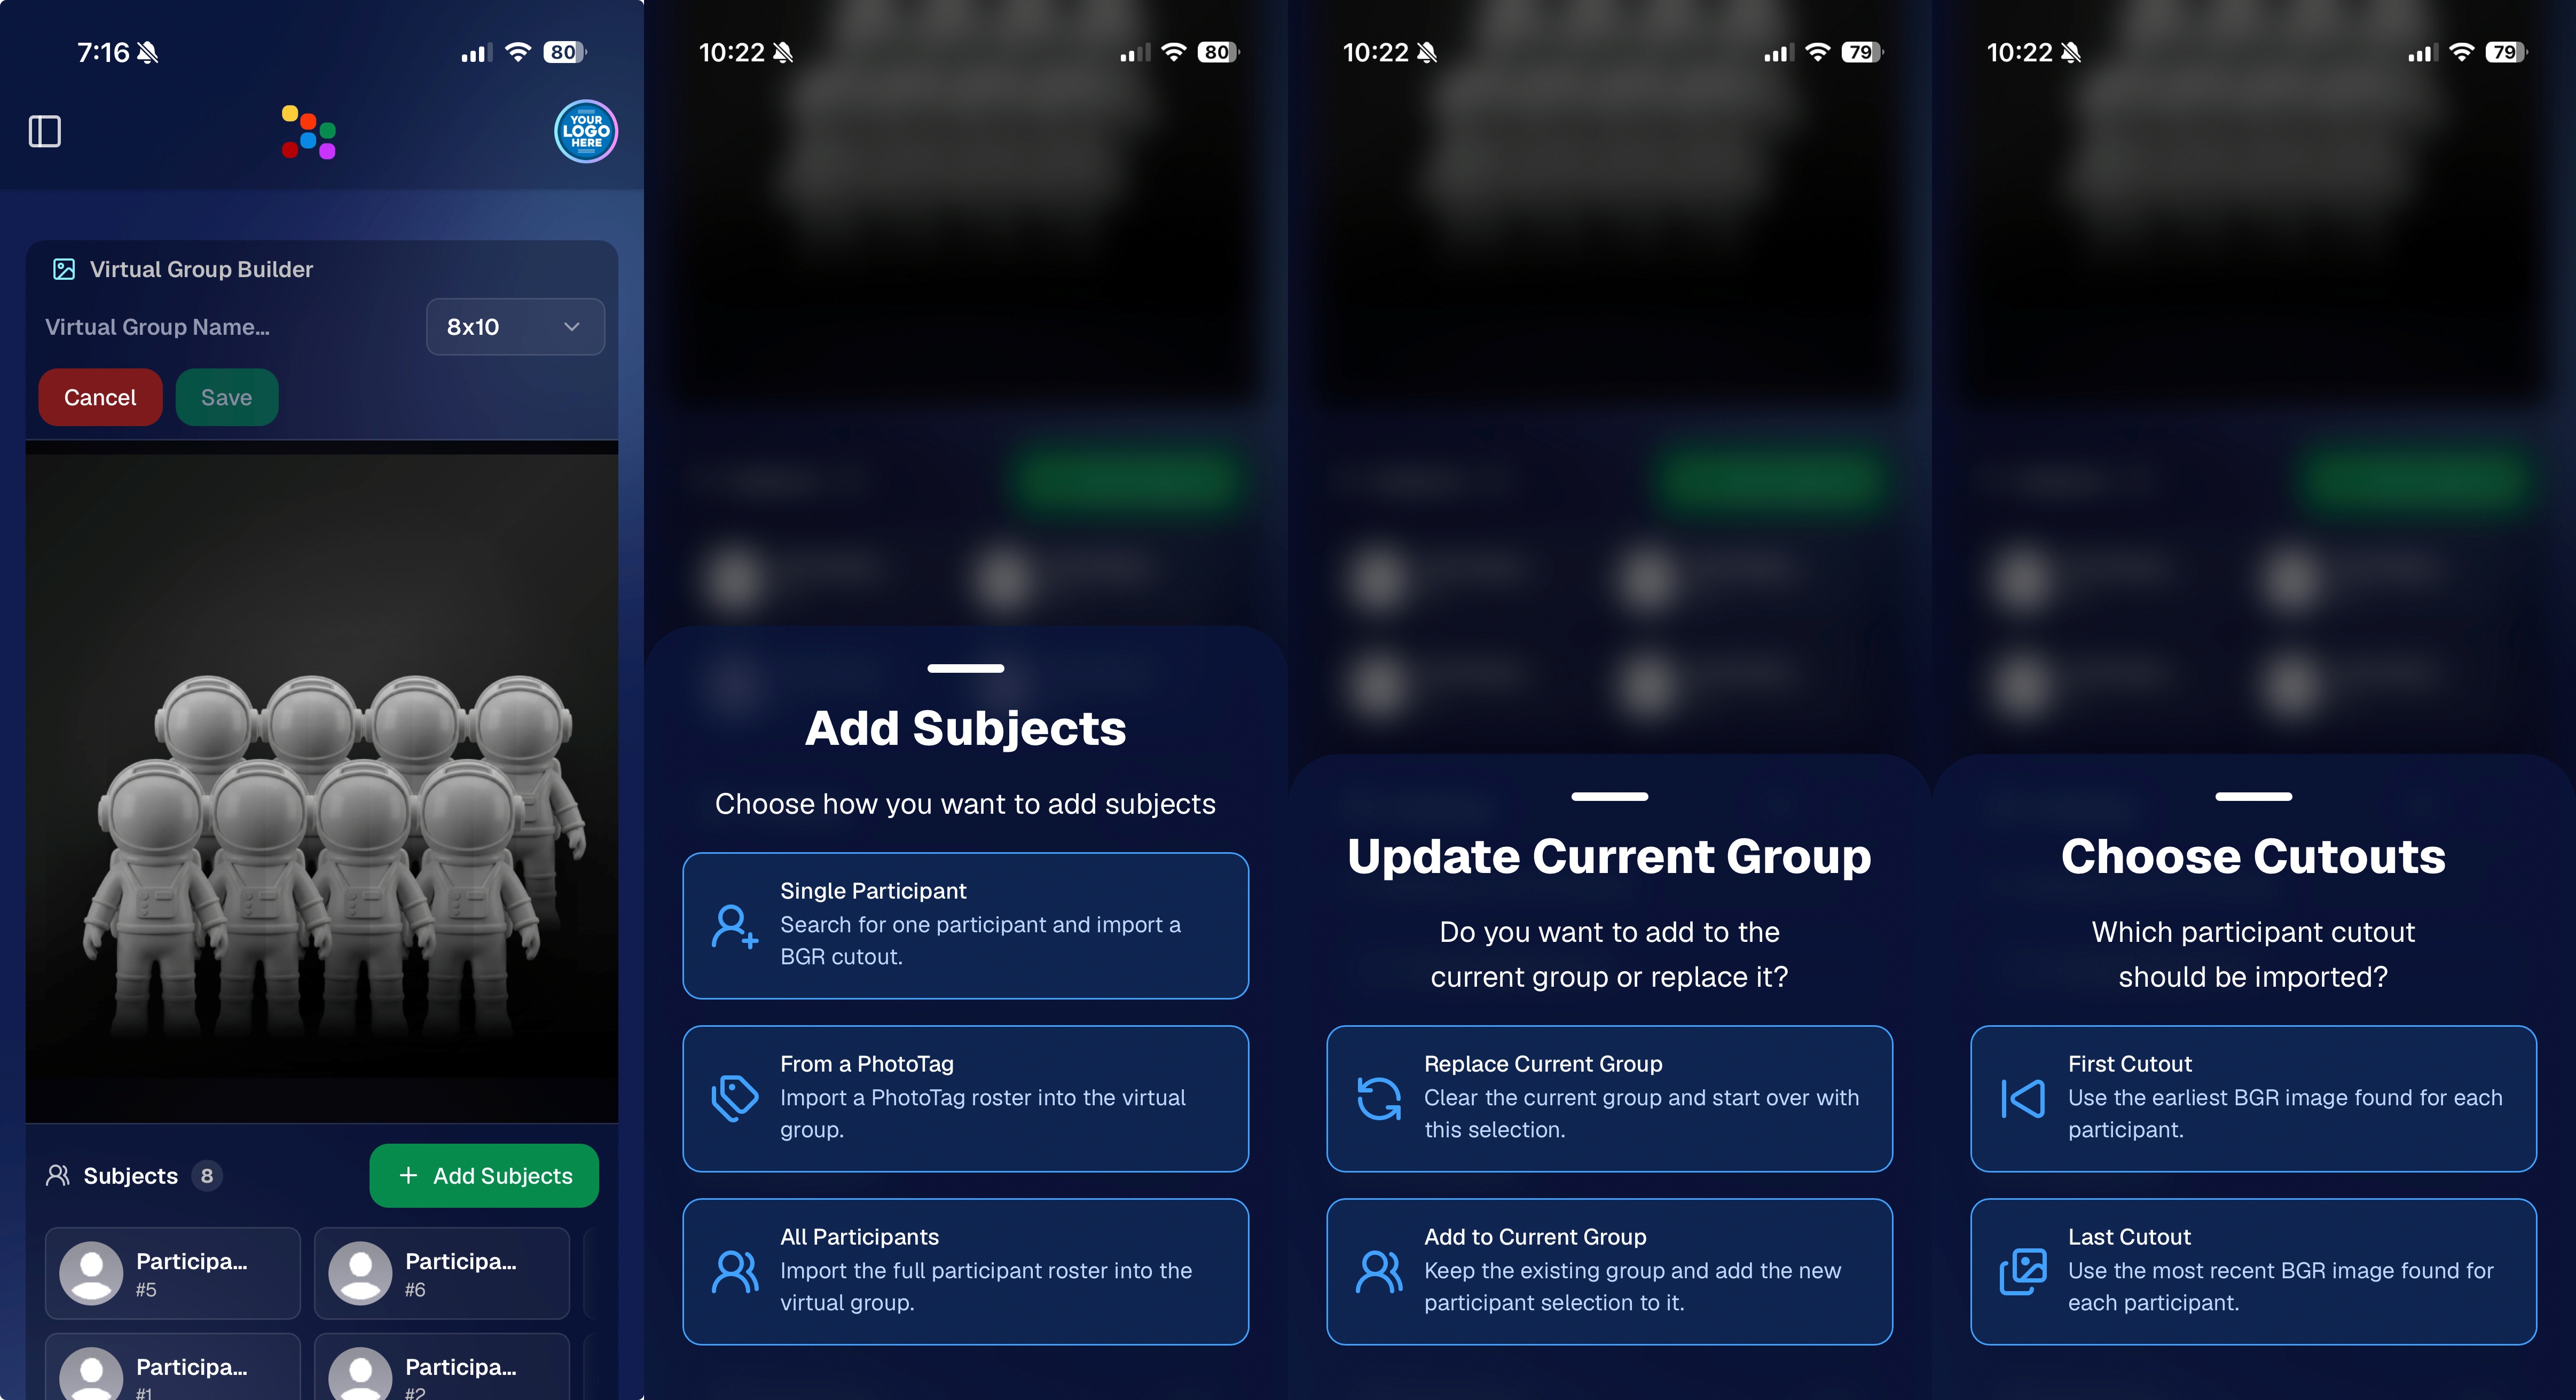
You can now build Virtual Groups directly on the Dashboard — with Mobile Dashboard support too!

Find it from an Event page by clicking Virtual Groups in the sidebar menu.

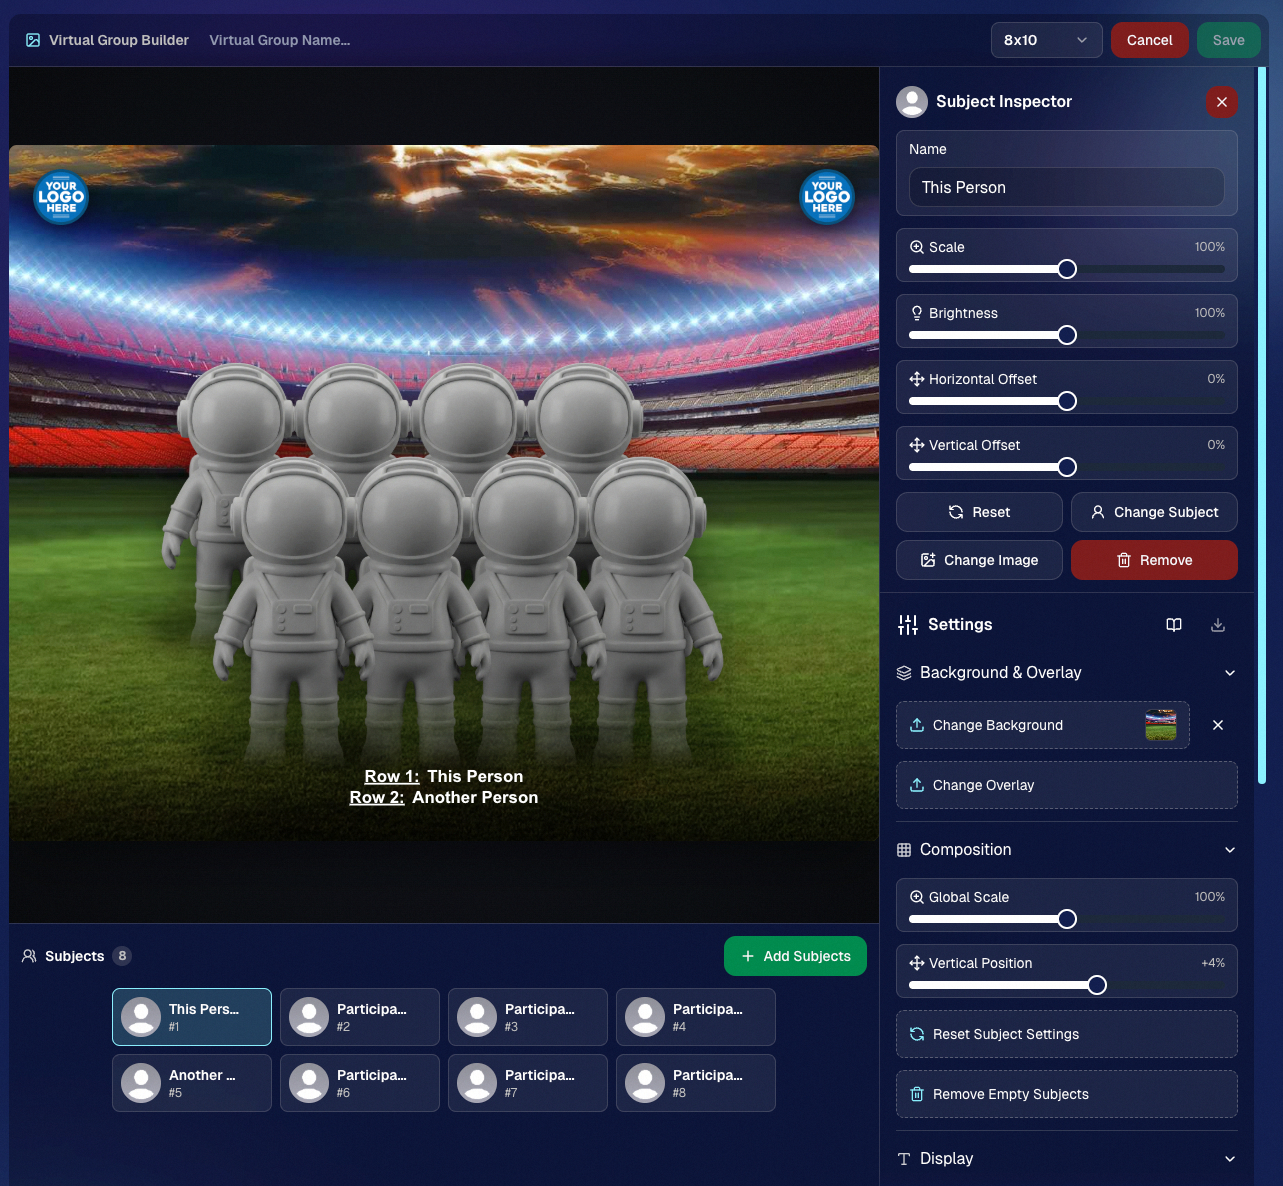
With Virtual Group Builder, you can:

👥 Import participants from the full Event, one at a time, or everyone with a specific PhotoTag

✂️ Use participant cutouts to build polished group images

🏷️ Build groups quickly when your Event has consistent cutouts and participants tagged with PhotoTags

🖼️ Create Virtual Groups in 4×6, 5×7, 8×10, or 11×14 formats

🎨 Choose from NowCandid default backgrounds, upload custom backgrounds, and add overlays

🧢 Add account logos to the corners

🔤 Toggle subject names on or off

📐 Preview crop lines and aspect ratio lines

🖱️ Zoom, pan, drag, reorder, resize, brighten, and position subjects

You can also adjust group-level settings like background, overlay, overall scale, vertical position, bottom shadow falloff, and individual cutout fade to help hide cropped legs.

When your Event is set up cleanly with cutouts and PhotoTags, you can create a full Virtual Group in just a few clicks. ✨

Docs page: https://app.nowcandid.com/docs/image-management/virtual-groups

Desktop Dashboard view of the new Virtual Group Builder

Mobile Dashboard view of the new Virtual Group Builder

🎓 Candy Image Studio: New Graduation Tools

Candy Image Studio got some very timely upgrades for graduation season:

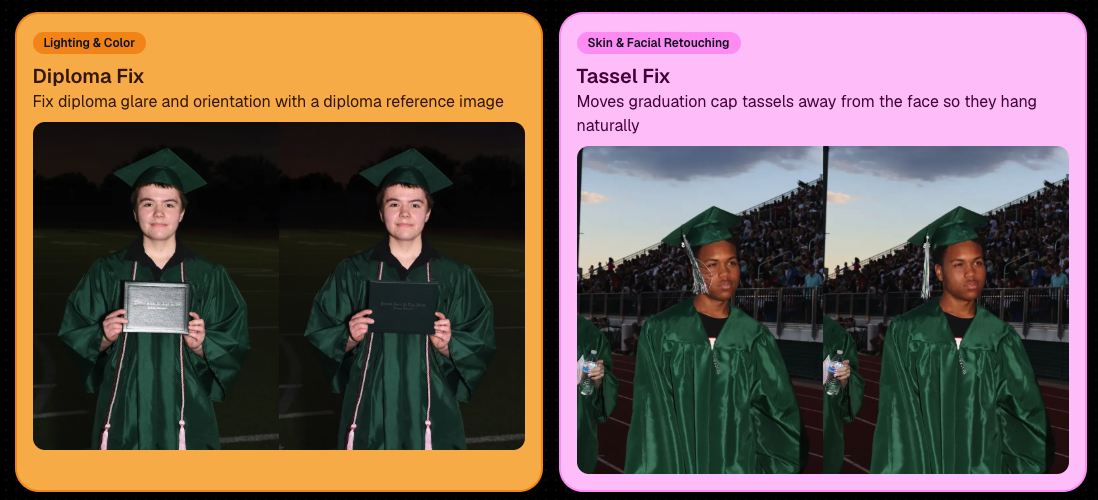
🎓 New “Diploma Fix” node

  • Helps fix diploma orientation and glare. You’ll need to upload a reference diploma so Candy knows what the diploma should look like, including details like school name, emblem, fonts, and colors.

🎗️ New “Tassel Fix” node

  • Helps adjust graduation tassels that are covering a subject’s face — similar to Stray Hair Removal, but tailored specifically for grad tassels.

👓 Improved Reduce Glass Glare

  • This node is now more reliable and less likely to accidentally add glasses to subjects who aren’t wearing them.

📣 Client Outreach Improvements

Client Outreach got a few useful updates to help save money and keep lists cleaner:

🚫 Unsubscribed contacts excluded by default

  • Imported Client Outreach contacts now exclude unsubscribed contacts unless you choose to include them.

🔘 New “Include unsubscribed contacts” toggle

  • You can still include them if needed, but the default helps avoid spending on contacts who can’t receive your outreach.

👀 Show Hidden on Client Lists

  • The Client Outreach list page now has a Show Hidden option, similar to Offers and PhotoRoster organizations.

🧭 Client List sidebar shortcut

  • The Client Outreach sidebar item now takes you back to the Client List page more clearly.

🖼️ Image Management & Dashboard Upgrades

🧩 Image Release Gallery redesign

  • The Image Release Gallery now uses a masonry layout like retail, supports lightboxes with arrow key navigation, has CMD/CTRL+F search support, and saves filters in the URL.

🧑‍💻 Manual Assignment page refresh

  • The Participant Manual Assignment page has a cleaner, more intuitive UI.

Camera star ratings on Image Details

  • If your camera includes star ratings, they now appear on the Image Details page.

⬇️ Image Details convenience buttons

  • Image Details now includes quick actions to download or open in Candy Image Studio.

🏷️ PhotoTag ampersand fix

  • PhotoTag names with ampersands now save correctly.

🧍 Merged participant name fix

  • Manual Assignment now shows the selected participant’s name instead of the first merged participant’s name.

🔙 Event sidebar remembers filters

  • When going back to the Event List from an Event Overview page, your filters are remembered as long as you haven’t refreshed.

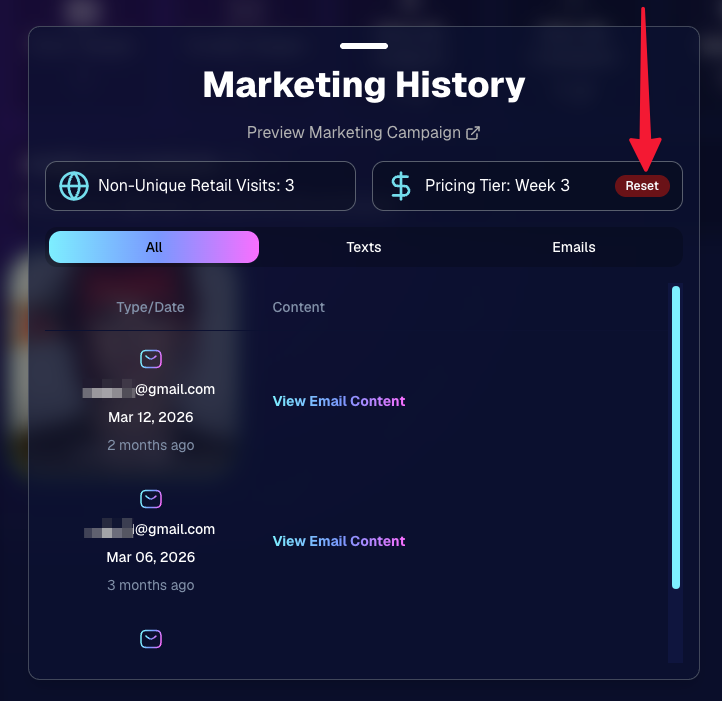
🔁 Pricing tier reset button

  • Participant marketing history now includes a button to reset a participant’s pricing tier start date, useful if support wants to re-offer first-week pricing.

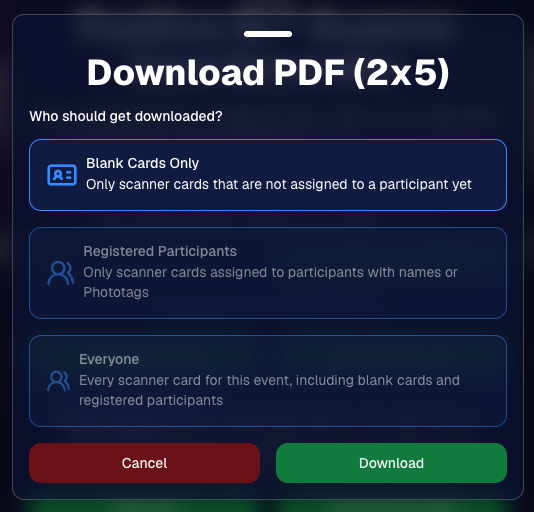
🪪 Positive ID QR Code downloader options

  • You can now download blank cards only, registered participants only, or everyone, making scan card PDFs easier to manage for multi-workflow sports events.

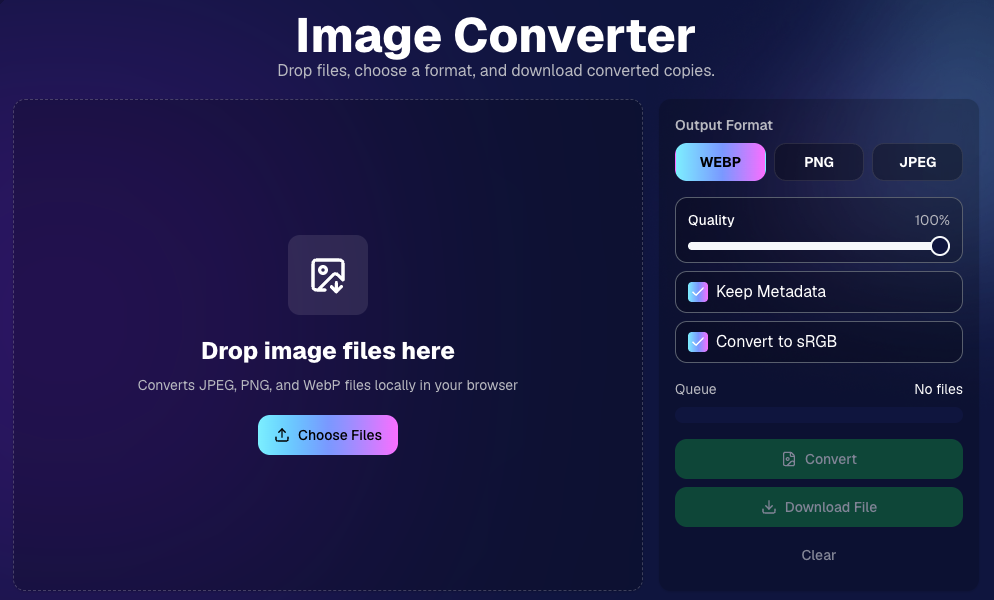
🛠️ New Tool: Image Converter

There’s a new tool under Tools & More → Image Converter.

Use it to:

🔄 Convert images to WEBP, PNG, or JPEG

🎨 Convert images to sRGB

Handy for preparing files before uploading them to NowCandid Events.

📚 New Capture App Camera Docs

We added a dedicated docs page for confirmed camera models that work with the Capture App.

More cameras may work than what’s listed, but this page focuses on models we’ve confirmed.

Docs page: https://app.nowcandid.com/docs/capture-app/cameras

🛍️ Retail Improvements

📬 New Contact Us form on retail

  • The Contact Us popup now includes a form that sends support an email with helpful details automatically included, such as browser info, window size, retail link, Event details, and order number when available. This should make support faster and reduce back-and-forth.

🖼️ Overlay step now comes before cropping

  • This prepares retail for future improvements while keeping product customization clearer.

🗓️ Smarter Year captions

  • Certain products now default the Year caption to the Event start year or participant Day 0 year instead of the current year. Helpful for late-December events or older graduation galleries.

🌍 International order fix

  • Fixed an edge case where some international orders could send multiple receipts and incorrectly show that the order wasn’t submitted.

🤳 Selfie Check-In & Capture App Updates

📶 Clearer Selfie Check-In upload errors

  • If a selfie upload fails, subjects now see a more specific error reason — like upload speed being too slow — so they know what to try next.

📱 Capture App 5.6.3 OTA update

  • Contact Info Settings now says Tap-A-Face or Type & Take based on the Event program
  • The 1000×1000 reference image requirement has been removed for Selfie Check-In Station and Roster Check-In, especially helpful for Android devices with lower-resolution cameras

That’s the week!

Virtual Group Builder is the big one, especially for sports and volume workflows — but between Client Outreach, Candy Image Studio, Image Converter, and retail support improvements, there’s a lot here to make your next Event easier to manage.

Keep creating magic,

Candy 🍬

Let’s get in touch

If you’re a photographer looking to add NowCandid™ services to your wheelhouse, set up a call with us!

How to customize formatting for each rich text

How to customize formatting for each rich text

How to customize formatting for each rich text

How to customize formatting for each rich text

How to customize formatting for each rich text

What’s a Rich Text element?

The rich text element allows you to create and format headings, paragraphs, blockquotes, images, and video all in one place instead of having to add and format them individually. Just double-click and easily create content.

A rich text element can be used with static or dynamic content. For static content, just drop it into any page and begin editing. For dynamic content, add a rich text field to any collection and then connect a rich text element to that field in the settings panel. Voila!

Headings, paragraphs, blockquotes, figures, images, and figure captions can all be styled after a class is added to the rich text element using the "When inside of" nested selector system.

  • List One
  • List Two
  • List Three
  • List Four
  • List Five

This is a link

This is bold text