HomeNavigation arrowBlogNavigation arrow
Current page
NowCandid 101

How to Make FreePics Work for Your Photography Business 📸✨

How to Make FreePics Work for Your Photography Business 📸✨
In honor of our QuicPics Program’s rebrand to FreePics, we wanted to take a fresh look at some helpful info, best practices, and booking strategies for using FreePics and service photography successfully!

Giving photos away for free might not sound like an obvious way to make money.

But with the right setup, FreePics can be a powerful business tool — whether you’re getting paid by an event organizer, working with a sponsor, building the cost into ticket sales, developing relationships with venues, or simply using free photos to get your name in front of more potential customers.

And depending on the kind of experience you want to offer, you now have three different Programs to choose from: FreePics, FreePics GO!, and FreePortraits.

First: What Is FreePics?

FreePics is designed for photographers who want to provide images to subjects at no cost to the person being photographed.

Instead of relying on each participant to purchase their own images, the photography can be funded another way — or used as a marketing tool to help generate future business.

That opens up a lot of possibilities.

Ways to “Sell” FreePics 💸

1. Work Through an Event Organizer

One of the simplest approaches is to have the event organizer pay for photography as part of the event itself.

That could include:

  • Reunions
  • Luncheons
  • Galas
  • Corporate parties
  • Balls
  • Private events
  • Community events

Instead of charging individual guests for their photos, the organizer pays you for your time and coverage.

This can make the photography feel like another included event amenity — just like entertainment, décor, or catering.

The original FreePics training material even suggested photographers may be able to charge a few hundred dollars per hour, per photographer, depending on the event and market.

2. Find an Event Sponsor

Another option is to have a sponsor cover the photography.

In exchange, you can incorporate the sponsor’s branding into the experience, including branded image artwork or overlays.

That gives the sponsor something more memorable than a banner or table sign: photos attendees may actually save, share, and revisit.

Sponsorship pricing will naturally depend on the event, audience, and sponsor, but this type of arrangement may support a much higher overall photography budget than selling directly to individual attendees.

3. Build Photography Into Ticket Sales 🎟️

If every attendee is going to receive photos, another option is to simply include the photography cost in the ticket price.

A relatively small increase per ticket can add up quickly across a large event.

For example, an organizer could add a photography fee to each admission ticket, then use that revenue to pay for event coverage while letting every guest access their photos afterward.

Participants feel like they’re getting something included with admission, while the photographer still gets paid.

4. Partner With Party Planners or Venues 🤝

FreePics can also be a great tool for building recurring relationships.

A photographer can establish themselves as the go-to photographer for a planner or venue and create an arrangement that works for everyone involved.

That could mean a commission, referral agreement, preferred-vendor relationship, or another setup that encourages the planner or venue to continue sending events your way.

Instead of thinking about a single event, you’re using FreePics to help build a steady pipeline of future bookings.

5. Use FreePics as Marketing for Your Own Business 📣

You don’t necessarily have to make money directly from every FreePics Event.

Sometimes, the value is the exposure.

Offering free photography at the right event can introduce your business to dozens or even hundreds of potential customers.

Because participants receive their images directly, you have an opportunity to put your business and branding in front of them while creating a positive interaction with your photography.

That can turn one promotional event into future:

  • Event bookings
  • Portrait sessions
  • School or sports opportunities
  • Corporate work
  • Referrals
  • Repeat customers

Sometimes the free photo is the product.

Sometimes it’s the advertisement. 👀

Which Free Program Should You Use?

This is where the three Programs start to differ.

FreePics — Best for Most Events ⭐

For most photographers, FreePics is the best all-around option.

It provides the full FreePics experience and gives you the most flexibility in how images are delivered to participants.

If you simply want to photograph an event and make it easy for subjects to receive their images for free, start here.

It costs more per image than the other Free Programs, but you’re paying for the broader experience and flexibility.

Best for:

  • Parties
  • Galas
  • Corporate events
  • Reunions
  • Sponsored events
  • General event photography
  • Most situations where you want free image delivery

FreePics GO! — Best for a Gallery-First Experience 🖼️

FreePics GO! is a gallery-only experience, which allows it to cost less per image than standard FreePics.

But the gallery format also gives it some unique advantages.

FreePics GO! is especially useful if you want participants to clearly see that they can download different versions of their images — such as versions without overlay artwork.

It can also be a better choice when using Background Removal, because participants can browse different background options before deciding which version of an image they want to download.

And because subjects are already browsing through a gallery, FreePics GO! gives you a stronger opportunity to showcase physical products and other potential upsells alongside their free images.

Best for:

  • No-overlay option is important
  • Sponsored events with branded artwork
  • Background Removal workflows
  • Events where you want subjects choosing between different image treatments
  • Photographers who want to promote prints or physical products
  • Situations where keeping per-image costs lower is important

FreePortraits — Best for Headshots 👤

FreePortraits takes the FreePics concept and adapts it specifically for headshot-style photography.

Because the workflow is more limited — with only one image file sent out per image — it can be offered at a lower per-image cost than standard FreePics.

If your Event is centered around individual portraits rather than a larger event gallery, that limitation can actually make perfect sense.

Best for:

  • Corporate headshots
  • Conferences
  • Professional networking events
  • Employee portraits
  • Profile photos
  • Other single-image portrait workflows

If you want the FreePics experience but you’re really photographing headshots, FreePortraits is likely the better fit.

A Simple Way to Choose 🍬

When in doubt:

Use FreePics for the best general-purpose experience.

Choose FreePics GO! when the gallery itself adds value — especially for Background Removal choices and physical-product upsells.

Choose FreePortraits when you’re photographing headshots and only need to deliver one finished image file per image.

The goal with all three is the same: make it easy to get great images into your subjects’ hands while giving you flexibility in how the photography fits into your business.

Free Doesn’t Have to Mean Unprofitable 🚀

FreePics is less about giving your work away and more about deciding who is paying for the experience — and what value the photography creates.

Maybe the event organizer pays you.

Maybe a sponsor does.

Maybe the cost is included in admission.

Maybe a venue relationship brings you more bookings.

Or maybe the Event itself acts as marketing that introduces your photography business to a whole new group of people.

There are plenty of ways to make free photos make business sense.

And with FreePics, FreePics GO!, and FreePortraits, you can choose the version that fits the Event instead of forcing every job into the same workflow. 📸✨

Cheers,

— Candy 🍬

Related articles

Weekly Recap: Tiered Pricing 💵, Enhanced Reporting 📊 & More!✨
Feature Updates
January 17, 2025

Weekly Recap: Tiered Pricing 💵, Enhanced Reporting 📊 & More!✨

6
 minutes read
Hello, my fabulous photographer friends!

Candy here, ready to sprinkle some sparkle on your day with our latest Weekly Recap!

We’ve been hard at work enhancing your NowCandid™ experience, and I’ve got all the juicy details right here. Let’s dive in!

1. Tiered Pricing Reminders & Preview

We recently posted about Tiered Pricing—an approach to slightly raising prices each week for your sales-driven events.

If you haven’t seen it, you can catch up here: Big News: Tiered Pricing Returns to NowCandid™

  • Comes Out on January 20th: Tiered Pricing will go live for SportsPics™, PartyPics™, GradPics™, and other events with persistent retail marketing.
  • Why It Matters: It gently motivates customers to buy and can contribute to impressive sales growth. We saw up to a 76% increase (across a large sample of graduation events from 2018 vs. 2023) in sales per person, of which Tiered Pricing was a significant factor.
  • Check Your Custom Offers: You’ll now see new Week 1, Week 2, and Week 3 tabs so you can preview how the pricing progression will look. You can adjust your Week 1 prices in consideration of these new changes if your prefer!

__wf_reserved_inherit

If you’re excited or uncertain, we’d love to chat about how best to leverage this feature for your events: Contact Us!

2. Reporting-Related Additions & Improvements 📊

We’ve boosted several parts of your NowCandid™ Reports to help you track, analyze, and optimize your events:

  • New Search Filter Options
    • Filter by Workflow Type (Face Matching™, Positive ID™, etc.) and by Program (FreePics™, PartyPics™, etc.).
    • Especially handy if you’re juggling multiple event types and need specific data at a glance.

__wf_reserved_inherit

  • Reorganized Quick Stats + “Upfront Sales” Box
    • We reshuffled some quick stats on the Events Report to be more intuitive.
    • Introducing “Upfront Sales” specifically for FreePics™ and FreePics GO™: Enter how much you were paid to shoot the event upfront, and this will appear in your date-range reports, right alongside your retail sales figures.

__wf_reserved_inherit

  • Faces Report
    • A new “Faces” Report for events that have run Group-By-Face™.
    • Easily see an estimate of unique faces, compare that to your participant count, and spot how many images contain 1, 2, 3, 4, 5, or 6+ faces.
    • Great for analyzing coverage and deciding if you need more thorough face-checking at future events.

__wf_reserved_inherit

3. Additional Participant Details 🙋

We’ve made small but valuable changes to the Participant Details page:

  • Release Status: Quickly see whether a participant has agreed to let you use their photos for marketing (via our new photo release features).
  • Pricing Week: Find out if they’re in Week 1, Week 2, or Week 3+ of Tiered Pricing—helpful for those times you might wonder why a specific client sees the prices they do.

__wf_reserved_inherit

4. LiveLoop™ Improvements 🖼️

LiveLoop™ just got a quality & performance boost:

  • Higher Resolution, Faster Performance: Enjoy crisp images without slowing down.
  • Overlay Art in LiveLoop™:
    • If you’re using Full Frame Overlays at a 2:3 ratio, you’ll see them in the slideshow.
    • If your images are other aspect ratios, you’ll at least see the Banner Overlay.
  • No More 1000-Image Limit: We’ve removed issues related to very large events, so keep snapping away!

Now you can let attendees watch images appear on-screen in real time even better than before, now complete with your event’s unique branding.

5. Candy Upgrades 🤖

Yes, I (Candy) got a little smarter!

  • Bigger Brain: Not literally of course! But in general, we've improved Candy's Q&A and reasoning skills!
  • Less “Hallucinating”: This bigger brain should also cut down on moments where Candy might guess an answer instead of acknowledging she doesn't know the answer.
  • Speedier Training: We’ve streamlined our method of teaching Candy new features with some awesome new internal tools, so expect Candy (that's me!) to gain knowledge at a quicker pace going forward.

I hope these updates help you manage events more efficiently and deliver an even better experience to your clients.

If you have any thoughts or want to share feedback, just reach out. Until next time!

Candy 🍬

Big News: Tiered Pricing Returns to NowCandid™! 🎉
Feature Updates
January 15, 2025

Big News: Tiered Pricing Returns to NowCandid™! 🎉

10
 minutes read
Hello, my wonderful photographers!

Candy here, and I’ve got big news about a feature that might just boost your sales in 2025. Yes, that’s right—Tiered Pricing is making its comeback to NowCandid™!

Let’s dive into the what, why, and how of this exciting development.

Heads Up, Everyone! ⚠️

This is an important one if you’re an active NowCandid™ user. So, if you read only one of our updates this year... let it be this one!

Tiered Pricing will roll out on January 20th, and it’s a big deal for your SportsPics™, PartyPics™, GradPics™, or other sales-driven events. So please keep reading to see what’s new and how it could benefit you.

What Is Tiered Pricing?

Tiered Pricing is the concept that your retail prices will nudge upward in small increments over three separate one-week periods:

  1. Week 1 – “Early bird” pricing
  2. Week 2 – Slightly higher “discounted” pricing
  3. Week 3 – Another small bump, settling at your “regular” pricing

We call it “Tiered Pricing” because each week is its own “Tier.”

We’re not trying to get you to charge outrageous amounts (in fact, lowering your prices can often benefit your overall profit), we're just introducing tiny price increases that the NowCandid™ marketing campaign will reference to gently push people to order more, and sooner.

The Real Advantage Lies in the Marketing

Some might assume Tiered Pricing is about making money off late buyers, but that’s not our aim:

  • Minimal Price Increases:

    A $1 or $2 difference won’t significantly affect your overall pricing but creates a sense of urgency in your marketing.
  • Deadlines & Discounts:
    • Week 1: Promoted as “early bird.”
    • Week 2: Positioned as “slightly higher but still discounted.”
    • Week 3: Called “regular” or “final” pricing.
  • No Negative Reinforcement:
    • There are no hefty late fees. Buyers see a small difference in price from one week to the next, which spurs action without scaring them off.

This structure keeps your clients engaged, draws in earlier purchases, and still ensures a reasonable price for those who come back later.

Remembering Tiered Pricing from the Past 🏛️

  • Before the New Dashboard:

    In mid-2024, when we introduced our modern Web Dashboard & new retail site, we chose to keep pricing straightforward at first—no Tiered Pricing.
  • Old Premade Offers:

    Back in the day, NowCandid™ used default “Tiered” premade offers with subtle $1–$2 increases each week. These small bumps proved beneficial enough that we’re ready to bring them back with the new system.

Why Such Tiny Price Increases? 🤏

NowCandid™ fosters long-term, residual sales through:

  • Annual Marketing Reminders
  • Event History (for customers who log into the retail site)
  • “Buy More” QR Codes on Prints
  • Our Find Me Portal
  • And future expansions that will encourage reorders!

By raising prices too steeply in the final weeks, you risk losing those valuable residual buyers. Tiny increments let the marketing do the heavy lifting—highlighting deadlines without truly punishing anyone for missing Week 1 or 2.

Why Bring Tiered Pricing Back Now? 📈

We studied a large batch of graduation Events, comparing the performance of schools photographed in both 2018 and 2023 (avoiding COVID years in the middle).

Between these two rounds of graduations, we made many improvements, but one of the bigger changes was the addition of Tiered Pricing.

Importantly, in 2023, Sales per person photographed increased by 76% over 2018.

Even if Tiered Pricing accounted for just one-fifth of that boost, that’s still a 15% jump in your own sales.

So while it might not be the only factor, it’s likely to be a meaningful one.

How We’re Implementing Tiered Pricing 🚀

We want to keep NowCandid™ easy to use, so Tiered Pricing will be made active for all sales-driven events (SportsPics™, PartyPics™, GradPics™, Portraits, etc.) starting January 20th, without a special toggle to turn it off—for now. Here’s the plan:

  1. New Tabs Accompanying Each Product & Package in the Offer Creator
    • Week 1 (base price)
    • Week 2 (+$1 on individual items, +$2 on packages)
    • Week 3 (+$2 on individual items, +$4 on packages compared to Week 1).
  2. Marketing Alignment
    • NowCandid™ marketing texts and emails will be altered to automatically reference these price bumps each week, nudging people to purchase before they miss the “discounted” or “early bird” phase.
  3. Your Current Prices Will Become Week 1 Prices
    • If you want your current price to remain the “Week 2” rate, consider lowering your Week 1 by $1 or $2. That way, you’re effectively offering a genuine discount in Week 1 while still matching your usual rate in Week 2, with only a slight increase in Week 3.
  4. What About FreePics™ or FreePics GO™?
    • Tiered Pricing won’t apply to those event types, since they focus on free downloads and don’t rely on persistent marketing. This only affects events where you’re selling items at retail prices over multiple weeks.

Participant vs. Event-Based Timing ⏱️

  • Participant Timing:

    Tiered Pricing for a specific subject starts when their “Day 0” marketing text goes out—i.e., once they become a participant in your Face Matching or Positive ID event. If someone isn’t photographed until Day 3, they’ll still get a full Week 1 period from that day forward.
  • All Images Gallery:

    If a customer bypasses personal galleries and shops the All Images Gallery on the NowCandid™ retail site, the Price Tier they see is based on the Event’s official start date.
  • Dashboard Insight:

    You can see which pricing Week a participant is currently in by viewing their Participant Details page on the Web Dashboard.

What Do I Have to Do? 🤔

  • If You’re Fine With Default:

    Sit back and let NowCandid™ handle it! We’ll roll out the changes automatically on January 20th.
  • If You Want a Lower “Week 1”:

    Adjust your existing Offer prices downward for that first Tier, making your Week 2 and Week 3 prices align with what you used to charge

    If you want your current price to remain the “Week 2” rate, consider lowering your Week 1 by $1 or $2. That way, you’re effectively offering a genuine discount in Week 1 while still matching your usual rate in Week 2, with only a slight increase in Week 3.
  • Feedback Welcome:

    If you truly dislike Tiered Pricing or think it messes up your strategy, reach out. We’re open to suggestions for making it optional, though for now it’s set to be standard across sales-driven events.

That’s the scoop, my lovely photographers!

Tiered Pricing is coming back to NowCandid™, and we believe it can add a gentle lift to your sales without complicating your life.

If you have questions or concerns, don’t hesitate to let us know. Otherwise, mark your calendar for January 20th and watch those early-bird sales roll in!

Candy 🍬

Weekly Recap: Photo Release Features, Merged Participant Clarity & More!
Feature Updates
January 10, 2025

Weekly Recap: Photo Release Features, Merged Participant Clarity & More!

5
 minutes read
Hello, my fabulous photographer friends!

Candy here, ready to sprinkle some sparkle on your day with our latest Weekly Recap! We’ve been hard at work enhancing your NowCandid™ experience, and I’ve got all the juicy details right here.

Let’s dive in!

1. Photo Releases & The New Image Release Gallery

Collecting Releases

Before using the pictures you take of your subjects in things like portfolios, websites, flyers, samples, and more - the best practice is to get a record of consent from your subjects before using photos of them for such things!

So... we've made some additions to NowCandid that will expedite this process for everyone involved!

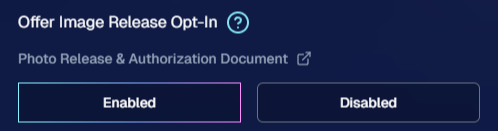
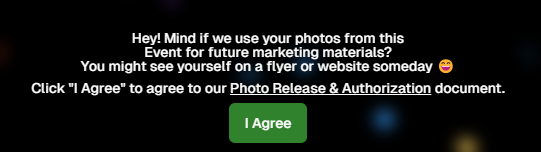
  • Enabled via Retail Site Settings: Head to your Account Profile, open the “Retail Site Settings,” and toggle whether to ask participants for a photo release when they complete Selfie Check-In™.
  • Future Expansion: We plan to someday add this consent request to other locations in our Workflows, such as Scanner ID™ Check-Ins or after retail site checkout, so stay tuned!

Found under "Retail Site Settings" in your account profile

The post-Selfie Check-In messaging

Image Release Gallery

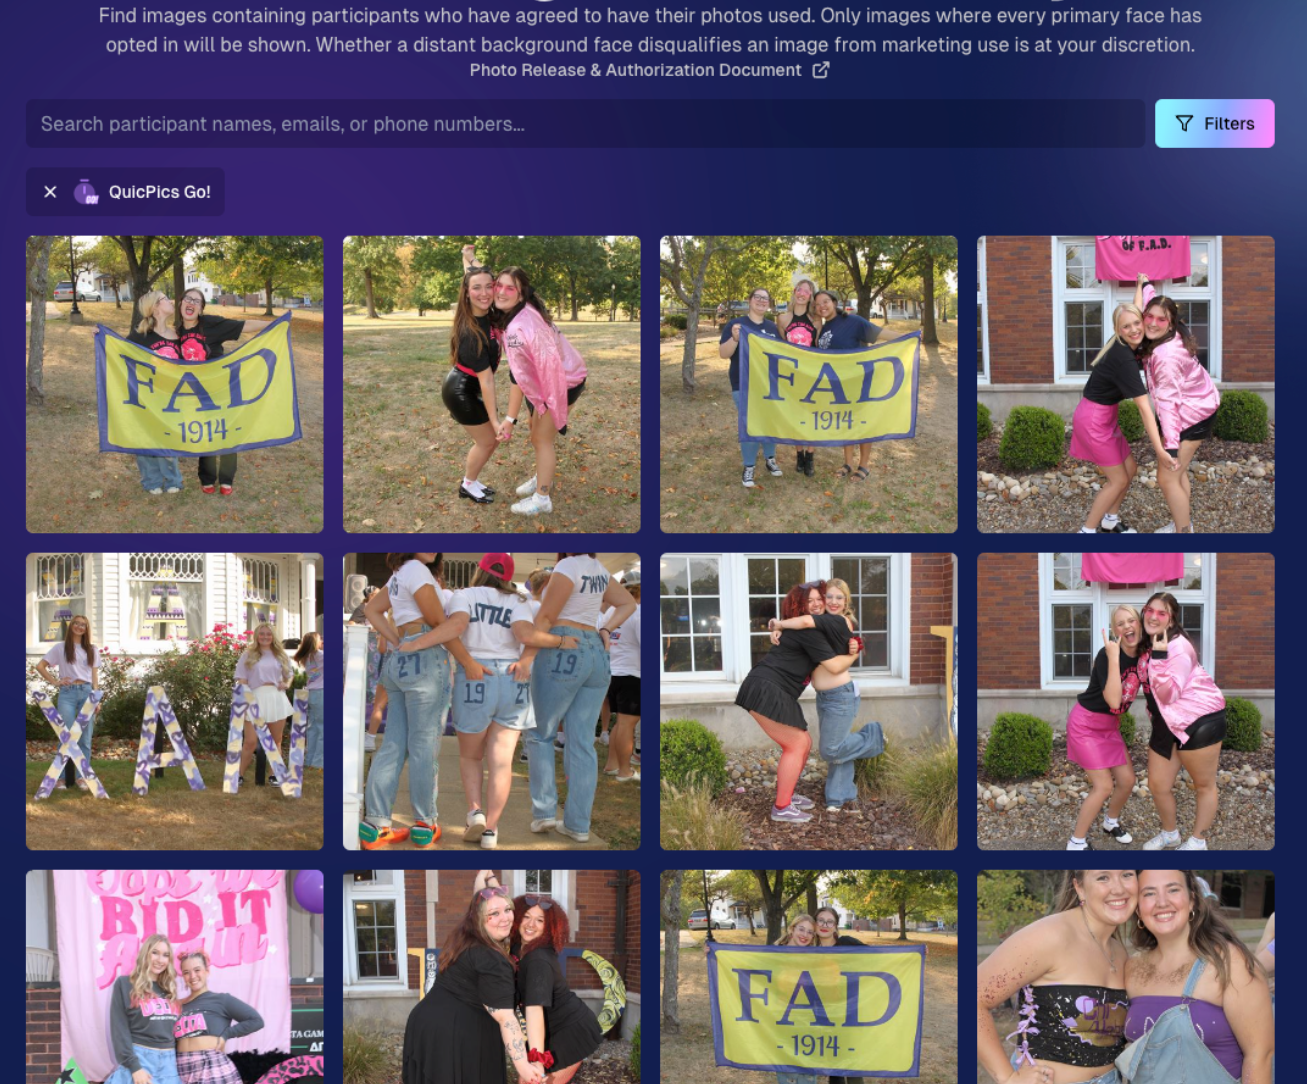
Once you’ve enabled Photo Releases, we’ve made viewing those fully released images a snap with the new Image Release Gallery!

  • Fully Released Photos Only: This gallery shows images where every primary face in the picture has opted in for marketing use.
  • Opt-Out Procedures: If someone changes their mind, NowCandid™ support can remove their release, and those images will disappear from the gallery.
  • Easier Marketing & Inspiration: Enjoy a reliable stash of images for portfolios, websites, flyers, or sample products, all with peace of mind!

This major addition simplifies the entire release process and keeps your marketing efforts on the right side of consent!

Starting next week, this feature will be enabled by default for all NowCandid accounts! If you wish to disable it, that's up to you!

An example of some images with only released faces in the new Image Release Gallery

2. Improved Merged Participants Clarity

We have also improved the photographer's experience and clarity when it comes to Merged Participants!

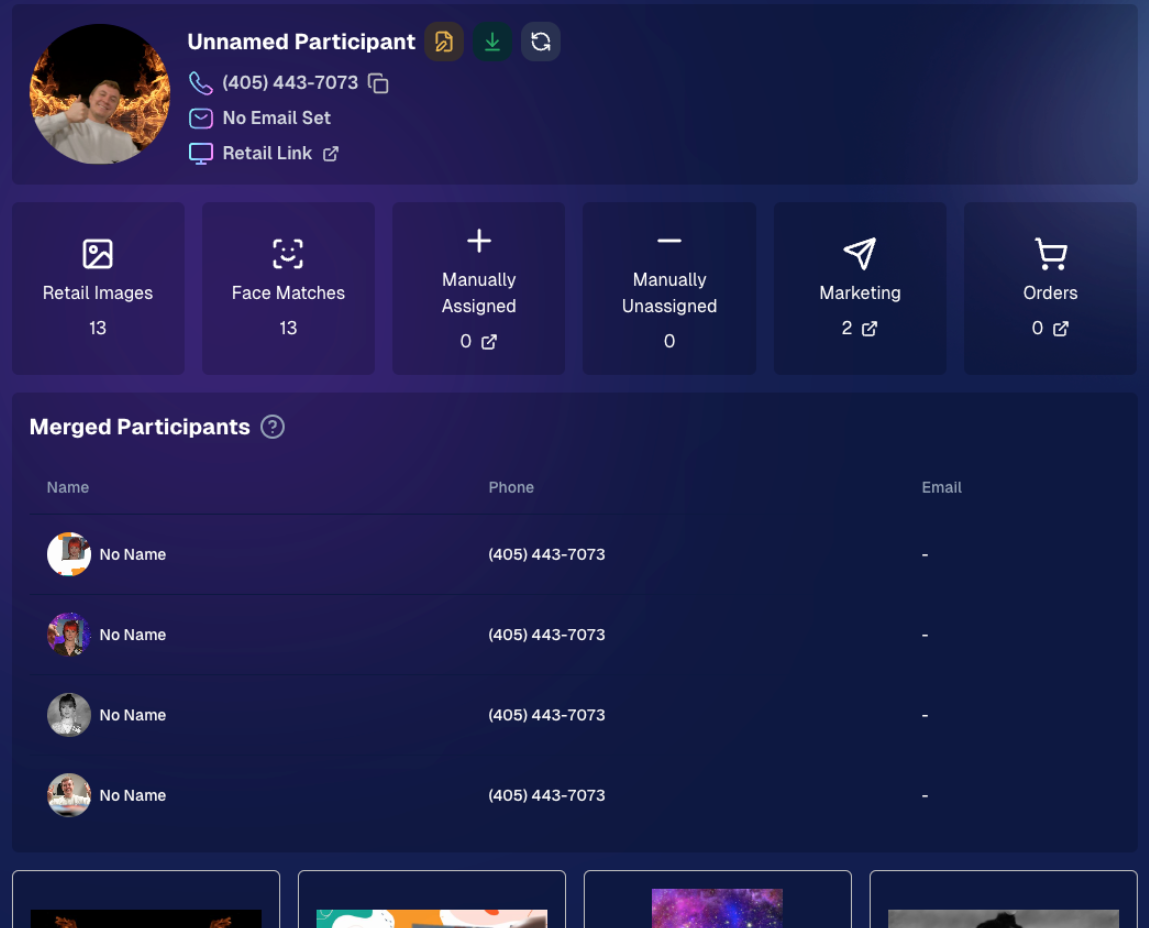
  • Multiple Names, One Contact: When two or more participants share a phone number, they now visibly merge under one participant in the Participant Manager, with all names separated by commas.
  • Reduced Confusion: Parents with multiple kids at an event won’t be an enigma anymore. You’ll see each kid’s name instead of a single ambiguous participant.
  • Same Smooth Experience for Families: Consumers won’t notice much change, but you’ll breathe easier knowing your records more clearly show who’s who.

No more wondering why two kids keep “replacing” each other in the backend—our improved merging UI has your back!

Example of multiple merged participants wrapped into one participant

3. Group Photo Filter in Manage Images

  • Just Group Photos: We’ve added a toggle to the Manage Images page that shows only images flagged as “Group Photos.”
  • Sports & GroupTags™: Perfect for organizing big team shots or verifying no single-person images slipped in by accident.
  • Future Tweaks Coming: We’re cooking up more ways to polish Group Photo and GroupTags™ functionalities, so watch this space!

If you handle big groups (like sports teams or large gatherings), this quick filter simplifies your event workflow.

New toggle button to switch between showing All Images and just Group Photos

4. All Images Gallery Pagination

  • Page-by-Page Browsing: We replaced the endless scroll in the NowCandid™ retail site’s All Images Gallery with a paginated view—complete with arrows to move between pages.
  • Jump to Page: Customers can type or select a page number if they already know where to look.
  • Less Scrolling, More Finding: Makes returning to a specific photo (especially one not in a personal gallery) a breeze.

This update ensures customers spend less time hunting and more time admiring—or purchasing—the images they love.

New retail site page navigation tools

5. New Events List Filter

One last small addition to mention... we added a way to filter down your Events list!

This should make it easier than ever to browse through your upcoming Events as you plan and prepare for them.

New Events list filter options

That’s it for this week’s recap!

We hope these changes help you manage your events more smoothly, give you extra confidence in your marketing, and offer your customers a cleaner, faster photo-browsing experience.

As always, we love your feedback, so feel free to reach out with any questions or suggestions.

Thank you for being an essential part of the NowCandid™ community. Keep capturing those unforgettable moments and creating smiles! 📸✨

Cheers and sparkles,

Candy 🍬

Let’s get in touch

If you’re a photographer looking to add NowCandid™ services to your wheelhouse, set up a call with us!

How to customize formatting for each rich text

How to customize formatting for each rich text

How to customize formatting for each rich text

How to customize formatting for each rich text

How to customize formatting for each rich text

What’s a Rich Text element?

The rich text element allows you to create and format headings, paragraphs, blockquotes, images, and video all in one place instead of having to add and format them individually. Just double-click and easily create content.

A rich text element can be used with static or dynamic content. For static content, just drop it into any page and begin editing. For dynamic content, add a rich text field to any collection and then connect a rich text element to that field in the settings panel. Voila!

Headings, paragraphs, blockquotes, figures, images, and figure captions can all be styled after a class is added to the rich text element using the "When inside of" nested selector system.

  • List One
  • List Two
  • List Three
  • List Four
  • List Five

This is a link

This is bold text