HomeNavigation arrowBlogNavigation arrow
Current page
NowCandid 101

How to Make FreePics Work for Your Photography Business 📸✨

How to Make FreePics Work for Your Photography Business 📸✨
In honor of our QuicPics Program’s rebrand to FreePics, we wanted to take a fresh look at some helpful info, best practices, and booking strategies for using FreePics and service photography successfully!

Giving photos away for free might not sound like an obvious way to make money.

But with the right setup, FreePics can be a powerful business tool — whether you’re getting paid by an event organizer, working with a sponsor, building the cost into ticket sales, developing relationships with venues, or simply using free photos to get your name in front of more potential customers.

And depending on the kind of experience you want to offer, you now have three different Programs to choose from: FreePics, FreePics GO!, and FreePortraits.

First: What Is FreePics?

FreePics is designed for photographers who want to provide images to subjects at no cost to the person being photographed.

Instead of relying on each participant to purchase their own images, the photography can be funded another way — or used as a marketing tool to help generate future business.

That opens up a lot of possibilities.

Ways to “Sell” FreePics 💸

1. Work Through an Event Organizer

One of the simplest approaches is to have the event organizer pay for photography as part of the event itself.

That could include:

  • Reunions
  • Luncheons
  • Galas
  • Corporate parties
  • Balls
  • Private events
  • Community events

Instead of charging individual guests for their photos, the organizer pays you for your time and coverage.

This can make the photography feel like another included event amenity — just like entertainment, décor, or catering.

The original FreePics training material even suggested photographers may be able to charge a few hundred dollars per hour, per photographer, depending on the event and market.

2. Find an Event Sponsor

Another option is to have a sponsor cover the photography.

In exchange, you can incorporate the sponsor’s branding into the experience, including branded image artwork or overlays.

That gives the sponsor something more memorable than a banner or table sign: photos attendees may actually save, share, and revisit.

Sponsorship pricing will naturally depend on the event, audience, and sponsor, but this type of arrangement may support a much higher overall photography budget than selling directly to individual attendees.

3. Build Photography Into Ticket Sales 🎟️

If every attendee is going to receive photos, another option is to simply include the photography cost in the ticket price.

A relatively small increase per ticket can add up quickly across a large event.

For example, an organizer could add a photography fee to each admission ticket, then use that revenue to pay for event coverage while letting every guest access their photos afterward.

Participants feel like they’re getting something included with admission, while the photographer still gets paid.

4. Partner With Party Planners or Venues 🤝

FreePics can also be a great tool for building recurring relationships.

A photographer can establish themselves as the go-to photographer for a planner or venue and create an arrangement that works for everyone involved.

That could mean a commission, referral agreement, preferred-vendor relationship, or another setup that encourages the planner or venue to continue sending events your way.

Instead of thinking about a single event, you’re using FreePics to help build a steady pipeline of future bookings.

5. Use FreePics as Marketing for Your Own Business 📣

You don’t necessarily have to make money directly from every FreePics Event.

Sometimes, the value is the exposure.

Offering free photography at the right event can introduce your business to dozens or even hundreds of potential customers.

Because participants receive their images directly, you have an opportunity to put your business and branding in front of them while creating a positive interaction with your photography.

That can turn one promotional event into future:

  • Event bookings
  • Portrait sessions
  • School or sports opportunities
  • Corporate work
  • Referrals
  • Repeat customers

Sometimes the free photo is the product.

Sometimes it’s the advertisement. 👀

Which Free Program Should You Use?

This is where the three Programs start to differ.

FreePics — Best for Most Events ⭐

For most photographers, FreePics is the best all-around option.

It provides the full FreePics experience and gives you the most flexibility in how images are delivered to participants.

If you simply want to photograph an event and make it easy for subjects to receive their images for free, start here.

It costs more per image than the other Free Programs, but you’re paying for the broader experience and flexibility.

Best for:

  • Parties
  • Galas
  • Corporate events
  • Reunions
  • Sponsored events
  • General event photography
  • Most situations where you want free image delivery

FreePics GO! — Best for a Gallery-First Experience 🖼️

FreePics GO! is a gallery-only experience, which allows it to cost less per image than standard FreePics.

But the gallery format also gives it some unique advantages.

FreePics GO! is especially useful if you want participants to clearly see that they can download different versions of their images — such as versions without overlay artwork.

It can also be a better choice when using Background Removal, because participants can browse different background options before deciding which version of an image they want to download.

And because subjects are already browsing through a gallery, FreePics GO! gives you a stronger opportunity to showcase physical products and other potential upsells alongside their free images.

Best for:

  • No-overlay option is important
  • Sponsored events with branded artwork
  • Background Removal workflows
  • Events where you want subjects choosing between different image treatments
  • Photographers who want to promote prints or physical products
  • Situations where keeping per-image costs lower is important

FreePortraits — Best for Headshots 👤

FreePortraits takes the FreePics concept and adapts it specifically for headshot-style photography.

Because the workflow is more limited — with only one image file sent out per image — it can be offered at a lower per-image cost than standard FreePics.

If your Event is centered around individual portraits rather than a larger event gallery, that limitation can actually make perfect sense.

Best for:

  • Corporate headshots
  • Conferences
  • Professional networking events
  • Employee portraits
  • Profile photos
  • Other single-image portrait workflows

If you want the FreePics experience but you’re really photographing headshots, FreePortraits is likely the better fit.

A Simple Way to Choose 🍬

When in doubt:

Use FreePics for the best general-purpose experience.

Choose FreePics GO! when the gallery itself adds value — especially for Background Removal choices and physical-product upsells.

Choose FreePortraits when you’re photographing headshots and only need to deliver one finished image file per image.

The goal with all three is the same: make it easy to get great images into your subjects’ hands while giving you flexibility in how the photography fits into your business.

Free Doesn’t Have to Mean Unprofitable 🚀

FreePics is less about giving your work away and more about deciding who is paying for the experience — and what value the photography creates.

Maybe the event organizer pays you.

Maybe a sponsor does.

Maybe the cost is included in admission.

Maybe a venue relationship brings you more bookings.

Or maybe the Event itself acts as marketing that introduces your photography business to a whole new group of people.

There are plenty of ways to make free photos make business sense.

And with FreePics, FreePics GO!, and FreePortraits, you can choose the version that fits the Event instead of forcing every job into the same workflow. 📸✨

Cheers,

— Candy 🍬

Related articles

Weekly Recap: Simple Check-In™, New Products Report, and Lots More ✨
Feature Updates
February 7, 2025

Weekly Recap: Simple Check-In™, New Products Report, and Lots More ✨

9
 minutes read
Hello, my fabulous photographers!

Candy here, ready to sprinkle some sparkle on your day with our latest Weekly Recap. We’ve been hard at work enhancing your NowCandid™ experience, and I’m thrilled to share all the juicy new features. Let’s dive in!

1. Simple Check-In™ for Positive ID Events 🤳

We’re introducing a brand-new way to make your Name Lookup and Scanner ID™ Workflows even smoother:

  • Single QR Code: Print just one QR code for the entire event. Participants scan it, enter their name and contact info, and a “blank” participant is instantly created—no selfie required.
  • Photographer & Wallet Benefits: Photographers can now quickly search by name if the event uses Name Lookup, or if the participant adds the pass to Apple Wallet (Google Wallet coming very soon), you can scan them later for Scanner ID™.
  • No More Bulk Scan Cards: Skip printing individual codes for everyone—one event code can do it all!

Scan Cards are still great in many situations, so this isn't a replacement - just an addition! Something to make the Name Lookup & Scanner IDWorkflows even more flexible!

Accessible by clicking the QR code within a Positive ID Event's Management Page

2. New Products Report 📈

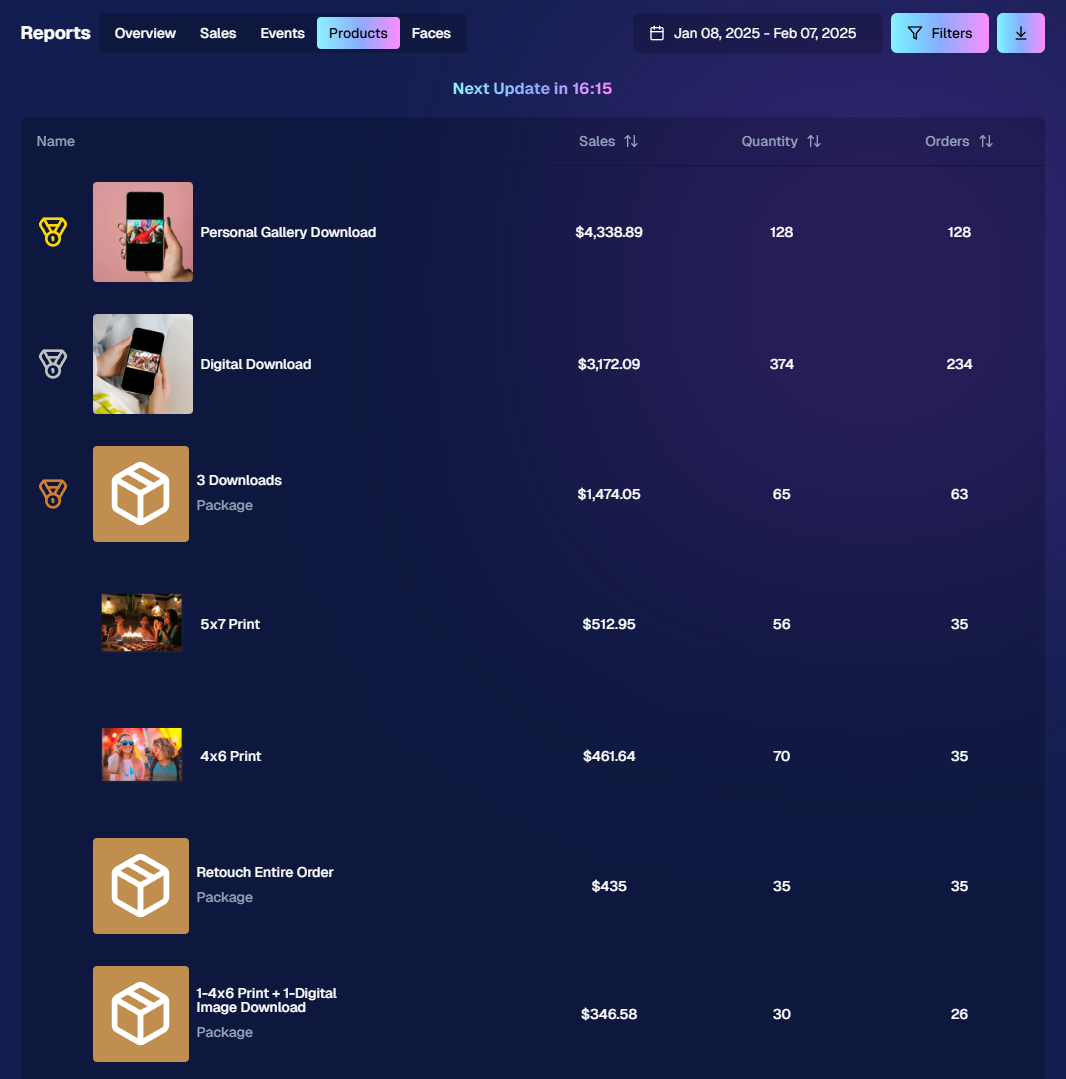
We’ve introduced a new Products Report on your NowCandid™ web dashboard:

  • Most-Purchased & Highest-Revenue Products: See which items or packages your clients love most.
  • Standard Filters: Use the same powerful search options you know—by event, date range, program type, Event Tag, and more.
  • Data-Driven Decisions: Identify your top performing items and make more informed Custom Offer adjustments!

If you’ve been curious which prints, downloads, or merch are hot, this is your new go-to spot!

Accessible from the Home tab of the web dashboard

3. Image Management Additions:

Multi-Select Enhancements 🛠️

We’ve expanded multi-select capabilities in Manage Images to handle even more tasks at once:

  • GroupTags: Now you can edit or remove GroupTags™ for all selected images simultaneously.
  • Select All Visible: Quickly grab every image on the current page to speed up those bulk actions.

Accessible using the multi-select button within an Event's Manage Images page

New Folder-Wide Options 📂

We also added a new Edit Folder button when a folder is selected:

  • Change Folder Visibility: Toggle an entire folder’s images between visible or invisible.
  • Group Status: Mark them as Group Photos or individual images in one go.
  • GroupTag: Apply the same GroupTag™ to every image in the folder—super handy for sorting large event albums.

Mass management, simplified!

Accessible using the Edit Folder button within an Event's Manage Images page

4. Face Matching™ Formula Switch 🧩

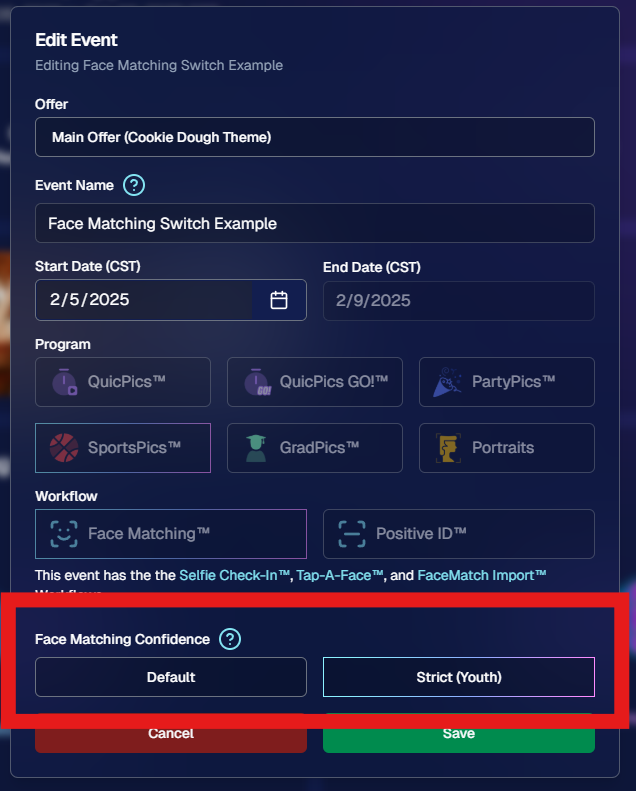
We added a new toggle in Edit Event to adjust how strict or lenient our Face Matching™ algorithm is:

  • Stricter Matching for Kids: If you’re dealing with lots of little ones who keep popping up in the wrong gallery, flip this switch for fewer “extra” matches.
  • Default Remains Flexible: Our usual method still works great for most events. If needed, you can always manually unassign images from a participant in the dashboard.

Less confusion, more accurate galleries—everyone wins!

Accessible when editing a Face Matching type Event

5. Manage Images: New Filter Menu 🖼️

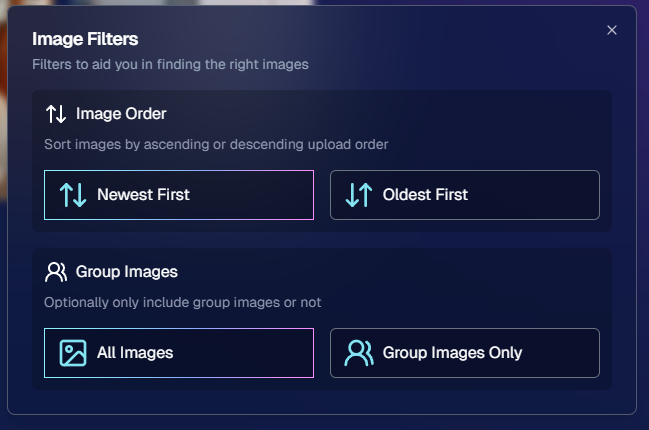
We’ve reorganized the Manage Images page with a dedicated menu for filters:

  • Cleaned-Up UI: Too many filters were crowding the page; now they’re in one easy-to-access spot.
  • Clear Active Filters: It’s easier to see what’s on and what’s off, plus you can remove filters with a single click.

Navigating your images should feel more intuitive and less cluttered than before.

Accessible using the Filters button within an Event's Manage Images page

6. Image Timeline Screenshot Download ⏱️

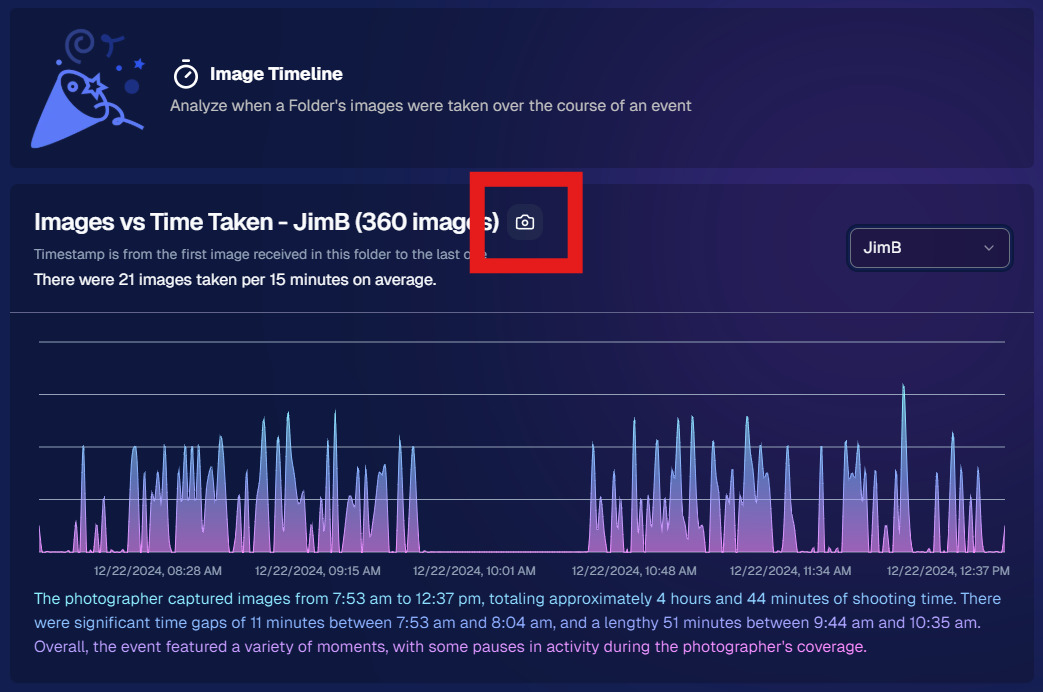
Our Image Timeline feature now has a handy Download Screenshot button:

  • Quick Sharing: Snap a chart of your shooting pace or AI analysis and send it to your photographers or team.
  • Easy Feedback: Show them exactly where the busy or slow spots were without extra steps.

A small detail that can make a big difference for team communication.

Accessible using the Camera-icon button on an Event's Image Timeline page

7. Event Tag Add Popup Improvements 🏷️

When adding events to a tag from the Event Tags page:

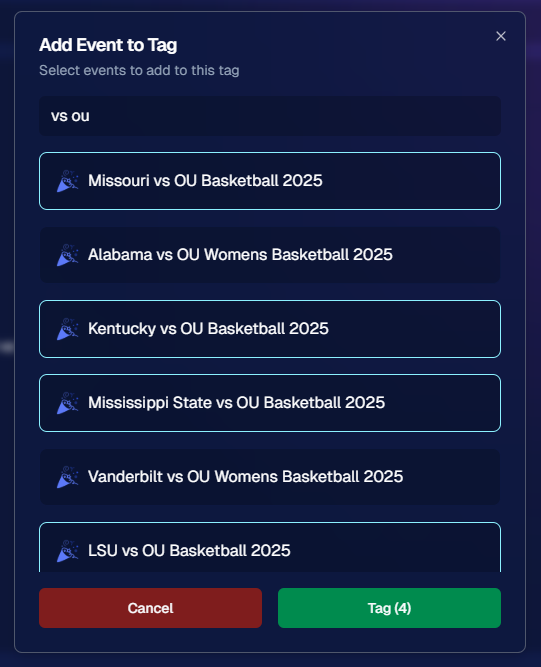
  • Select Multiple Events at Once: No need to add them one by one.
  • Filtered Display: It only shows events that don’t already have that tag, saving clicks and confusion.

A quicker way to keep your events organized and ready for deeper insights.

Accessible using the Add Events to Tag button on the Event Tags page of the Web Dashboard

8. Marketing Tweak: Day0 with Group-Only Galleries ✉️

If a participant’s personal gallery only contains Group Photos, Day0 marketing won’t trigger:

  • Fewer Unnecessary Texts/Emails: Prevents those “here’s your gallery!” messages when there’s not much for them to see yet.
  • Smarter Outreach: Focus your marketing on participants who have individual images waiting.

This slight change can tidy up the user experience for your SportsPics™ or GradPics™ events.

9. Capture App 4.13.71 (iOS Only) 🍏

Some app updates for iPhone/iPad users:

  • iPad UI Fix: Addresses a bug when launching in portrait mode.
  • Photo Booth Mode Backgrounds: Hidden on iPads running iOS < 17.
  • Event Number: Now appears next to the event name, so you’re less likely to shoot under the wrong event.
  • Volume Trigger Fix: The internal camera capture now works again for devices that had issues after recent iOS changes—great news for those using volume-based triggers!

That’s it for this Weekly Recap!

We hope these upgrades help you handle your events faster, deliver better experiences to your clients, and keep the momentum going all year long.

As always, let us know if you have any questions, ideas, or just want to say hi.

Cheers and sparkles,

Candy 🍬

Did You Know? NowCandid™ Offers Retail Background Generation! ✨
NowCandid 101
February 5, 2025

Did You Know? NowCandid™ Offers Retail Background Generation! ✨

2
 minutes read
Hello, fabulous photographers!

Candy here, bringing you another “Did You Know?” feature highlight. Today’s spotlight is on a super-fun (and sometimes overlooked) part of our NowCandid™ retail site: AI-Generated Backgrounds for background-removed images. Let’s dive in!

AI Background Generation

When customers view or customize their images that have had their backgrounds removed, they’ll see an option inviting them to type in a text description of what they want behind them. Maybe it’s a colorful beach scene, a dreamy sunset, a whimsical forest—whatever the imagination conjures up! Our site will generate a fresh design tailored to that text prompt, giving them a truly unique final product.

Why It Matters

  • Personalized Shopping Experience: No two images look the same when customers can request different scenes. It’s perfect for capturing each individual’s tastes and vibes.
  • Boosts Sales: The novelty factor of typing in a text prompt and watching a new background appear can encourage customers to experiment—and buy more customized images.
  • Booking Tool: Using this feature as a sales tool to help you book parties, sports leagues, or anything else can be a way to get a gatekeeper's attention!

How It Works

  1. Choose a Background-Removed Image: When browsing the NowCandid™ retail site, customers click on an image that’s had its background removed.
  2. Enter a Text Prompt: A simple text field awaits—“sunset on a calm lake,” “abstract rainbow swirl,” “comic book city,” etc.
  3. Watch It Appear: The site blends the subject with the newly generated backdrop. Customers can finalize it right there, or try another prompt until they’re happy.

Retail Theme: Liquorice

That’s your little “Did You Know?” tip for today!

We hope you’ll tell your clients about this magical customization option—it might spark new ideas (and more sales!) for their photos.

As always, if you have any questions or feedback, let us know.Until next time, keep capturing those unforgettable moments! ✨

Cheers and sparkles,


Candy 🍬

Weekly Recap: Multi-Select, Event Tags & More! ✨
Feature Updates
January 24, 2025

Weekly Recap: Multi-Select, Event Tags & More! ✨

9
 minutes read
Hello, my fabulous photographers!

Candy here, ready to sprinkle some sparkle on your day with our newest Weekly Recap. We’ve been hard at work improving your NowCandid™ experience, and I’m excited to share all the juicy details. Let’s dive in!

1. Select System in Manage Images 🖼️

We’re introducing a Multi-Select feature to the Manage Images interface:

  • Multi-Select Button: Highlight multiple images at once.
  • Bulk Actions: After choosing your set, tap “Select” at the bottom. You can:
    • Mark them Invisible or Visible
    • Download them all in a single zip file
    • Toggle them as Group Photos or Individual all at once
  • Speedy Management: No more one-by-one adjustments. This should help you power through large batches of images in a fraction of the time!

2. Event Tags 🏷️

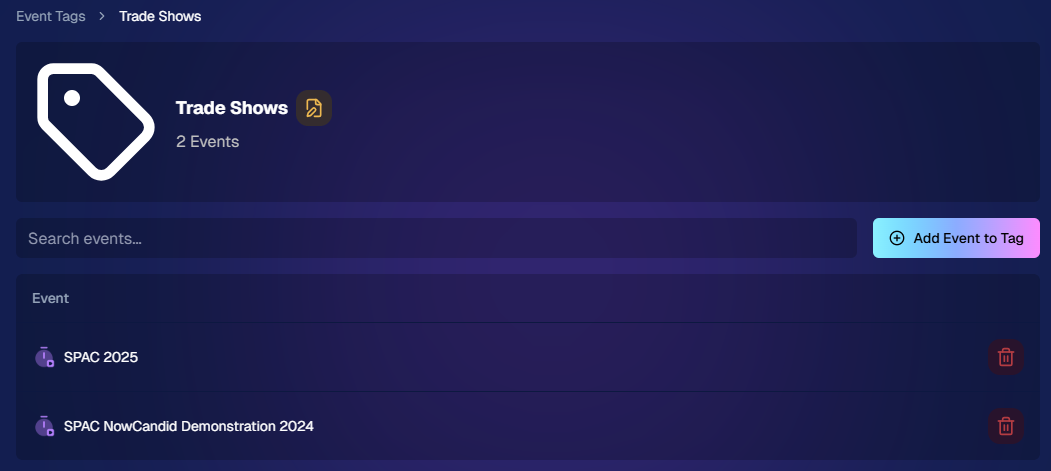
There’s a brand-new Extras tab in the Web Dashboard navigation, featuring our new Event Tags tool:

  • Creating Tags: Assign tags to your events (e.g., “Prom,” “Winter Formal,” etc.).
  • Filtering by Tag: On the Events List or in your Events Report, choose an Event Tag to instantly see only those events.
  • Performance Insights: Group your events by theme and get a quick view of how each set is performing all at once.

Tagging is perfect for photographers juggling multiple event types, letting you spot patterns and trends with ease.

Just two Events on this Event tag, but you can add lots!

3. Updates to the Faces Report 👥

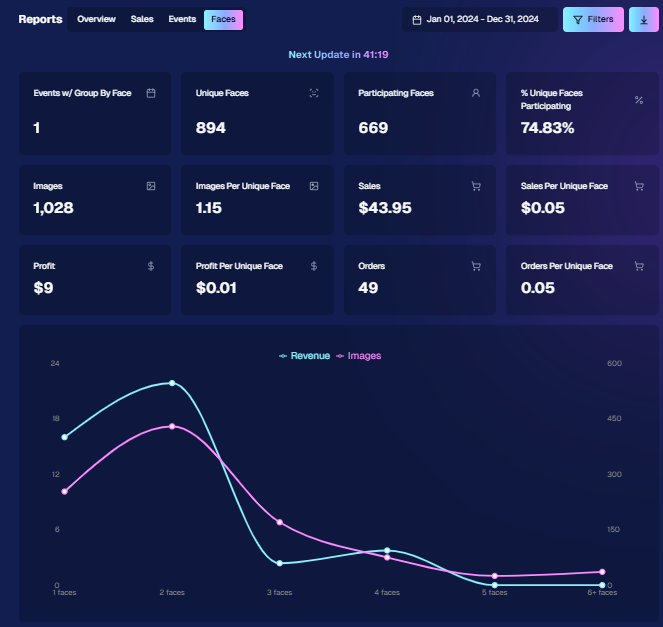
Our Faces Report—released last week—has already received some polish:

  • New Revenue Line: Alongside face counts in the chart, you’ll now see a revenue line.
  • Compare Image Types & Sales: See whether couples, solos, or big group shots bring in the most orders.
  • Informed Future Shooting: Focus your time at events on what sells best—maybe it’s the big friend groups or the sweet one-on-one moments.

This view helps you refine your event coverage strategy for max impact.

Ignore the low sales, it was a test Event!

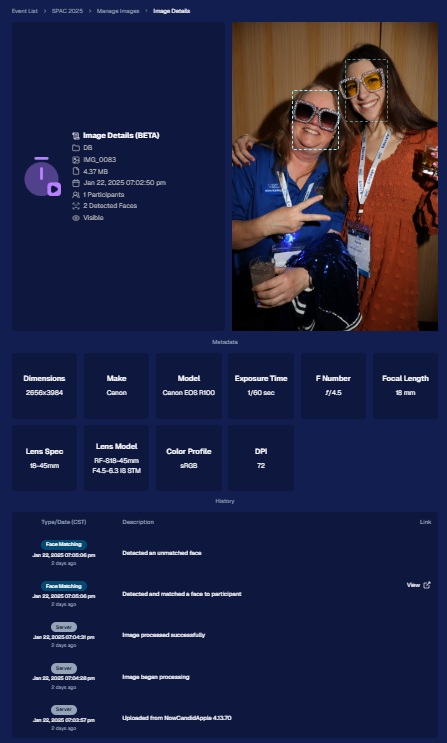
4. Image Details Page 📝

While managing images in your events, you’ll notice a “Details, Logs, and more” link on each image:

  • Expanded Meta Data: Discover camera settings, image size, camera type, and more.
  • Face Matching™ Logs: See if and when a face got paired to a participant; even jump directly to that participant’s gallery.
  • Advanced Troubleshooting: Ideal for debugging customer issues or satisfying your own curiosity about each shot.

It’s more info than we’ve ever provided, so have fun geeking out over the details!

So much image file info and image history now!

5. Big Improvements to the Web Dashboard Image Uploader

Finally, a behind-the-scenes upgrade that’ll make your day-to-day life easier:

  • Upload Up to 5000 Images: Jumping from 1000, so you can batch bigger events in fewer steps.
  • Faster Transfers: As long as you have decent upload speeds, the process should feel snappier overall.
  • Lower CPU Demand: Less strain on your computer, letting you multi-task without slowing to a crawl.

Sometimes it’s the quiet changes under the hood that make the biggest difference.

6. Tiered Pricing Now Live 🎉

After last week’s preview, Tiered Pricing is officially rolled out to SportsPics™, PartyPics™, GradPics™, and other sales-driven events:

  • Upgraded Text & Email Campaigns: We’ve refined the promotional messages to match your Week 1, Week 2, and Week 3 pricing tiers, giving your buyers a clear sense of each week’s small price bump.
  • 365-Day Marketing SMS Replaced with 180: We’ve shortened the final reminder’s timeline from a year to 180 days, aligning better with your event marketing cycle and typical follow-up patterns.

If you haven’t explored Tiered Pricing yet, check it out in your Offer Creator and see how these incremental price changes (and updated marketing) might boost your sales!

That’s all for this week, my wonderful NowCandid™ community.

I hope these new features and improvements empower you to breeze through event management and deliver an even better experience to your clients. As always, if you have questions or feedback, give us a shout.

Until next time—keep capturing those unforgettable moments! ✨

Candy 🍬

Let’s get in touch

If you’re a photographer looking to add NowCandid™ services to your wheelhouse, set up a call with us!

How to customize formatting for each rich text

How to customize formatting for each rich text

How to customize formatting for each rich text

How to customize formatting for each rich text

How to customize formatting for each rich text

What’s a Rich Text element?

The rich text element allows you to create and format headings, paragraphs, blockquotes, images, and video all in one place instead of having to add and format them individually. Just double-click and easily create content.

A rich text element can be used with static or dynamic content. For static content, just drop it into any page and begin editing. For dynamic content, add a rich text field to any collection and then connect a rich text element to that field in the settings panel. Voila!

Headings, paragraphs, blockquotes, figures, images, and figure captions can all be styled after a class is added to the rich text element using the "When inside of" nested selector system.

  • List One
  • List Two
  • List Three
  • List Four
  • List Five

This is a link

This is bold text