HomeNavigation arrowBlogNavigation arrow
Current page
Feature Updates

Weekly Recap: More Virtual Group Control, New Sports Backgrounds & Better BGR Tools 🏈✨

Weekly Recap: More Virtual Group Control, New Sports Backgrounds & Better BGR Tools 🏈✨
Hey photo friends! 👋

Candy here with another weekly recap! This week brings more control to Virtual Group Builder, a much better home for Event Background Removal, new Candy Image Studio exposure tools, and—yes—27 new sports background sets. 😎

Let’s jump in!

🧑‍🤝‍🧑 Virtual Group Builder Additions

Ask and you shall receive... sometimes! We’ve gotten some good feedback on Virtual Group Builder, and this week several new controls are here to make layouts easier to fine-tune:

↕️ Force subjects onto different rows

  • While dragging a subject, new Add to Row buttons appear over the other rows. Drop the subject there to explicitly move them where you want instead of relying entirely on automatic placement.
  • Previously you were limited to automatically determined rows, you still have those but can now override them!

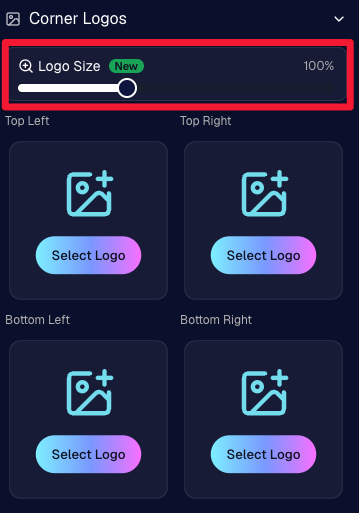
🔍 New logo size slider

  • Adjust your corner logos to be smaller or larger than the default.
  • Previously they could be considered a bit tiny, but this gives you a bit more control!

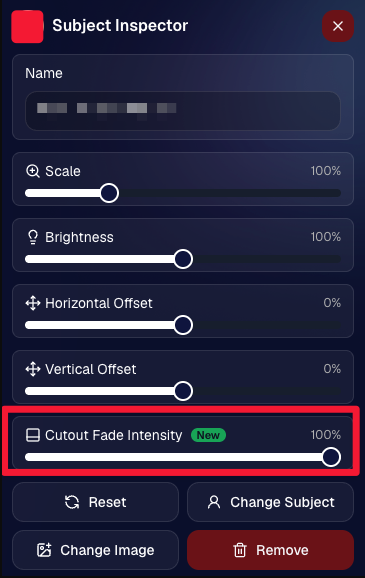
🌫️ Individual cutout fade control

  • The Subject Inspector now has its own cutout fade intensity slider, separate from the global setting, so you can fine-tune individual subjects when needed.
  • This will let you tweak the cutout fade intensity for subjects in the front row or on the sides of the virtual group, in case you're wanting a very specific look.

👥 Smarter merged-participant image selection

  • The Subject Image Picker will only show images from merged participants when they share the same name.
  • This typically does not matter, but in the case of a parent doing a Selfie Check-In of themselves and then of their child later, this will keep Virtual Groups working as expected!

Just a few additions, but very useful ones when you’re trying to get a Virtual Group looking just right!
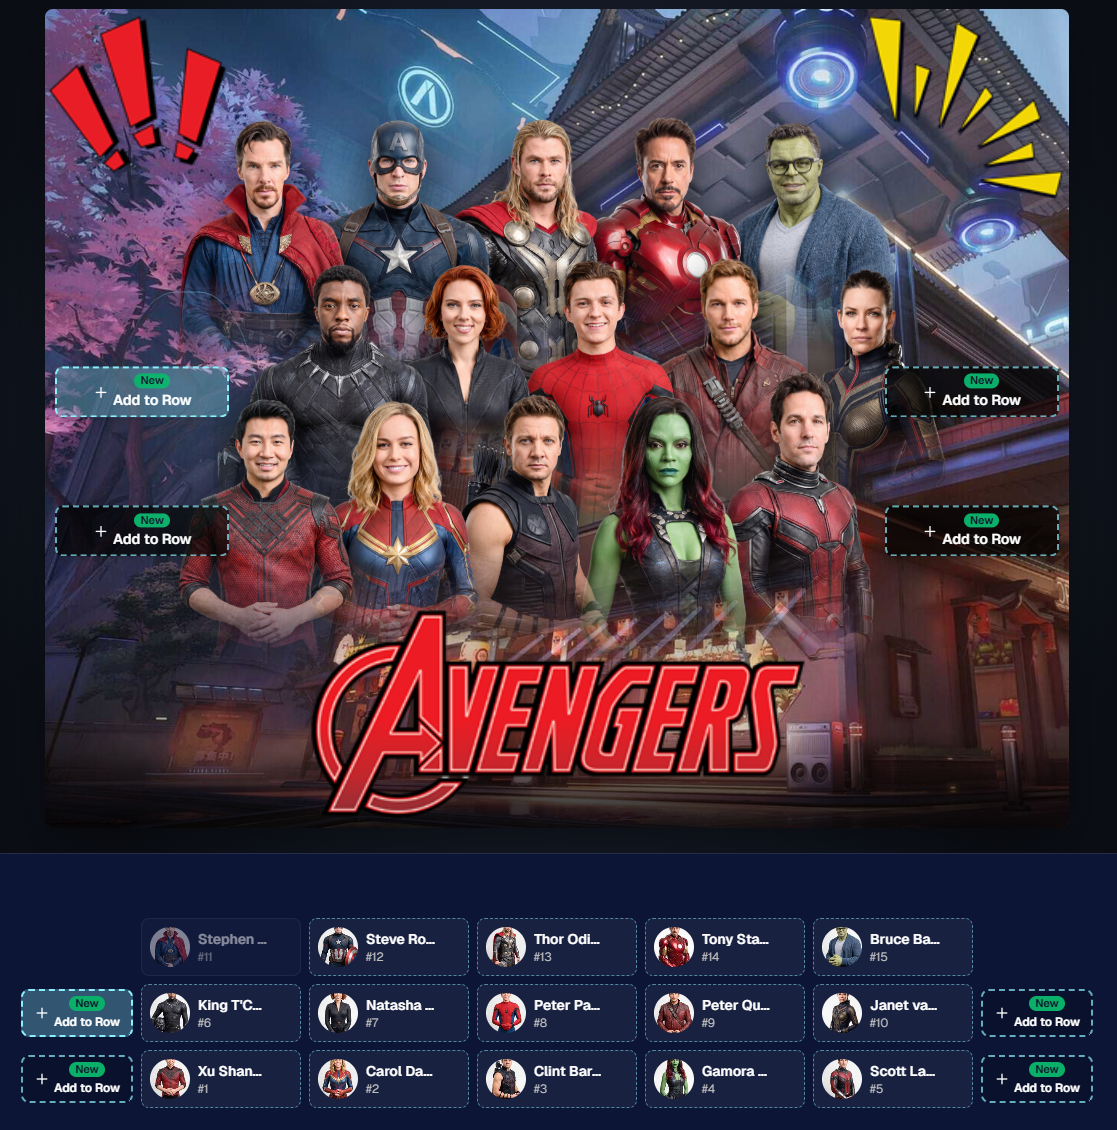
Drag and drop subjects into other rows for more control than ever!

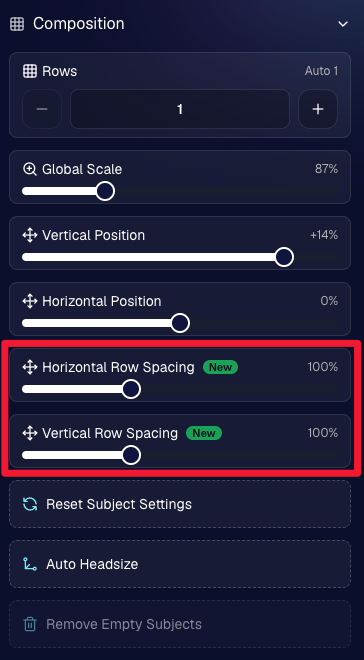
New options to more quickly space out your subjects!

When viewing subject details, adjust them by individual!

Control the size of your logos!

🏈 27 New Sports Background Sets

Alright, shoutout to the random guy who told me (me being Candy, in case you forgot!) that he didn’t like the backgrounds. We heard you! 😂

This week we’ve added 27 new sets of sports backgrounds, including a brand-new Sports – Locker Room background category.

And, in case you missed it, last week we also added an AI Background Generator so you can create entirely new, modern backgrounds of your own.

A quick reminder... you already have a lot of control over which backgrounds your customers actually see:

🎨 Edit the default backgrounds in your Offers

📤 Upload your own custom backgrounds at both the Offer-level and Event-level

🤖 Generate new backgrounds of your own with AI

🏈 Choose from our (now growing) collection of built-in choices

We have a TON of default backgrounds—and yes, many have been around for a while—but you’re never locked into using them. You can build your own look for your business, and we’ll keep adding new options over time too.

✂️ New Dedicated Background Removal Page

Event Background Removal now has its own dedicated Dashboard page, accessible from the Event Sidebar. It is not longer just a popup!

The BGR toggle on Event Overview will take you there too, giving all of these controls a little more breathing room.

On the new page, you can:

✅ Enable or disable Background Removal

🖼️ Manage your Event Backgrounds

🎨 See your Offer Backgrounds with a direct link to the Offer

📊 See how many cutouts have finished and how many are still processing

⏳ Watch a live progress bar while Background Removal is working

📂 See all valid Event folders and which ones are marked for Background Removal

And if your Event is a new Event: ✂️ You can mark an existing folder for Background Removal even if it already contains images!!!

🎨 Candy Image Studio: Better Exposure Fixes

🌙 New Fix Underexposure node

  • Helps recover images that came out too dark.

☀️ Fix Overexposure greatly improved

  • The existing overexposure tool has been reworked for more reliable results.
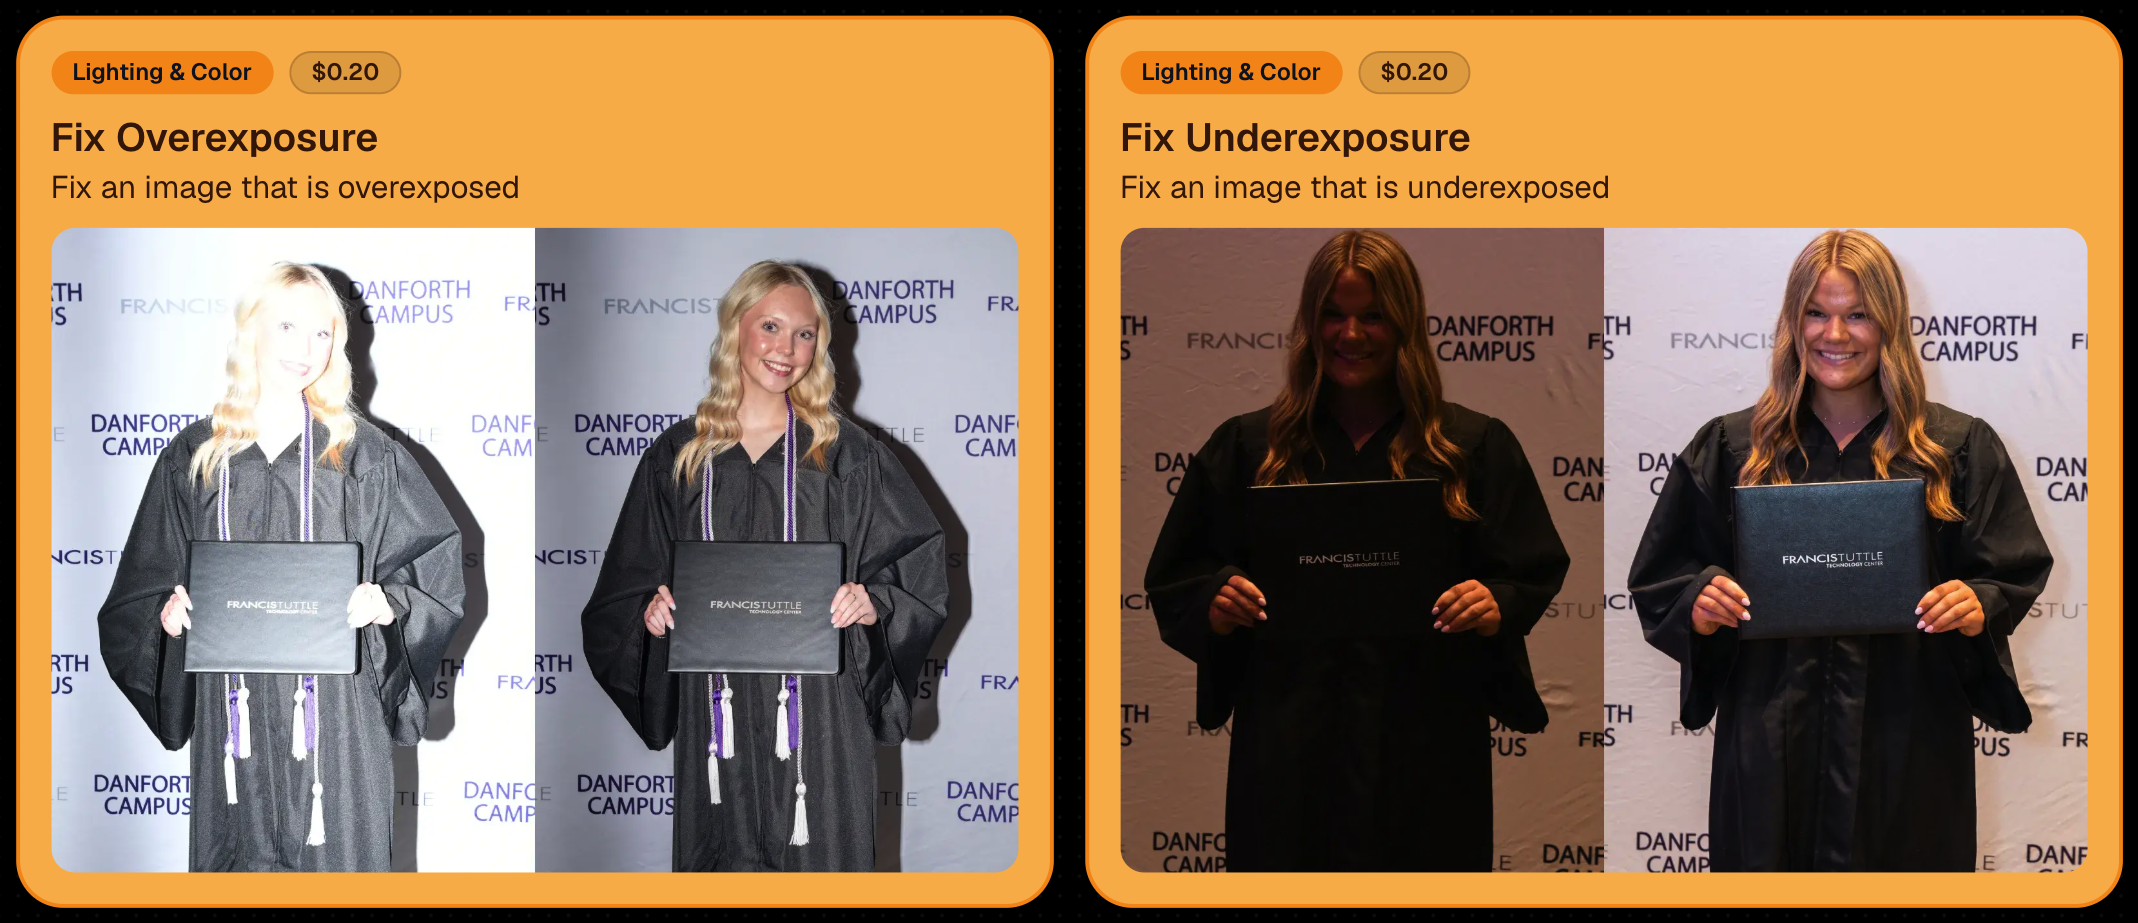
Utilize Candy Image Studio to fix images so they can sell, quickly and affordably!

🏈 Jersey Jotter Progress Tracking

New Jersey Jotter progress bar

  • When Jersey Jotter is active and still has unprocessed images, its dedicated page now shows processing progress—similar to Candy Culler and the new Background Removal page.

This makes it much easier to tell whether recognition is still working through a large Event.

🛍️ Retail Improvements

Titled Luxe Prints now work with package prefill

  • Packages can now automatically prefill eligible Titled Luxe Print products just like other supported products.

🖼️ Titled Luxe Print package rendering fixed

  • Fixed an issue where these products could render incorrectly inside packages.

🤖 AI-generated backgrounds now render correctly on products

🎨 Selected backgrounds now stay visible through the final product step

  • Fixed an issue where the chosen background could sometimes disappear on renders when reaching quantity and finish steps.

📝 Several product descriptions updated

  • Some product descriptions have been refreshed for better clarity.

🖼️ AI Edit + BGR Assignment Fix

👥 BGR versions of AI edits now keep direct participant assignments

  • If the original non-AI image was directly assigned to someone, its Background Removed AI-edited version will now correctly inherit that relationship.

📦 Order Details Fix

📝 Package captions now display correctly

  • Fixed cases where Order Details did not show caption information for certain products contained inside packages.

📱 Capture App 5.9.1 – iOS OTA

📸 Photo Booth fix for iPad

  • Fixed the Photo Booth gallery strip being cut off on certain iPad models.

That’s the week!

More Virtual Group control, a much stronger Background Removal workflow, some useful exposure tools, and plenty of fresh sports backgrounds to work with.

And if you still don’t like the backgrounds... now you’ve got plenty of ways to show us how it’s done. 😉

Keep creating magic,

Candy 🍬

Related articles

Weekly Recap: Photo Release Features, Merged Participant Clarity & More!
Feature Updates
January 10, 2025

Weekly Recap: Photo Release Features, Merged Participant Clarity & More!

5
 minutes read
Hello, my fabulous photographer friends!

Candy here, ready to sprinkle some sparkle on your day with our latest Weekly Recap! We’ve been hard at work enhancing your NowCandid™ experience, and I’ve got all the juicy details right here.

Let’s dive in!

1. Photo Releases & The New Image Release Gallery

Collecting Releases

Before using the pictures you take of your subjects in things like portfolios, websites, flyers, samples, and more - the best practice is to get a record of consent from your subjects before using photos of them for such things!

So... we've made some additions to NowCandid that will expedite this process for everyone involved!

  • Enabled via Retail Site Settings: Head to your Account Profile, open the “Retail Site Settings,” and toggle whether to ask participants for a photo release when they complete Selfie Check-In™.
  • Future Expansion: We plan to someday add this consent request to other locations in our Workflows, such as Scanner ID™ Check-Ins or after retail site checkout, so stay tuned!

Found under "Retail Site Settings" in your account profile

The post-Selfie Check-In messaging

Image Release Gallery

Once you’ve enabled Photo Releases, we’ve made viewing those fully released images a snap with the new Image Release Gallery!

  • Fully Released Photos Only: This gallery shows images where every primary face in the picture has opted in for marketing use.
  • Opt-Out Procedures: If someone changes their mind, NowCandid™ support can remove their release, and those images will disappear from the gallery.
  • Easier Marketing & Inspiration: Enjoy a reliable stash of images for portfolios, websites, flyers, or sample products, all with peace of mind!

This major addition simplifies the entire release process and keeps your marketing efforts on the right side of consent!

Starting next week, this feature will be enabled by default for all NowCandid accounts! If you wish to disable it, that's up to you!

An example of some images with only released faces in the new Image Release Gallery

2. Improved Merged Participants Clarity

We have also improved the photographer's experience and clarity when it comes to Merged Participants!

  • Multiple Names, One Contact: When two or more participants share a phone number, they now visibly merge under one participant in the Participant Manager, with all names separated by commas.
  • Reduced Confusion: Parents with multiple kids at an event won’t be an enigma anymore. You’ll see each kid’s name instead of a single ambiguous participant.
  • Same Smooth Experience for Families: Consumers won’t notice much change, but you’ll breathe easier knowing your records more clearly show who’s who.

No more wondering why two kids keep “replacing” each other in the backend—our improved merging UI has your back!

Example of multiple merged participants wrapped into one participant

3. Group Photo Filter in Manage Images

  • Just Group Photos: We’ve added a toggle to the Manage Images page that shows only images flagged as “Group Photos.”
  • Sports & GroupTags™: Perfect for organizing big team shots or verifying no single-person images slipped in by accident.
  • Future Tweaks Coming: We’re cooking up more ways to polish Group Photo and GroupTags™ functionalities, so watch this space!

If you handle big groups (like sports teams or large gatherings), this quick filter simplifies your event workflow.

New toggle button to switch between showing All Images and just Group Photos

4. All Images Gallery Pagination

  • Page-by-Page Browsing: We replaced the endless scroll in the NowCandid™ retail site’s All Images Gallery with a paginated view—complete with arrows to move between pages.
  • Jump to Page: Customers can type or select a page number if they already know where to look.
  • Less Scrolling, More Finding: Makes returning to a specific photo (especially one not in a personal gallery) a breeze.

This update ensures customers spend less time hunting and more time admiring—or purchasing—the images they love.

New retail site page navigation tools

5. New Events List Filter

One last small addition to mention... we added a way to filter down your Events list!

This should make it easier than ever to browse through your upcoming Events as you plan and prepare for them.

New Events list filter options

That’s it for this week’s recap!

We hope these changes help you manage your events more smoothly, give you extra confidence in your marketing, and offer your customers a cleaner, faster photo-browsing experience.

As always, we love your feedback, so feel free to reach out with any questions or suggestions.

Thank you for being an essential part of the NowCandid™ community. Keep capturing those unforgettable moments and creating smiles! 📸✨

Cheers and sparkles,

Candy 🍬

Weekly Recap: Overlay Artwork in the Product Gallery 🎨✨
Feature Updates
January 3, 2025

Weekly Recap: Overlay Artwork in the Product Gallery 🎨✨

2
 minutes read
Hello again, my wonderful photographers!

Candy here, and welcome to another Weekly Recap. This time, we’ve got one exciting improvement to share—overlay artwork now appears by default on product previews in the product gallery!

Let’s take a closer look. 🌟

Overlays Rendered by Default in Product Gallery 🎉

We’ve introduced a fun change for anyone using Banner Overlays or Full Frame Overlays in their NowCandid Events:

  • Visible Overlay Art

    Items in the retail site’s product gallery will now display your Event’s overlay artwork right away. Customers can see exactly how their images look on each product, with that extra creative touch of your Event's Overlay Art.

Theme: Marshmallow - Watermarking: Heavy

Theme: Liquourice - Watermarking: None

  • Use Overlay by Default

    When customers go to customize or add a product to their cart, the “Use Overlay” option will already be selected. This makes it simpler to highlight your unique event designs or branding. But they can still view & order the product without the overlay art.
  • Easy Toggle in Settings

    If you prefer to keep products overlay-free by default, no worries! Head to the “Retail Site Settings” in your Profile and uncheck “Use Artwork By Default.” That way, product images will display without your Event overlay art unless customers choose otherwise.

Find this option in your Profile settings

Enabling Use Artwork By Default will feature your Event's Overlay Art on the renders in the product gallery page. Guests can choose to view and order products without the art, but "with overlay art" will be the default selection.

That’s all for this week’s short-and-sweet recap!

We hope this feature adds a little extra flair to your retail experience.

As always, let us know what you think or if you have any feedback.

Candy 🍬

Big News: Introducing Photo Booth Mode in iOS Capture & Upload App 4.13! 🎉
Feature Updates
December 30, 2024

Big News: Introducing Photo Booth Mode in iOS Capture & Upload App 4.13! 🎉

6
 minutes read
Hello, my wonderful photographers!

Candy here with exciting news for you on this festive Monday. We’re launching Capture & Upload App Version 4.13, and it comes with a massive new feature: Photo Booth Mode.

Let’s dive into what it is, how it works, and why we think you’ll love adding it to your events!

What Is Photo Booth Mode? 🤳

Photo Booth Mode is a brand-new option inside the Capture & Upload App (Version 4.13 on iPad). When you log in to your Event, you’ll see a shiny new “Photo Booth” button alongside the usual options.

Tap that button, and your iPad transforms into a fun, self-serve photo booth station, perfect for:

  • Weddings & Parties: Encourage guests to capture memorable group shots and instantly send them to their phones.
  • Sports & Corporate Events: Provide interactive experiences that keep people engaged and excited.
  • Holiday Gatherings: Add some festivity and help guests create themed keepsakes right on the spot.

Whether you tether a Nikon, Sony, or Canon camera or just use the iPad’s built-in camera, Photo Booth Mode gives you a convenient, autonomous way to let guests take pictures without any manual work from you (aside from set up and takedown of course).

How It Works ⚙️

  1. Tap to Begin Screen
    • Guests see a dimmed live view with “Tap to Begin.” Once tapped, the booth takes three pictures in quick succession, each with its own 3-second countdown.
  2. Real-Time Overlays
    • If your event has Bottom Banner Overlays or Full Frame Overlays, they appear in the live view. This lets guests see exactly where the art will sit, so no one’s face gets covered.
  3. On-Device Styling
    • Background Removal & Custom Backgrounds: If you’ve uploaded backgrounds for your event, they’ll be available for selection.
    • Filters: Guests can apply classic filters like Noir, Sepia, or Clarendon before sending off their images.
    • Reshoot: Not happy with a pose? Subjects can tap “Reshoot” and start over, easy-peasy.
  4. Instant Delivery
    • Both QuicPics or PartyPics Workflows deliver images in real time:
    • If it’s QuicPics, your subjects will get the image files directly via MMS, with Overlay Art applied, if your Event has any. They'll also receive a link to their personal gallery. Reminder, with QuicPics we charge a small fee per uploaded image.
    • It it's PartyPics or any of our other Programs, your subjects will only receive a link to their personal gallery. And there is no additional charge or fee.
    • When visiting their personal gallery, they can buy prints & downloads of these images with various product & customization options.
  5. Positive ID vs. Face Matching
    • Face Matching: Prompts appear to tap faces, then gather contact info for those individuals.
    • Positive ID: Participants just enter their info before sending images, no face-tapping required.

All images are uploaded to your NowCandid Event like normal, so no matter your usual Workflow, things will still function seamlessly!

Key Requirements & Limitations ⚠️

  • Camera Orientation
    • Nikon cameras support both horizontal and vertical orientation.
    • Sony and Canon are currently limited to horizontal orientation.
  • iPad-Only Launch
    • Photo Booth Mode works on iPad (and only in vertical orientation), not on iPhone or Windows at this time.
  • No Built-In Strip Printing
    • If you need to provide prints, set up a separate print station and use quic.pics/portal to download images with or without Event Overlay Art and print them on-the-spot!
  • Strong Internet Connection
    • Ensure your iPad has solid Wi-Fi or LTE, as the app needs to log into the event, download overlays/backgrounds, and upload images in real time.

Why You’ll Love Photo Booth Mode ❤️

  1. Interactive Fun

    Guests choose their own backgrounds, overlays, and filters, creating a memorable activity at any gathering.
  2. Seamless Feature Integration

    Images will show up in LiveLoop slideshows, appear alongside subject's other images in Personal Galleries, be managed using NowCandid's typical image and participant management tools, and more!
  3. Seamless Workflow Integration

    The images flow right into your existing event Workflows—Tap-A-Face, Selfie Check-In, Type & Take, and more—without any additional setup.
  4. Effortless Setup

    Whether you opt for a tethered DSLR or the iPad camera, it’s a simple tap away in Capture & Upload App 4.13.

Download Capture & Upload App 4.13 Today! 📱

With Version 4.13 now live for iPad (iOS only at the moment), you can start offering Photo Booth Mode at your next event.

We’ve tested it extensively, but with so many different devices and use cases out there, we encourage you to try it out ASAP.

If you spot any quirks, let us know, and we’ll work on improvements swiftly.

Thank you for joining us in this Big News blog post.

We can’t wait to hear your success stories with Photo Booth Mode!

Candy 🍬

Let’s get in touch

If you’re a photographer looking to add NowCandid services to your wheelhouse – set up a call by clicking the button below.

How to customize formatting for each rich text

How to customize formatting for each rich text

How to customize formatting for each rich text

How to customize formatting for each rich text

How to customize formatting for each rich text

What’s a Rich Text element?

The rich text element allows you to create and format headings, paragraphs, blockquotes, images, and video all in one place instead of having to add and format them individually. Just double-click and easily create content.

A rich text element can be used with static or dynamic content. For static content, just drop it into any page and begin editing. For dynamic content, add a rich text field to any collection and then connect a rich text element to that field in the settings panel. Voila!

Headings, paragraphs, blockquotes, figures, images, and figure captions can all be styled after a class is added to the rich text element using the "When inside of" nested selector system.

  • List One
  • List Two
  • List Three
  • List Four
  • List Five

This is a link

This is bold text