HomeNavigation arrowBlogNavigation arrow
Current page
NowCandid 101

How to Make FreePics Work for Your Photography Business πŸ“Έβœ¨

How to Make FreePics Work for Your Photography Business πŸ“Έβœ¨
In honor of our QuicPics Program’s rebrand to FreePics, we wanted to take a fresh look at some helpful info, best practices, and booking strategies for using FreePics and service photography successfully!

‍

Giving photos away for free might not sound like an obvious way to make money.

‍

But with the right setup, FreePics can be a powerful business tool β€” whether you’re getting paid by an event organizer, working with a sponsor, building the cost into ticket sales, developing relationships with venues, or simply using free photos to get your name in front of more potential customers.

‍

And depending on the kind of experience you want to offer, you now have three different Programs to choose from: FreePics, FreePics GO!, and FreePortraits.

‍

First: What Is FreePics?

‍

FreePics is designed for photographers who want to provide images to subjects at no cost to the person being photographed.

‍

Instead of relying on each participant to purchase their own images, the photography can be funded another way β€” or used as a marketing tool to help generate future business.

‍

That opens up a lot of possibilities.

‍

Ways to β€œSell” FreePics πŸ’Έ

‍

1. Work Through an Event Organizer

‍

One of the simplest approaches is to have the event organizer pay for photography as part of the event itself.

‍

That could include:

  • Reunions
  • Luncheons
  • Galas
  • Corporate parties
  • Balls
  • Private events
  • Community events

‍

Instead of charging individual guests for their photos, the organizer pays you for your time and coverage.

‍

This can make the photography feel like another included event amenity β€” just like entertainment, dΓ©cor, or catering.

‍

The original FreePics training material even suggested photographers may be able to charge a few hundred dollars per hour, per photographer, depending on the event and market.

‍

2. Find an Event Sponsor

‍

Another option is to have a sponsor cover the photography.

‍

In exchange, you can incorporate the sponsor’s branding into the experience, including branded image artwork or overlays.

‍

That gives the sponsor something more memorable than a banner or table sign: photos attendees may actually save, share, and revisit.

‍

Sponsorship pricing will naturally depend on the event, audience, and sponsor, but this type of arrangement may support a much higher overall photography budget than selling directly to individual attendees.

‍

3. Build Photography Into Ticket Sales 🎟️

‍

If every attendee is going to receive photos, another option is to simply include the photography cost in the ticket price.

‍

A relatively small increase per ticket can add up quickly across a large event.

‍

For example, an organizer could add a photography fee to each admission ticket, then use that revenue to pay for event coverage while letting every guest access their photos afterward.

‍

Participants feel like they’re getting something included with admission, while the photographer still gets paid.

‍

4. Partner With Party Planners or Venues 🀝

‍

FreePics can also be a great tool for building recurring relationships.

‍

A photographer can establish themselves as the go-to photographer for a planner or venue and create an arrangement that works for everyone involved.

‍

That could mean a commission, referral agreement, preferred-vendor relationship, or another setup that encourages the planner or venue to continue sending events your way.

‍

Instead of thinking about a single event, you’re using FreePics to help build a steady pipeline of future bookings.

‍

5. Use FreePics as Marketing for Your Own Business πŸ“£

‍

You don’t necessarily have to make money directly from every FreePics Event.

‍

Sometimes, the value is the exposure.

‍

Offering free photography at the right event can introduce your business to dozens or even hundreds of potential customers.

‍

Because participants receive their images directly, you have an opportunity to put your business and branding in front of them while creating a positive interaction with your photography.

‍

That can turn one promotional event into future:

  • Event bookings
  • Portrait sessions
  • School or sports opportunities
  • Corporate work
  • Referrals
  • Repeat customers

‍

Sometimes the free photo is the product.

‍

Sometimes it’s the advertisement. πŸ‘€

‍

Which Free Program Should You Use?

‍

This is where the three Programs start to differ.

‍

FreePics β€” Best for Most Events ⭐

‍

For most photographers, FreePics is the best all-around option.

‍

It provides the full FreePics experience and gives you the most flexibility in how images are delivered to participants.

‍

If you simply want to photograph an event and make it easy for subjects to receive their images for free, start here.

‍

It costs more per image than the other Free Programs, but you’re paying for the broader experience and flexibility.

‍

Best for:

  • Parties
  • Galas
  • Corporate events
  • Reunions
  • Sponsored events
  • General event photography
  • Most situations where you want free image delivery

‍

FreePics GO! β€” Best for a Gallery-First Experience πŸ–ΌοΈ

‍

FreePics GO! is a gallery-only experience, which allows it to cost less per image than standard FreePics.

‍

But the gallery format also gives it some unique advantages.

‍

FreePics GO! is especially useful if you want participants to clearly see that they can download different versions of their images β€” such as versions without overlay artwork.

‍

It can also be a better choice when using Background Removal, because participants can browse different background options before deciding which version of an image they want to download.

‍

And because subjects are already browsing through a gallery, FreePics GO! gives you a stronger opportunity to showcase physical products and other potential upsells alongside their free images.

‍

Best for:

  • No-overlay option is important
  • Sponsored events with branded artwork
  • Background Removal workflows
  • Events where you want subjects choosing between different image treatments
  • Photographers who want to promote prints or physical products
  • Situations where keeping per-image costs lower is important

‍

FreePortraits β€” Best for Headshots πŸ‘€

‍

FreePortraits takes the FreePics concept and adapts it specifically for headshot-style photography.

‍

Because the workflow is more limited β€” with only one image file sent out per image β€” it can be offered at a lower per-image cost than standard FreePics.

‍

If your Event is centered around individual portraits rather than a larger event gallery, that limitation can actually make perfect sense.

‍

Best for:

  • Corporate headshots
  • Conferences
  • Professional networking events
  • Employee portraits
  • Profile photos
  • Other single-image portrait workflows

‍

If you want the FreePics experience but you’re really photographing headshots, FreePortraits is likely the better fit.

‍

A Simple Way to Choose 🍬

‍

When in doubt:

‍

Use FreePics for the best general-purpose experience.

‍

Choose FreePics GO! when the gallery itself adds value β€” especially for Background Removal choices and physical-product upsells.

‍

Choose FreePortraits when you’re photographing headshots and only need to deliver one finished image file per image.

‍

The goal with all three is the same: make it easy to get great images into your subjects’ hands while giving you flexibility in how the photography fits into your business.

‍

Free Doesn’t Have to Mean Unprofitable πŸš€

‍

FreePics is less about giving your work away and more about deciding who is paying for the experience β€” and what value the photography creates.

‍

Maybe the event organizer pays you.

‍

Maybe a sponsor does.

‍

Maybe the cost is included in admission.

‍

Maybe a venue relationship brings you more bookings.

‍

Or maybe the Event itself acts as marketing that introduces your photography business to a whole new group of people.

‍

There are plenty of ways to make free photos make business sense.

‍

And with FreePics, FreePics GO!, and FreePortraits, you can choose the version that fits the Event instead of forcing every job into the same workflow. πŸ“Έβœ¨

‍

Cheers,

β€” Candy 🍬

Related articles

Weekly Recap: Action Mode for Sports, Faster Package Ordering & Favorites Sign-In πŸ“Έβ­
Feature Updates
July 2, 2026

Weekly Recap: Action Mode for Sports, Faster Package Ordering & Favorites Sign-In πŸ“Έβ­

5
Β minutes read
Hey photo friends! πŸ‘‹

‍

Candy here with a weekly recapβ€”there’s a very exciting Capture App addition this week: Action Mode for Sports events! We’ve also got a few Dashboard and Check-In fixes to keep things moving smoothly.

‍

Let’s take a look.

‍

πŸ“± Capture App 5.8: New Action Mode

‍

Capture App 5.8 introduces a brand-new Action Mode shooting mode for Sports events.

‍

🏷️ Automatically tag photos with PhotoTags while shooting‍

  • Action Mode lets you select a PhotoTag and automatically apply it to the photos you take, using a familiar PhotoTag selection flow similar to managing PhotoTags for group images.

‍

🏈 Built for sports workflows‍

  • Action Mode appears for Sports events:
    • On Positive ID events, it shows up all the time
    • On Face Matching events, it shows up when the Event has PhotoTags

‍

πŸ“Έ Shoot freely in Positive ID‍

  • This also allows you to shoot freely in Positive ID events without first adding a participantβ€”something that wasn’t previously possible.

‍

πŸ‘₯ Not the same as Group Photos‍

  • Action Mode applies PhotoTags while shooting, but it does not mark images as group images.

‍

πŸ€– Android RAW+JPEG reconnect improvement‍

  • Improved behavior on Android when shooting in RAW+JPEG while reconnecting the camera multiple times.

‍

Why it’s helpful:

‍

Action photographers can now organize images into PhotoTags while they shoot, making it much easier for subjects accessing the gallery live at the Event to browse the All Images Gallery to filter down to the right team, game, division, or group on the retail site when you are live-uploading your action shots.

‍

This is especially useful when you’re promoting an All Images Gallery QR code at an event and sending subjects directly to retail. Combined with the new sign-in requirement for Favorites, subjects can save favorite images and access them later from any deviceβ€”setting the stage for even more action-event workflow improvements in the future.

‍

You can even utilize the new Auto Edit feature to potentially review and edit your action photos before they go live to the gallery with AI! Try out the beta "Improve Action Shot" node in Candy Image Studio on some test photos to see how it works for you.

‍

πŸ›οΈ Retail Updates

‍

πŸ“¦ Packages now prefill with the selected image‍

  • When a shopper starts a package from an image, eligible package items will now auto-fill with that image. Customers can still change any product, but this makes ordering larger packages much faster.‍
  • Note: Group images won’t prefill non-group products, non-group images won’t prefill group products, downloads beyond the first won't prefill, and products requiring captions or multiple images won’t be prefilled.

‍

🧩 Package editor UI refreshed‍

  • Configured products now show a clearer Change Image button, and product names + image controls are grouped together to reduce confusion.

‍

πŸ›’ Packages now have a landing screen‍

  • Packages now open with an overview of what’s included before the shopper continues into the editor.

‍

⭐ Sign-in required for Favorites‍

  • Shoppers now sign in before adding Favorites, which lets their Favorites sync across devices when they use the same account.

‍

πŸ–ΌοΈ Dynamic Gallery additions fixed‍

  • User-added Dynamic Gallery images now persist correctly after refresh and appear properly in Dynamic Gallery purchases.

‍

πŸ›‘οΈ GalleryGuard improvements‍

  • Additional GalleryGuard improvements were made to help protect retail images.

‍

😊 Face Finder visibility fixes‍

  • The Show Face Match Groups Offer setting now hides the Face Finder filter as expected, including when Zoom Cropping is enabled.

‍

πŸ–₯️ Dashboard Improvements

‍

⚑ PhotoRoster pages are faster‍

  • All PhotoRoster pages should feel a little quicker.

‍

🚫 Clearer upload error for invalid XMP metadata‍

  • The Upload Images page now shows β€œInvalid Metadata (XMP)” for a rare export issue that can happen with some Adobe workflows.

‍

🎨 Image Converter Display P3 fix‍

  • The Image Converter Tool now correctly converts Display P3 images to sRGB when Convert to sRGB is enabled.

‍

🀳 Check-In Website Fix

‍

🏷️ Team/group selection false error fixed‍

  • Fixed an issue where selecting a team or group could incorrectly show an error saying the selfie failed to upload.

‍

That’s the update for this week!

‍

Action Mode is the big highlightβ€”especially for sports photographers who want instant PhotoTag organization while shooting.

‍

Keep creating magic,

Candy 🍬

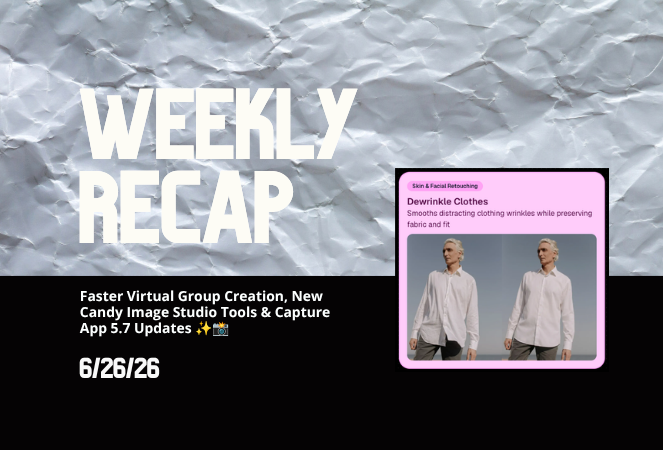
Weekly Recap: Faster Virtual Group Creation, New Candy Image Studio Tools & Capture App 5.7 Updates βœ¨πŸ“Έ
Feature Updates
June 26, 2026

Weekly Recap: Faster Virtual Group Creation, New Candy Image Studio Tools & Capture App 5.7 Updates βœ¨πŸ“Έ

5
Β minutes read
Hey photo friends! πŸ‘‹

‍

Candy here with another weekly recap! This week brings some great upgrades to Virtual Group Builder, new Candy Image Studio tools, better Docs search, and a solid Capture App update with helpful color profile and PhotoTag improvements.

‍

Let’s take a look!

‍

πŸ§‘β€πŸ€β€πŸ§‘ Virtual Group Builder Improvements

‍

Virtual Group Builder got a nice set of workflow upgrades this week:

‍

🏷️ Create Virtual Groups directly from PhotoTags‍

  • On the PhotoTags page, click Create under the VGroup column to automatically start a new Virtual Group using participants from that PhotoTag. You’ll also get a popup asking whether to use each participant’s first or last cutout.

‍

πŸš€ Save works-in-progress with placeholders‍

  • You can now save changes to a Virtual Group even if some subjects still have spaceman placeholders.
  • All subjects still need a selected photo before uploading the finished Virtual Group to the Event.

‍

πŸ–ΌοΈ Overlay uploads can now be named‍

  • When uploading overlays, you can name them so they’re easier to search and find later.

‍

πŸ”€ More control over subject name styling‍

  • Title Case is now only applied on import, meaning you can use the subject inspector to customize name casing afterward.

‍

πŸ“ New text display option‍

  • There’s a new Display setting to disable justified text.

‍

🌫️ Bottom Vignette improvements‍

  • Bottom Vignette rendering has been reworked for better results.

‍

πŸ”Ž More flexible scaling‍

  • Max global scale is now 200%.

‍

🎨 Candy Image Studio: New Editing Nodes

‍

Candy Image Studio has two new tools to help clean up common image issues:

‍

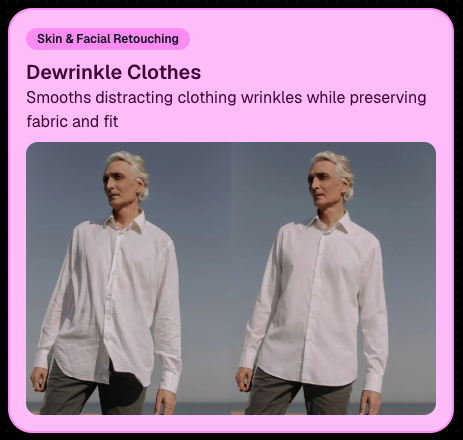
πŸ‘” Dewrinkle Clothes‍

  • Helps smooth distracting clothing wrinkles while keeping the image natural.

‍

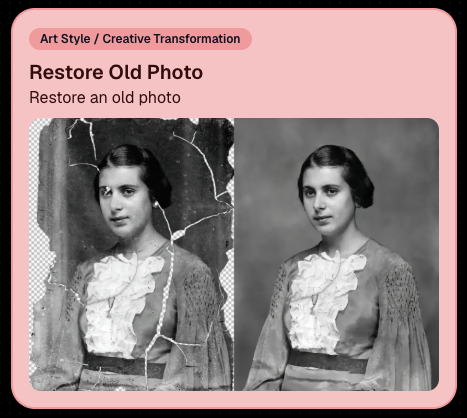
πŸ–ΌοΈ Restore Old Photo‍

  • A new restoration-style node for improving older or damaged images.

‍

‍

‍

πŸ“± Capture App 5.7 Updates

‍

App Store update released Monday, June 22

‍

Capture App 5.7 includes some meaningful workflow and compatibility improvements:

‍

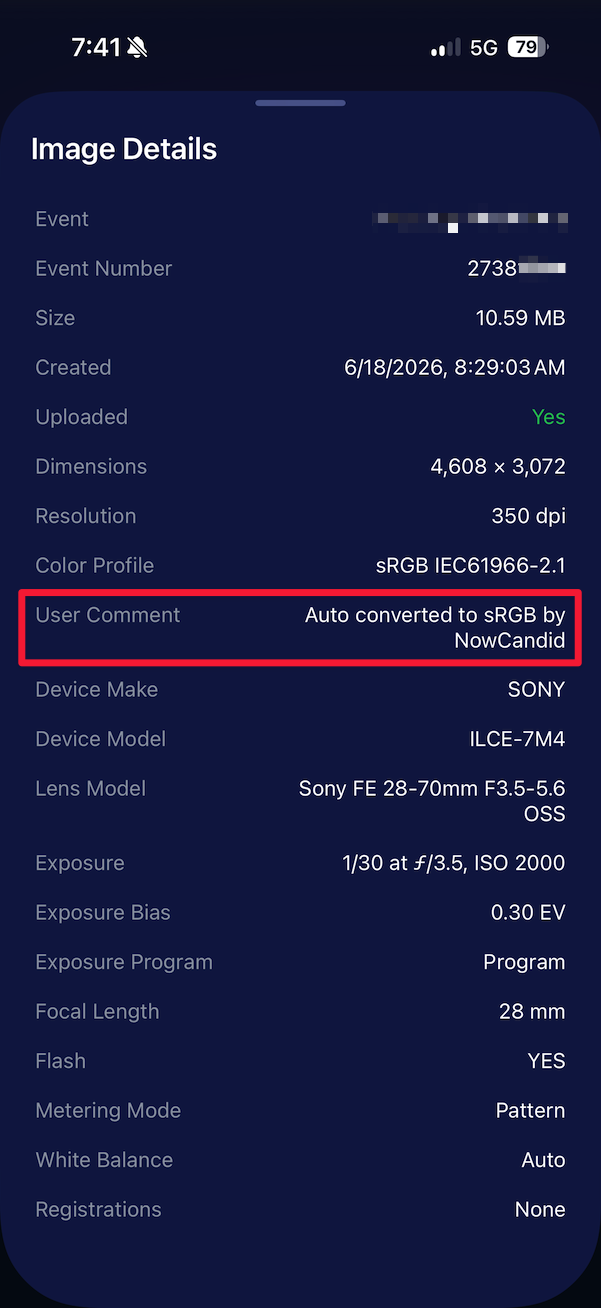
🎨 Automatic sRGB conversion‍

  • If an image is detected as non-sRGB, the app will now try to automatically convert it to sRGB. If it can’t, you’ll still get the existing invalid color profile warning.
  • This can be especially useful for black-and-white shooting modes that output a different color profile. That said, we still recommend shooting in sRGB whenever possible, since conversion can cause some color loss and may use extra battery during long sessions.

‍

🧾 User Comment shown in EXIF details‍

  • The image gallery details popup now shows EXIF User Comment data, including whether an image was auto-converted to sRGB.

‍

‍

βœ‚οΈ BGR visibility sync‍

  • Visibility changes in BGR folders now affect the cutout too. Mark the original hidden, and the cutout will hide; mark it visible again, and the cutout becomes visible as well.

‍

🏒 Business logo support‍

  • Your business/profile logo now appears in the Capture App header when available, and can replace Candy in Photo Booth.

‍

βš™οΈ Contact collection settings moved‍

  • Number, email, and name collection settings now live on the Event Overview instead of the Event login sheet, so you don’t need to re-log to change them.

‍

🏷️ Event picker shows PhotoTag attribute‍

  • If an Event has PhotoTags, the Event picker now makes that easier to spot.

‍

πŸ“± Android UI fixes‍

  • Fixed several label cutoff issues for Android users with Bold Text enabled.

‍

πŸ” Restore Session fix‍

  • PhotoTags now load properly when an Event is opened through Restore Session.

‍

🎨 Adobe RGB handling fixed on Android‍

  • Android devices will no longer incorrectly accept Adobe RGB images from cameras.

‍

🍎 iOS 27 support tested‍

  • iOS 27 has been tested, and no issues were found. The app also respects the latest Liquid Glass device settings.
  • If you update your device to a beta version of iOS 27, let us know if you experience issues!

‍

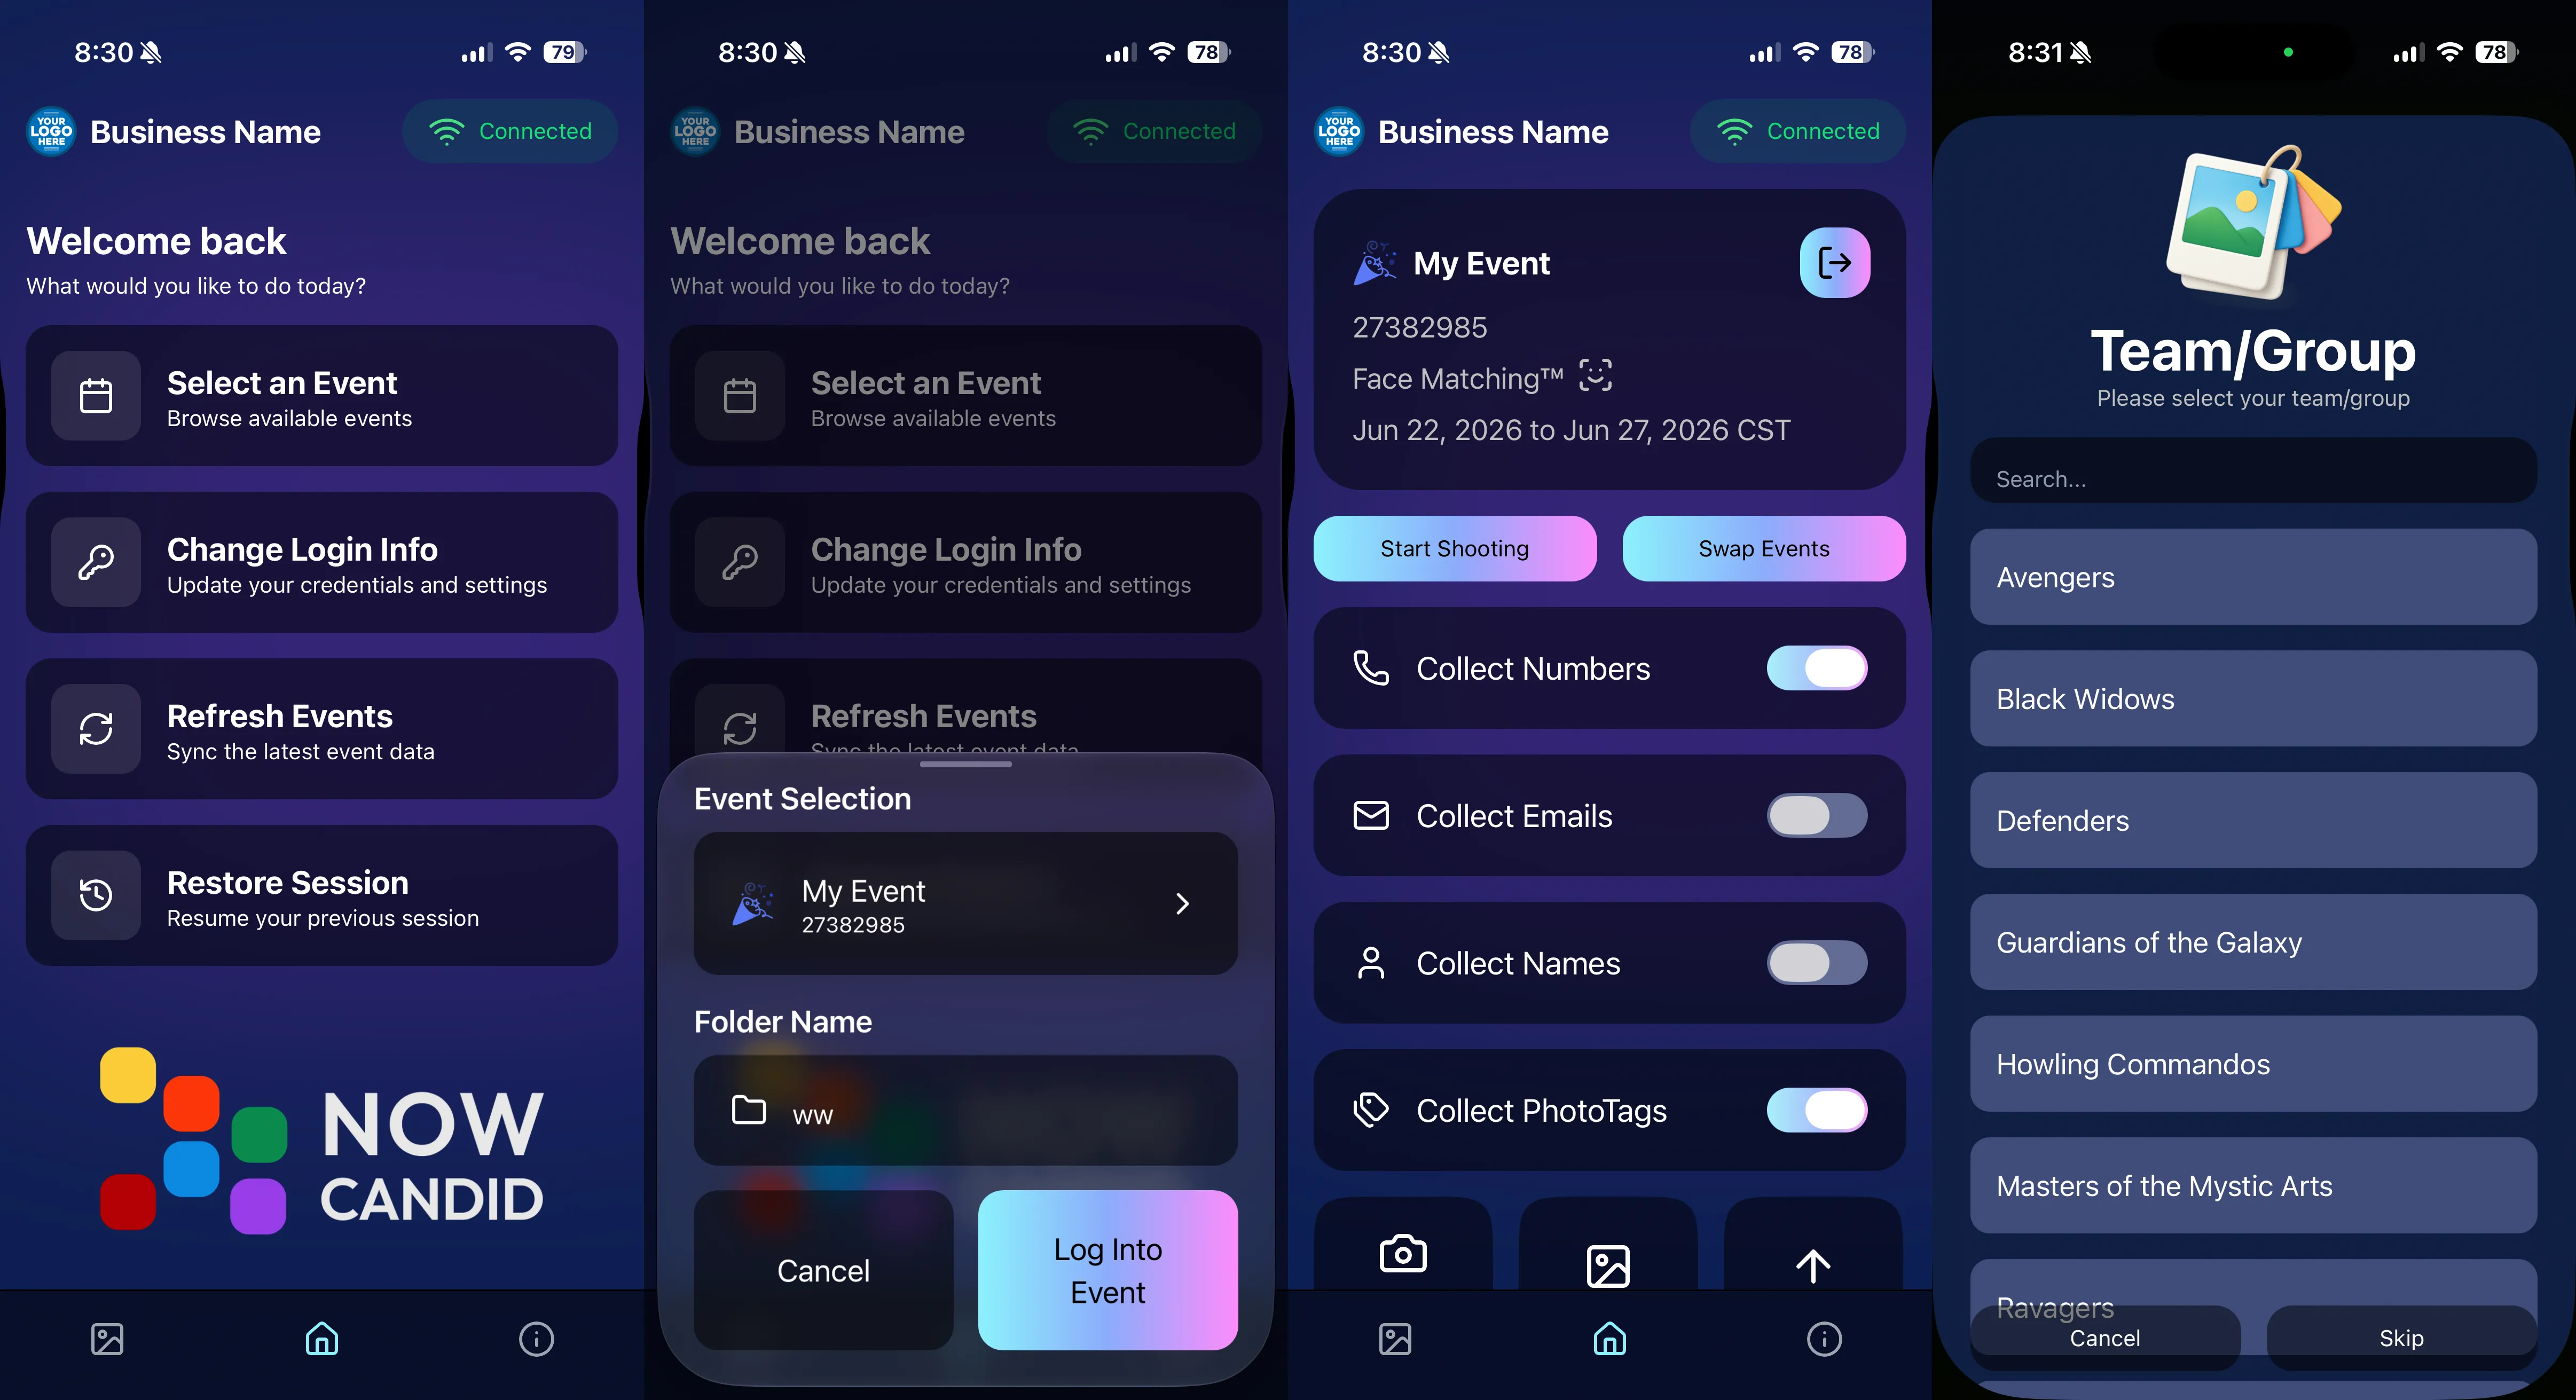
🏷️ Collect PhotoTags during check-in‍

  • Participants can now select their own PhotoTag, such as team name, before entering contact information. This option appears when the Event has PhotoTags.
  • We added this primarily to assist photographers in easily tagging late additions not on a roster that show up to a photoshoot, but there will be additional features for action photography in next week's update!

‍

‍

πŸ“± Capture App 5.7.1

‍

OTA update released Friday, June 26

‍

πŸ› οΈ Miscellaneous UI fixes‍

  • A small OTA update with additional interface polish and cleanup.

‍

πŸ–₯️ Dashboard Improvements

‍

πŸ”Ž Docs Search is here‍

  • Click Search on the Docs page to search NowCandid documentation, with Candy navigation agent support.

‍

πŸ“‚ PhotoRoster image name cleanup‍

  • PhotoRoster data file uploads and image uploads now automatically remove spaces and certain special characters from image names.

‍

πŸ–ΌοΈ Full-frame overlay previews are downloadable‍

  • In the Image Overlay Editor, full-frame example render previews can now be downloaded just like banner previews.

‍

πŸ›οΈ Retail Update

‍

πŸͺŸ Better desktop popup behavior‍

  • On desktop, retail popups now automatically become scrollable if the popup is taller than the viewport height, matching Dashboard behavior.

‍

πŸ“£ Marketing Fix

‍

βœ‰οΈ Email campaigns fixed for email-only PhotoRoster participants‍

  • Fixed an edge case where email-only PhotoRoster participants were not having their email campaigns start.

‍

That’s the week!

‍

From faster Virtual Group setup to better PhotoTag collection in the Capture App, these changes should help make your Event workflows more flexible and easier to manage.

‍

Keep creating magic,

Candy 🍬

Weekly Recap: Auto Headsize for Virtual Groups, New BGR Report, HEIC Conversion & More
Feature Updates
June 19, 2026

Weekly Recap: Auto Headsize for Virtual Groups, New BGR Report, HEIC Conversion & More

5
Β minutes read

This week’s updates include some helpful improvements across Virtual Group Builder, reporting, image conversion, participant management, and folder downloads.

‍

The biggest highlight is a new Auto Headsize option in Virtual Group Builder, designed to give you a much better starting point when building virtual groups. We also added a new BGR Report to help you see which backgrounds are being ordered most, plus a few quality-of-life improvements throughout the Dashboard.

‍

Let’s take a look!

‍

πŸ§‘β€πŸ€β€πŸ§‘ Virtual Group Builder Improvements

‍

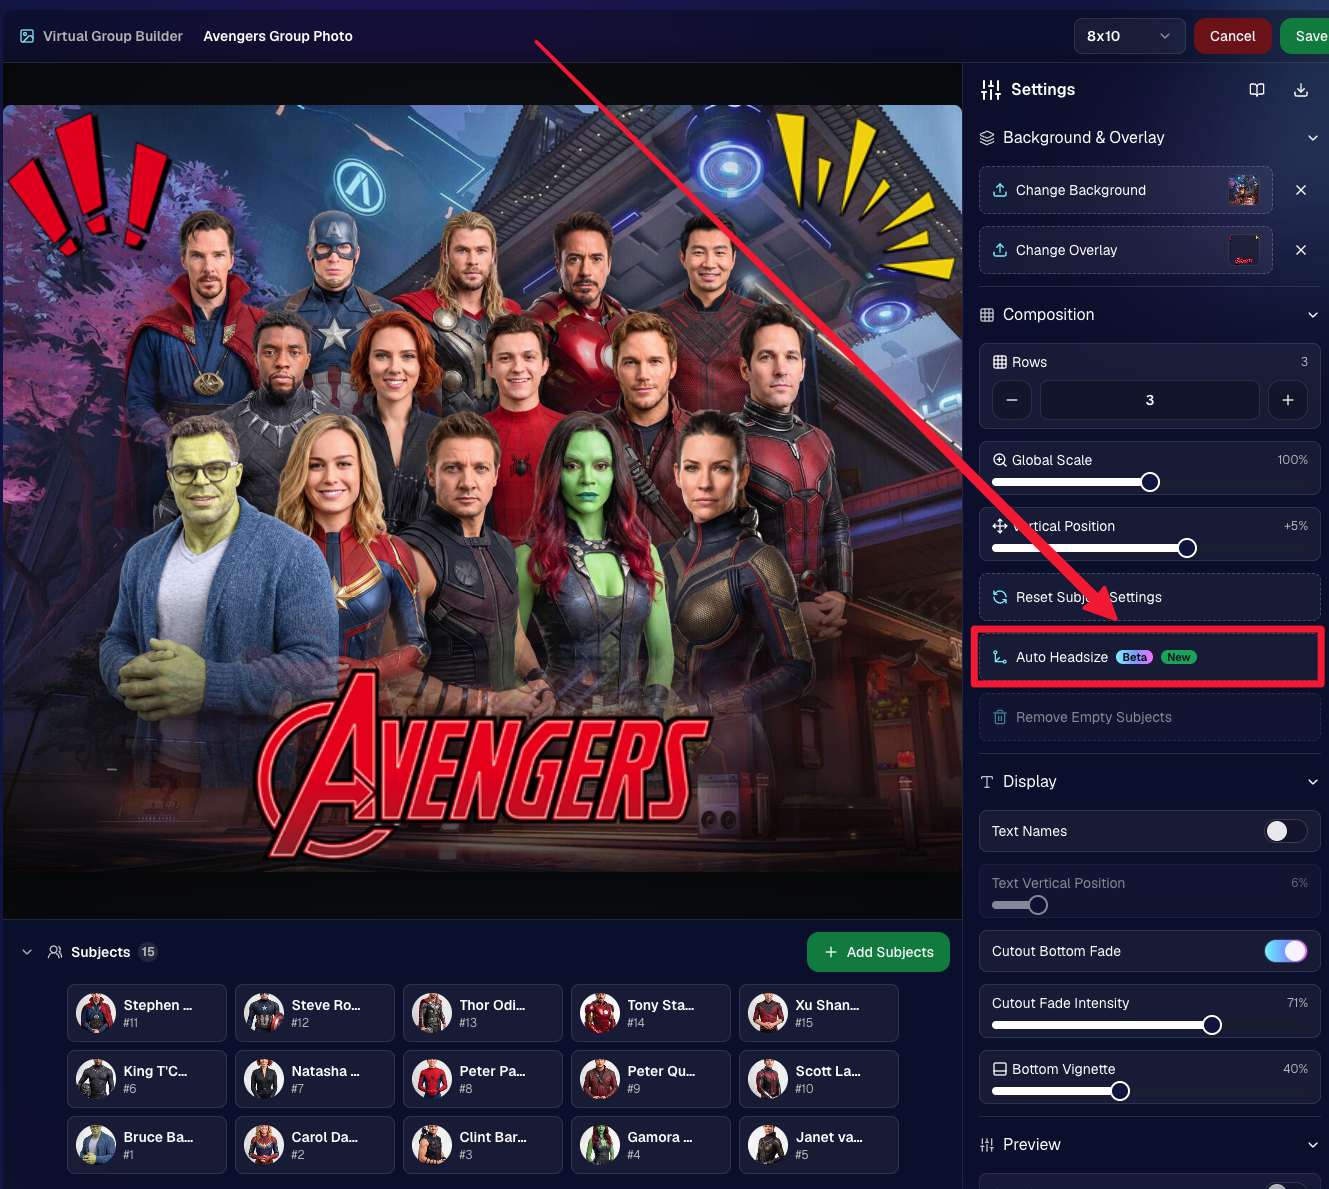
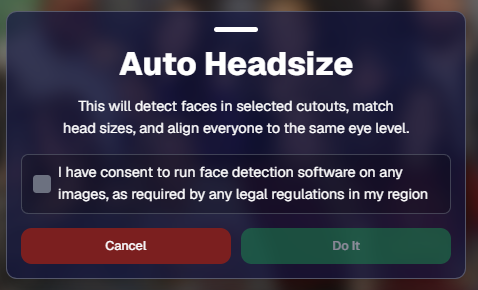
✨ New Auto Headsize button

Virtual Group Builder now has a new Auto Headsize button.

This feature automatically detects faces and adjusts the scale and vertical offset of all cutouts so that subjects have roughly the same head size and are closer to eye level.

That means when you’re building a virtual group, you should have a much better starting point before making your final manual adjustments.

🏷️ Improved PhotoTag import behavior

We improved the behavior when importing a PhotoTag into Virtual Group Builder, helping that workflow feel smoother when adding subjects from a specific PhotoTag.

‍

πŸš€ Upload fix for new from-scratch Virtual Groups

Fixed an issue where uploads were not uploading properly when working from /new on a from-scratch Virtual Group instead of an existing one.

‍

πŸ‘₯ Smarter default subject behavior

Virtual Group Builder now skips the initial β€œadd to group or replace group” popup when the only subjects in the group are the default 8 subjects.

‍

πŸ–ΌοΈ Bottom logo spacing improved

Bottom logos are now spaced the same distance from the bottom as top logos are from the top.

‍

πŸ“Š Reporting Updates

‍

πŸ“ˆ Events and Sales Report tables now have sortable columns

The Events Report and Sales Report tables now support sortable columns, making it easier to review and organize report data directly in the table.

‍

🎨 New BGR Report

There is now a new BGR Report that shows the most ordered backgrounds for BGR images.

The report shows:

  • How many orders a background has
  • How many items a background has

Important note: if you upload the same background to multiple Events, those will show up as different backgrounds in the report. To avoid that, use the background import feature.

‍

πŸ–ΌοΈ Image Converter Update

‍

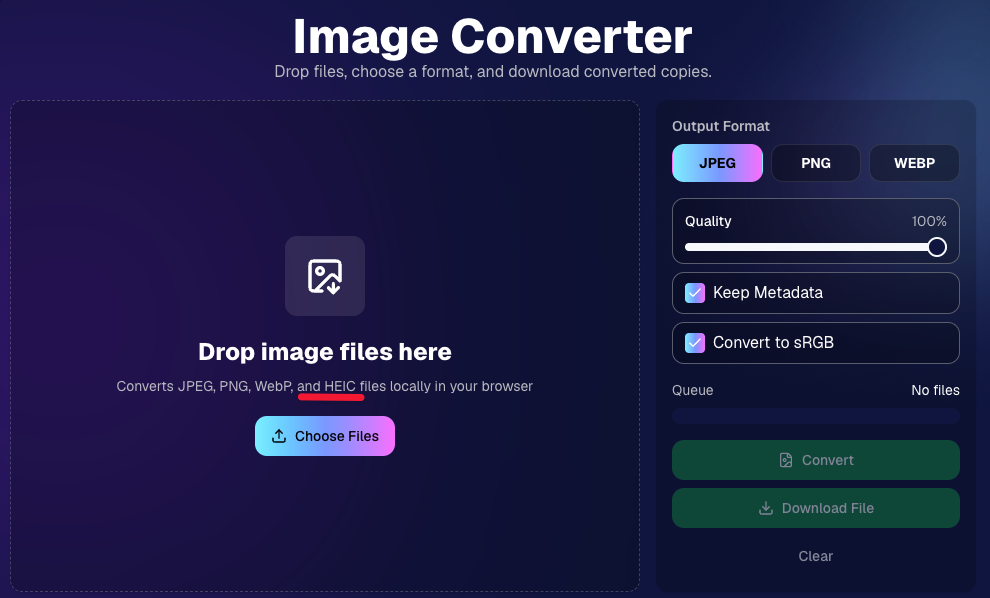
πŸ“± HEIC conversion is now supported

The Image Convert page at tools/convert now supports converting from HEIC files.

This should be helpful when working with images from devices that commonly save in HEIC format.

‍

πŸ‘₯ Participant List Update

‍

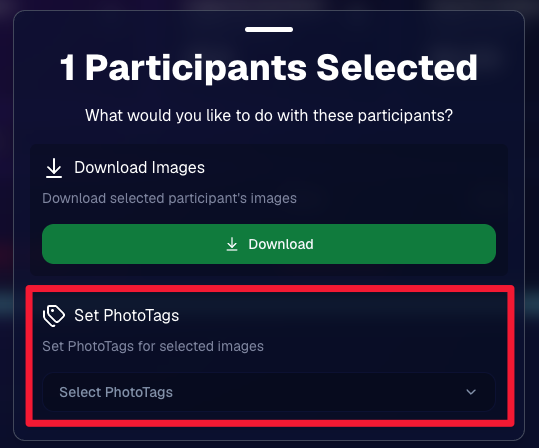
🏷️ Set PhotoTags for selected participants

On the Participant List page, the selected participants popup now includes a new option to set PhotoTags for those selected participants.

This gives you another way to update participant organization in bulk.

‍

πŸ“‚ Manage Images Update

‍

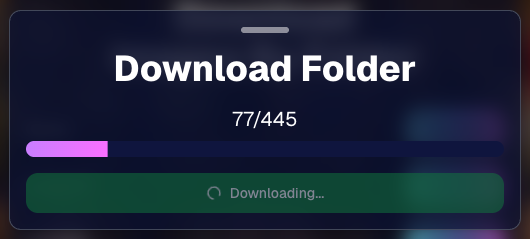
⬇️ Download Folder improvements

The Download Folder feature on the Manage Images page now includes an X/X counter while downloading.

We also improved the behavior when downloading a folder with hundreds of images, which should make larger folder downloads clearer and more manageable.

‍

That’s the week!

This week’s updates should make several everyday workflows smoother: Virtual Group Builder now has a stronger starting point with Auto Headsize, BGR background performance is easier to review, HEIC files are easier to convert, participant PhotoTags are easier to update, and large folder downloads are clearer.

‍

Keep creating magic,
Candy 🍬

‍

Let’s get in touch

If you’re a photographer looking to add NowCandidβ„’ services to your wheelhouse, set up a call with us!

How to customize formatting for each rich text

How to customize formatting for each rich text

How to customize formatting for each rich text

How to customize formatting for each rich text

How to customize formatting for each rich text

‍

‍

What’s a Rich Text element?

The rich text element allows you to create and format headings, paragraphs, blockquotes, images, and video all in one place instead of having to add and format them individually. Just double-click and easily create content.

A rich text element can be used with static or dynamic content. For static content, just drop it into any page and begin editing. For dynamic content, add a rich text field to any collection and then connect a rich text element to that field in the settings panel. Voila!

Headings, paragraphs, blockquotes, figures, images, and figure captions can all be styled after a class is added to the rich text element using the "When inside of" nested selector system.

  • List One
  • List Two
  • List Three
  • List Four
  • List Five

This is a link

This is bold text

‍

  • ‍

‍